10 July, 2016

Rope Bowl


I had this on the back burner in my head for many months and finally stopped at Ace Hardware and bought the cotton cording. This cording is about 1/4" in diameter and flexes quite nicely as you sew round and round.

If you would like to make one yourself, I can assure you they are addicting as well as slightly hypnotic (endless circles). There's no one right way to make these and certainly no wrong way.
I have a Pinterest board where I keep some photos of some nice ones that were created.


 To start a circular bowl, you'll need to wind your cord in a circle and stick some straight pins through from the side to secure. Then carefully start zigzagging so the stitch catches both coils.
At the beginning,  take two stitches, lift your presser foot, pivot, and sew another two stitches and repeat. At about 2 1/2" wide (see photo) you don't have to lift your presser foot so much and can start feeding it through on the curve.

I tried to sew over my pins at the beginning and ended up hitting one and breaking my needle. This is really the trickiest part of making the bowl. Keeping the bottom coils flat enough as you zig zag in stops and starts. Maybe pull your pin out enough as you pass and then stick it back in. The pins are only there for a few rounds.

I'm not real OCD here. The tutorial I read indicated she was (ocd) and, if you are OCD as well, then you'll want to count stitches, lift the presser foot, pivot the coil, sew the same count as before so your stitching ends up a little more even than mine.

I can assure you, no one will notice and, usually, there will be an apple or two hiding the bottom anyway.


At 6" across on my flat bottom is where I started lifting the bowl up, thus creating the bowl effect. A couple of rounds of stitching and it's starting to look like a bowl.

I ran through about five bobbins of thread and switched from aqua to off-white. I also didn't match the outer to the inside. I wanted the more vibrant aqua inside with a quiet turquoise-green on the outside.  The cording is already off-white and contrasts beautifully with any color you choose. The five stripes of aqua as I sewed up the bowl cleaned out a bobbin-worth of thread.


 Based on the Pinterest tutorials that I saved, I went with a 4.8 width to my zig zag and a 3.0 length. You can adjust a teeny bit, like me to 4.3 width but any abrupt changes will show. It's up to you if that bothers you.

I will tell you, as you are going round and round, you want to make more of these to incorporate any changes you dream up.


 I wanted the sides to be a bit more straight here so I had to lift up with my left hand.
This particular cording fed very nicely allowing my right hand to keep the coils centered and the rope evenly feeding.


You can see my soft aqua on the outside here. Subtle change in color.


How to finish.

Well - you have to eventually. I liked a knot here so I sewed up to the knot as close as I could get and then back-stitched the end in place.

I've seen handles. Holes left purposely to make handles, etc.
You just sew to the place where you want a handle in place and run your zigzag so it doesn't catch the upper coil for 3 or 4 inches (5?). The handle will be a bit fuller than the previous coil so when you want to end the handle hole, you bring the outer coil down with enough give to create a visible hole. Move your zigzag stitch back so it catches both coils.  Continue sewing to the other side and repeat. It probably would be helpful to mark those places with a pin or wonder clip.


I used up nearly all of the 100 feet. Maybe 90 ft and made a good-sized bowl.
 

 My rope at Ace Hardware was not on sale and cost me $14.99. Ouch.

On the search for a cheaper alternative because now I need to send this rope to my friend in Japan so she can play too.


A close-up of my bottom - ha! not mine, the bowl's bottom. That first darker teal is where I broke the needle. The second is where I ran out of bobbin thread and started again. The thread tail got caught up in the stitching.


 I used a butt-load of thread in this project. Good thing I find lots of spools at garage sales.
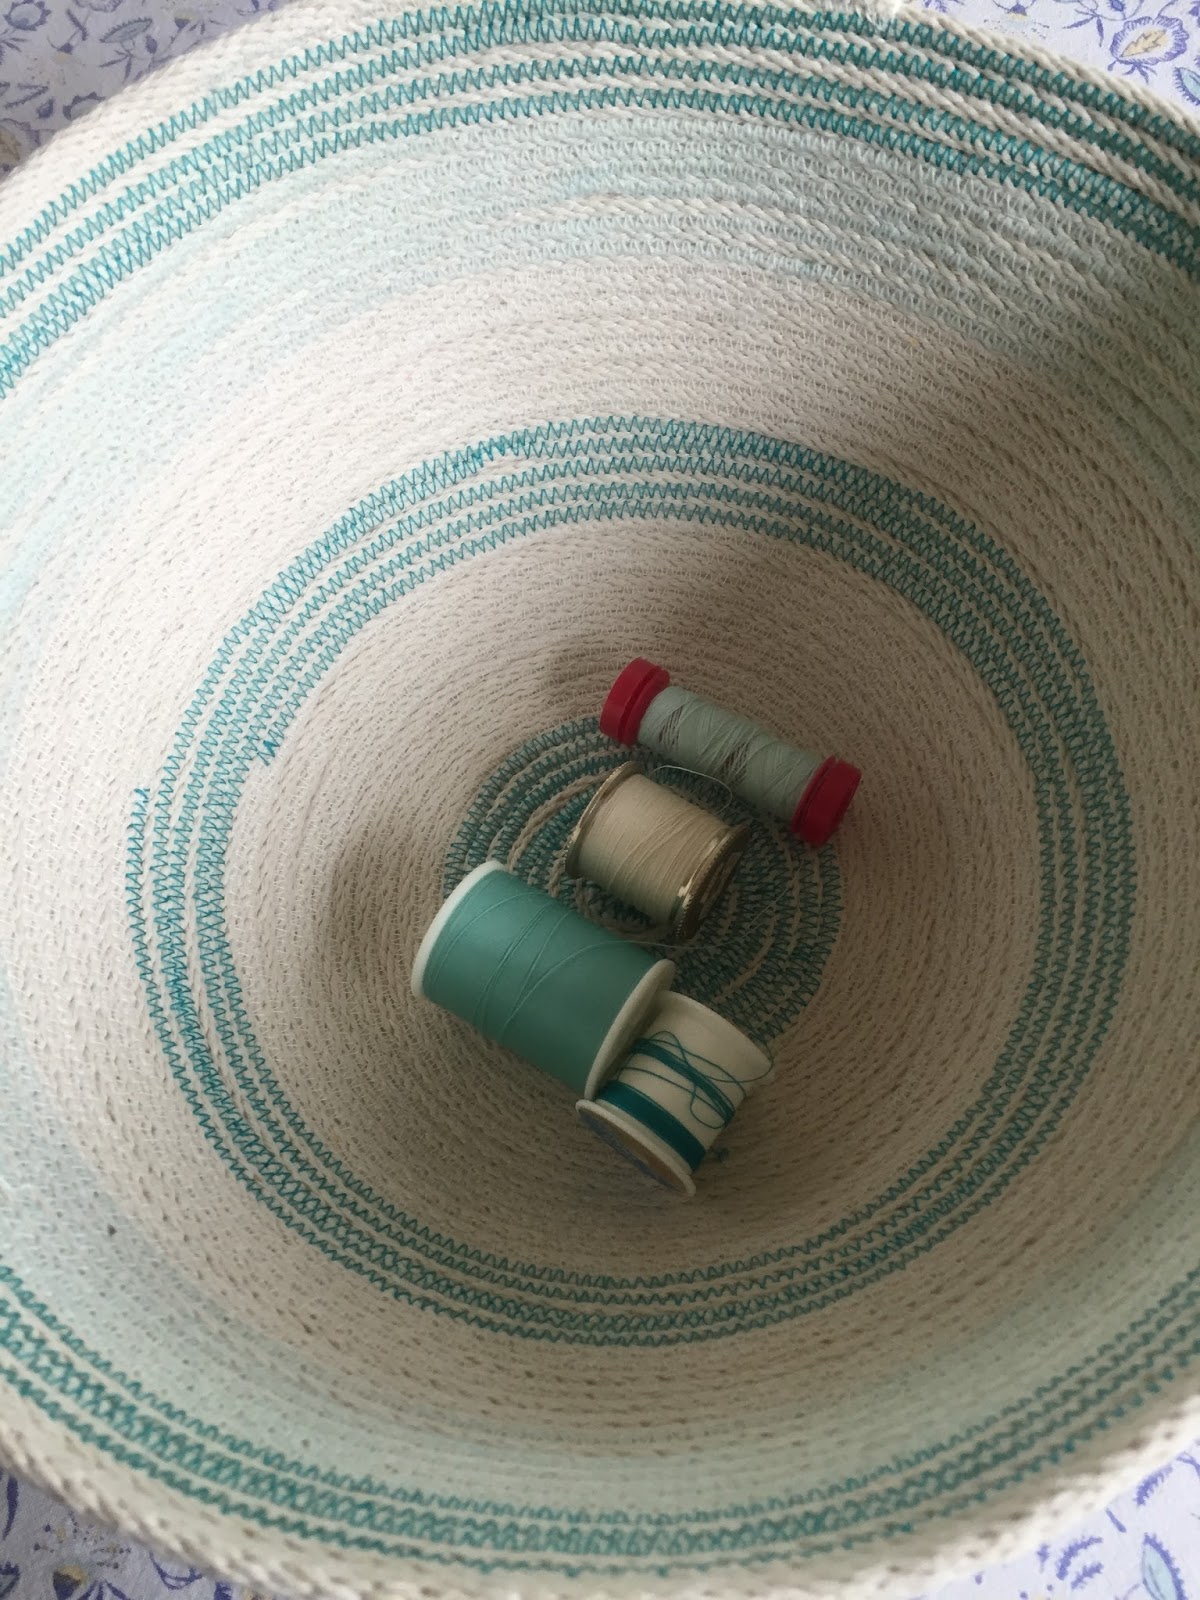
Maybe five bobbins too. I filled as I went because I didn't really have a plan other than the aqua stripes. If you are organized, you could pre-fill your five bobbins beforehand.


About the stripes: I arbitrarily did five rounds ( an odd amount) but also this is where a bobbin would run out. 

The OCD person didn't like the looks of the starts and stops of the color switches all randomly around the bowl and wanted these all in the same line up the bowl. Thankfully, I don't see the stops and starts and that means I'm doing okay with my auto-immune, 'cuz OCD is a symptom when I am really stressed.


One very awesome sturdy decorative bowl.

05 July, 2016

Canbyland Parade


OSU Sponsered 4-H animal groups

I adopted this kid. Taught him everything I know about getting more candy.

We  wave, They throw candy.

Motorcycles; Harleys and BMX

Chitty Chitty Bang Bang

Our local classic cars.
Politicians likes these convertibles. We'll vote -- if they throw good candy....ahem.

Knight's Of Columbus

Gorgeous John Deeres

This kid played soccer with my kid. His mom is the librarian. He likes his tractors and has an awesome collection.


Happy 4th of July everyone!
I biked into town with my library returns and my shipping packages, dumped them at my friend's shop and watched the parade.
We have new organizers, mostly because the old organizers thought it was a thankless task (yeah?). The new peoples thought it was too hot at 2pm so they moved the parade up to 9:30am. Early and cold.

This was my favorite entry. These three girls dressed themselves and their horses up as Alice in Wonderland. This grey horse is one tall horse. He's wearing rabbit ears if you look closely.
Her cohorts are the Mad Hatter and The Queen of Hearts.

It's a pleasure to have horses back in our parade. Many years ago, a horse bolted after a firecracker scare and thumped someone in the head with his hoof. My little kidlets were on the swings at that moment as he soared over our blanket and hit the lady next to it.  It took many years to get the organizers calm enough to allow horses back.


 A couple of bands - always great to have live music. Those glad-handing politicians with canned patriotic music....hmmmm.


 Our other local controversy with the old organizers was patriotism. They told the American Legion they could not lead the parade with their honor guard. No one had ever, EVER, had to think about this before so a flurry of pissed off citizens peppered the local paper with editorials.
 

The organizers sad little arguments was this parade was not about war and flags. (wtf?!?!?).

It's the 4th of July. Celebrating America's Independence.
Besides, the American Legion had always headed the parade.


My candy haul
I adopted a set of kids who started off not so fast in the candy haul biz. I taught them everything I know. Especially the part where you watch the beginning of the parade (most candy) and when the police cruiser sweeps by at the end, you hightail it three streets over to catch the parade again (less candy)

After the parade, I perused the vendor booths and also the library book sale. Even though I biked, I managed to find three books to stuff into my little backpack.

We finished the day with Baby Back Ribs on the grill with potato salad and watermelon.


I hope you all had a wonderful fourth. It was super nice for me to have a two day weekend which only happens about twice a year. My co-worker had to work this holiday. (Of course that means I'll be working Labor Day.) Happy Independence Day!

04 July, 2016

It's A Thing


It's a thing.

A couple of weeks ago, a potato with only one stamp showed up at work postage due.
On the front was an address and on the back was "Test For Wedding".
And the recipient paid the postage due.

It got me thinking.

I sent an Idaho baker to the 15 year old nephew for his birthday.
He texted me that he received it.

I immediately texted him back, "Did you find the money inside?"

If you aren't already laughing, then I was dying in the aisle.

The nephew was left wondering, "Is there money inside?"

So I'm telling this story to various peoples and fully 50% also wonder how I got the money inside. And proceed to tell me how they would do it.

The other 50% get the joke.

Fast forward a week or so to summer camps and moms sending small packages to their kidlets.
Many camps autocratically declare, "Do not send candy."

I show the photo and say, "Why not send a potato?"


It's officially, now a thing.


Most bakers weigh 12 -13 oz, so it will cost you $4.35 to send one. I put four Int'l stamps on (space available) for $4.60.

28 June, 2016

Boys Grow Up


This is my boy.

Celebrating in style after completing his Pharmacy Doctorate Program from OSU (Oregon State University).

Out of a class of just over 100 graduates this year, OSU and OHSU (Oregon Health Sciences University) gave away ten awards to twelve of the graduates. My son was given the Most Outstanding Graduate of the entire class.

He has been president of his class, been active in the pharmacy fraternity, attended numerous pharmaceutical conferences and events, helped produce a winning film for OSU about the pharmacy program. He also helped get legislation passed that allows Oregon Pharmacists to dispense birth control to women.

Above and beyond that, he has a mom who has an auto-immune disease. He has seen me actively seek tests and information so I can be as functional as possible. His education, just like medical doctors leans heavily on drugs to help symptoms. He knows I would like to be drug-free for as long as possible and has acknowledged that my naturopath and voodoo hippie doc (chiropractor) have identified what is wrong with my immune system where traditional doctors have failed miserably.

He has seen my awkward health journey and has worked to incorporate it into his training.
He will be doing his residency closer to home next year (residencies are optional) and is very excited to finally be out of school.

 I am so proud to be his mom. He is amazing.


Central Oregon

26 June, 2016

Little White Purse


I know someone who is attending a wedding next week. I felt like sewing a small purse with a cross-body strap that would go with anything.

A purse that could hold the essentials including the all important phone with camera.

It does look bridal - maybe too bridal white.
I lined it with pale pink cotton.

There is a lace zippered pocket in front for 'valuables'.
Behind that is a slip pocket for the phone.
And behind that the main pocket of the bag.
Everything from stash (yay!)

20 June, 2016

Random Humming


Working.

Putting up the berries.

Weeding.

Got the kid graduated.


I go into my sewing room and pull fabrics for my next project, then I get interrupted.

I go into my sewing room with another project in mind, pull fabrics and zippers, and get interrupted.


I have five projects pulled, pattern picked, too much to do.

Strawberry Moon - I saw it this morning. Summer solstice.

Riding my bike to work this week - no rain, not super hot. It takes time.


See me on Instagram - RocketGirl50

06 June, 2016

New T-Shirt


It's been a thousand degrees here in Oregon. I succumbed to the air conditioner and set up the fans so I could sew.

Rusty, our very old Lab, has been suffering, needing to pace at night, so what with the heat and not getting enough sleep, I started this shirt in the morning and finished it after my two movie snooze fest.


 The original tshirt was a Walmart wonder. I bought it online, sight unseen, because I needed five bucks more to get free shipping.


 I loved the blue 'camo' but it pilled asap and took on underarm odor after working in it on Saturdays. The blue ikat color was flattering to me. However, the neckline was a tad wide and I was always hiking it back up the shoulder bump.

The neck opening was cut nicely where I can show some chest but not have all my assets on view. I rarely sew t shirts from commercial sewing patterns as the necklines are either too high or way too low. This one was just right.

When it was  time to dispose of this shirt to the rag bin, I knew I wanted to draft a pattern. The body of the t-shirt extends past the shoulder bump and has cuffs folded back so your upper arms don't get burnt. It was also cut perfectly to skim over my lumps and bumps despite being a tissue-weight knit.


For the back side - which roughly matched the front side, I laid the shirt carefully on my Swedish tracing paper and traced around. All the seams are serged - as is most RTW (ready--to-wear) so I didn't need to add seam allowances.

For the front side, I cut up the side seams carefully and snipped through the under arm area. Then I flipped the back side out of the way to do my tracing.

Invariably, since knits stretch, you are going to skew up the tracing. Not too mention this item has been worn out and stretched. To make sure my neckline and sleeves and hem were 'even', I folded my tracing fabric pattern in half lengthwise and trimmed until both sides matched.


 The only 'alteration I did was to draw the neckline in a quarter of an inch so it wouldn't be as wide and show my bra straps.

You can barely make out my copious thought-notes on the tracing fabric. I may make this again and I will have forgotten any cool stuff when that time comes. Best to put it down on paper.


This is when I realized my knees hurt from the wood floor, My knees were sticking to the floor and my swedish tracing paper and I neglected to set up a fan here. 100 degrees. We Oregonians are puddles of whining and complaining. Off I went to the couch for a snooze fest.


 I bought this blue-grey tie-dye knit from Helsinki, Finland four years ago when we visited my host-families and friends and my husband re-united with lots of cousins.
 

 Eurokangas is a big department store with lots of fabrics. I have another thin knit with mini red stripes percolating in stash.

I had bought 1.3 meters which was just enough to get both front & back lengths top to bottom.
I had to trim off 1/2" from the back because it was that tight. Lots of scraps left over for neck binding and armhole banding plus numerous scraps to determine serger and coverstitch settings.

In fact, this is how I buy yardage without a pattern nearby. I can't fit both front and back sides next to each other. Thus, you need to lay out your pieces in tandem (Ha! airplane lingo  - one in front of the other). You need to buy from neckline to hem times two, which equals two lengths.
If there were a sleeve, then you would also add in a rough sleeve length to your calculated yardage.


 How cute are these sleeve cuffs? Just a band of fabric sewn to the 'armhole' then doubled back over and tacked in place.


Neckline bands are the second hardest part of sewing a t-shirt.

There is an art to getting it to be the right length and stretching it just right. The figure I have heard is 10% less than the neck opening. My neckline measured 31 inches. Thus, the band would be 3 inches shorter (3.1 to be exact).
 
Then you want the band to lie flat against your skin so most of the stretching would be in the front center and arcing around those curves and again on the back of the neck. My front wobbles a bit, meaning, I needed a bit more stretching right there. But hey, this is a t-shirt and I am not a perfectionist. Good to go.

The back neckline needed stabilizing and I had already sewn around once to top-stitch the band in place. Instead of using the selvedge of the knit, I used some small rickrack and sewed it down on the line of stitching I already had sewn.

One of the reasons to stabilize that back neck is because the shirt hangs from this area and this area will stretch out over time. I could have put clear elastic there but I thought it would be scratchier than the rickrack. I did use the clear elastic in the shoulder seams to stabilize there.


The most difficult part is hemming.

I'd already sewn everything else and knew this would be squirrely. While this knit is not a tissue-weight, its still thin.

I took some scraps and used some ultra-thin Stitch witchery (iron-on webbing) to see if i could stabilize this area without making it stiff. It seemed to work so I got the cover stitch  out - the machine that makes twin rows of stitching - like on all RTW clothing.


I haven't used my coverstitch in a long while so it might have been faster just to stitch the hem on my regular machine than the time it took to figure out the settings that would work on my chosen knit. Except, my regular machine would not be stretchy enough for the wear this shirt will receive.

I also used tissue paper strips underneath so my machine wouldn't grab the stretchy knit. Which helped a little. (Instead of tearing the strips off by hand, I threw this into the washing machine to dissolve the paper. Removing it by hand would have compromised my horrible coverstitch stitching)
I'm not particularly happy with how this hemmed. It skipped some stitching, tried to start gathering instead of moving forward evenly. I'm not sure how much the squirrely knit had to do with it and how much my machine knowledge needs tuning up. Pencil Girl? You better come over here....


A shout-out to Vacuuming The Lawn:
Most knits do not stretch evenly in all directions.  I had taken note when my blogging friend, Kyle, who is a wee bit of a perfectionist, said that the settings on her serger were different when stitching in the stretchy direction and the other direction with less stretch. This really helped with this squirrely knit.


I think the blue in the original shirt was more flattering. My freckles aren't vivid enough yet for this cooler blue.


Frizz-curls from working already this morning.