Showing posts with label pattern. Show all posts

16 April, 2018

Wee Braw Bag


 I might have had a moment a few weeks ago when I purchased three PDF sewing patterns.
God knows I dislike PDF's. Having to print out the pattern myself, tape it together.

I need to sew a dress up for myself and the pattern I liked only came in PDF form.
In a moment of madness, I went with it.

This wee drawstring bag is only five pages of instructions. It's all rectangles so you don't need a pattern piece for this. For the dress - more than 80 pages. Thank goodness it came with a copy shop option for a commercial printer to print it out on the big sheet of paper. That will be another blog post right there.

i was in a mood to sew something new and for once, I didn't have the energy to figure out the dimensions myself.

I took the pattern and ran with it.

It's fairly smallish but will hold a sewing kit. With pockets on the inside as well as the outside, it organizes small items quite well.

I just happened to have that orange and black striped trim in stash (think OSU Beavers possibilities). which jumped on the zebra bandwagon very nicely. The blue fabric is a cotton/poly that coordinated well. The zebras were purchased at the recent SewExpo so that's nice to use one item I bought already.

The picture on the wall is a needlepoint purchased at a garage sale. In fact, I recently found another that is similar. It's isn't framed, so now I'm looking for a similar frame at a garage sale so I can hang the other sewing-themed needlework art.


 WeeBrawBag: A Sewing Pattern by Laura Zuckerkuss   https://payhip.com/b/gmI4


The other two pdf patterns I purchased are The Fringe Dress  and The Augusta Moto Pant


I almost forgot to add dd's newest Study In Blue photos.
Byron Glacier, Alaska.


21 December, 2016

Cork Wallet


 One of the nephews suffers from  having a December 18th birthday.
At 14 years old, I think it's high time he learns about the combined birthday/Christmas gift.

Of course I caved.
I'm the airplane auntie.


 This was a quick, easy sew. I would do one part different, but otherwise the directions were very clear to follow.

Made with cork fabric, the pattern is designed with non-fraying materials in mind. This produces a very thin wallet.

The back piece is cork and it is 'lined' with cotton fabric (did you notice the airplanes?).
The pattern has you cut the cork and cotton lining separately and then make them the same size by folding in the 'seam allowances' of the cotton fabric just so and it will magically match the cork fabric dimensions. Sure. Between the cotton stretching as I ironed the raw edges under and the cork stretching a wee bit. Ahem.

But I have a solution of cutting the cotton fabric first. Then I will use a template cut from card stock that is near the finished size to help with ironing the raw edges under. Then I will lay my finished cotton lining on top of the cork fabric and draw an outline and cut out. Then they will match easier.

Except for turning the raw edges under on the cotton lining, all other edges are raw - hence the name of the pattern - Rawly Wallet by Clo Bird Designs.


 There is a 3-piece credit card pocket on the right side of the wallet and an ID slip pocket on the left. You can customize by adding more card pockets to both sides. You can add decoration to the front or onto the pocket. I added a piece of the fabric selvedge to the ID pocket - "Flying High".


Folded in half, it's quite slim.

I'm going to make more of these as these wallets are quick to sew.

06 June, 2016

New T-Shirt


It's been a thousand degrees here in Oregon. I succumbed to the air conditioner and set up the fans so I could sew.

Rusty, our very old Lab, has been suffering, needing to pace at night, so what with the heat and not getting enough sleep, I started this shirt in the morning and finished it after my two movie snooze fest.


 The original tshirt was a Walmart wonder. I bought it online, sight unseen, because I needed five bucks more to get free shipping.


 I loved the blue 'camo' but it pilled asap and took on underarm odor after working in it on Saturdays. The blue ikat color was flattering to me. However, the neckline was a tad wide and I was always hiking it back up the shoulder bump.

The neck opening was cut nicely where I can show some chest but not have all my assets on view. I rarely sew t shirts from commercial sewing patterns as the necklines are either too high or way too low. This one was just right.

When it was  time to dispose of this shirt to the rag bin, I knew I wanted to draft a pattern. The body of the t-shirt extends past the shoulder bump and has cuffs folded back so your upper arms don't get burnt. It was also cut perfectly to skim over my lumps and bumps despite being a tissue-weight knit.


For the back side - which roughly matched the front side, I laid the shirt carefully on my Swedish tracing paper and traced around. All the seams are serged - as is most RTW (ready--to-wear) so I didn't need to add seam allowances.

For the front side, I cut up the side seams carefully and snipped through the under arm area. Then I flipped the back side out of the way to do my tracing.
Invariably, since knits stretch, you are going to skew up the tracing. Not too mention this item has been worn out and stretched. To make sure my neckline and sleeves and hem were 'even', I folded my tracing fabric pattern in half lengthwise and trimmed until both sides matched.


 The only 'alteration I did was to draw the neckline in a quarter of an inch so it wouldn't be as wide and show my bra straps.

You can barely make out my copious thought-notes on the tracing fabric. I may make this again and I will have forgotten any cool stuff when that time comes. Best to put it down on paper.


This is when I realized my knees hurt from the wood floor, My knees were sticking to the floor and my swedish tracing paper and I neglected to set up a fan here. 100 degrees. We Oregonians are puddles of whining and complaining. Off I went to the couch for a snooze fest.


 I bought this blue-grey tie-dye knit from Helsinki, Finland four years ago when we visited my host-families and friends and my husband re-united with lots of cousins.
 

 Eurokangas is a big department store with lots of fabrics. I have another thin knit with mini red stripes percolating in stash.

I had bought 1.3 meters which was just enough to get both front & back lengths top to bottom.
I had to trim off 1/2" from the back because it was that tight. Lots of scraps left over for neck binding and armhole banding plus numerous scraps to determine serger and coverstitch settings.

In fact, this is how I buy yardage without a pattern nearby. I can't fit both front and back sides next to each other. Thus, you need to lay out your pieces in tandem (Ha! airplane lingo  - one in front of the other). You need to buy from neckline to hem times two, which equals two lengths.
If there were a sleeve, then you would also add in a rough sleeve length to your calculated yardage.


 How cute are these sleeve cuffs? Just a band of fabric sewn to the 'armhole' then doubled back over and tacked in place.


Neckline bands are the second hardest part of sewing a t-shirt.

There is an art to getting it to be the right length and stretching it just right. The figure I have heard is 10% less than the neck opening. My neckline measured 31 inches. Thus, the band would be 3 inches shorter (3.1 to be exact).
 
Then you want the band to lie flat against your skin so most of the stretching would be in the front center and arcing around those curves and again on the back of the neck. My front wobbles a bit, meaning, I needed a bit more stretching right there. But hey, this is a t-shirt and I am not a perfectionist. Good to go.

The back neckline needed stabilizing and I had already sewn around once to top-stitch the band in place. Instead of using the selvedge of the knit, I used some small rickrack and sewed it down on the line of stitching I already had sewn.

One of the reasons to stabilize that back neck is because the shirt hangs from this area and this area will stretch out over time. I could have put clear elastic there but I thought it would be scratchier than the rickrack. I did use the clear elastic in the shoulder seams to stabilize there.


The most difficult part is hemming.

I'd already sewn everything else and knew this would be squirrely. While this knit is not a tissue-weight, its still thin.

I took some scraps and used some ultra-thin Stitch witchery (iron-on webbing) to see if i could stabilize this area without making it stiff. It seemed to work so I got the cover stitch  out - the machine that makes twin rows of stitching - like on all RTW clothing.


I haven't used my coverstitch in a long while so it might have been faster just to stitch the hem on my regular machine than the time it took to figure out the settings that would work on my chosen knit. Except, my regular machine would not be stretchy enough for the wear this shirt will receive.

I also used tissue paper strips underneath so my machine wouldn't grab the stretchy knit. Which helped a little. (Instead of tearing the strips off by hand, I threw this into the washing machine to dissolve the paper. Removing it by hand would have compromised my horrible coverstitch stitching)
I'm not particularly happy with how this hemmed. It skipped some stitching, tried to start gathering instead of moving forward evenly. I'm not sure how much the squirrely knit had to do with it and how much my machine knowledge needs tuning up. Pencil Girl? You better come over here....


A shout-out to Vacuuming The Lawn:
Most knits do not stretch evenly in all directions.  I had taken note when my blogging friend, Kyle, who is a wee bit of a perfectionist, said that the settings on her serger were different when stitching in the stretchy direction and the other direction with less stretch. This really helped with this squirrely knit.


I think the blue in the original shirt was more flattering. My freckles aren't vivid enough yet for this cooler blue.


Frizz-curls from working already this morning.


08 May, 2016

Olivia The Pig Purse


A few weeks back, I made a Star baby quilt for someone who is about to pop. That baby has a three year old sister, named, Olivia. My niece also has that name, so I have Olivia the Pig fabric in my stash. I decided to make a small purse for her and fill it with some fun girly items.

 This is a largish stuffed bear who is modeling my purse so well.

Pattern called for piping, I used faux piping instead.
 This was a new-to-me sewing pattern that went together fairly fast once I decided to sit down and just sew.


I want to eventually write sewing patterns so this was a great lesson on what to do and what not to do. I find some pattern makers choke at a difficult part - they can't find the words to describe what they are doing, they can't get clear photos.

I'm left trying to figure how to get from step K to P with nothing of use in-between. That lesson is to re-make the dang thing, take even more photos, and get help to figure out the words.

Her pattern was short without excess wordiness chatter - which I like.
Her site is slow and filled with ads, so it can be slow going to navigate the pattern.


Finished Star quilt


I added some Bubbles, a Tiara, Stickers and some cool Sunglasses for Big Sister.
The quilt is rolled up next to the purse.


 And here is Mr. Bear reclining on the lovely flannel quilt.


 This is my most awesome African Violet. Pink, edged in lime green ruffles.

16 August, 2015

Colleen's Retro Velcro Wallet


My cousin, 18 times removed*, wanted a pink velcro wallet.

She was tired of trying to find her wallet at the bottom of her bag. I told her I would make one for her. About a year ago.

I bought the supplies awhile back at RCT Fabrics.

Her hubby just got a permanent job and they are moving from relatively close by to much further away. This was the kick in the butt I was waiting for.

***Her mom is my mom's niece which makes me and her 'cousins'.


 I made the pattern myself after searching fruitlessly on the internet. I did find some inspiration.
The angled pockets are from this tute.


However, she didn't have a closure. Decisions about velcro or magnetic snaps had to be made. She did have a hint of making everything bigger and trimming later and this worked with my outer and inner fabrics stretching a bit.

Her card pockets all had the same depth. She had three and I thought why make separate pockets if they are in the same stack....


Velcro (trimmed narrow) on right edge before grosgrain ribbon

 A couple of months ago, I made duck tape wallets for my nephews. It's basically the same system.
You make an outer piece.
And an inner piece. You make sections of card pockets, slip pockets, etc. Then you use bias tape/grosgrain ribbon to secure them together.
You have to decide what you want to include before moving onto the next step.

I wanted a gusseted coin pocket but could not find out how to add a gusset to the left hand side under the zipper pull without pulling out my hair and making ugly sewing decisions. I made a simple inset zipper pocket instead.

If anybody has seen instructions for a side gusseted coin pocket, let me know. They are almost always in RTW wallets. I'll need to buy one to disassemble....


 Top part is inside. Bottom is outside of outer. I placed an ID pocket on the middle outside section as well as a hidden pocket (because I could). My thinking was not having to open the wallet to show ID and a CC could be placed behind that as well for purchases while out and about but not needing to flash everyone with the wallet contents.


To apply my grosgrain ribbon, I used my new (back-to-school) glue stick and smeared that on the grosgrain. Then I used my wonder clips to help hold as glue set and I sewed.


My second inspiration was this tri-fold wallet post on CraftPassion.
It wasn't quite what I was looking for but it did have a zippered compartment plus the same measurements as above which helped cement mine at 9.75" wide by 4.5" high. The inner part is 4.25" high..


 The outer is a non-fraying thicker then Ripstop fabric. My inner - do you know how difficult it was to find PINK? - is a gridded taffeta that I love but it frays like crazy.


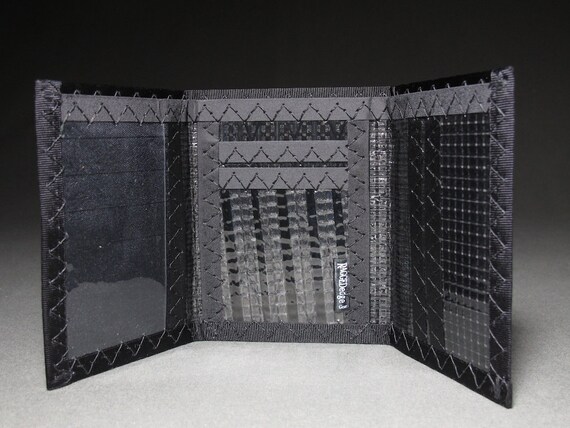
 My third inspiration was this wallet on etsy. I loved the super zigzag stitching.
It looks very manly - balancing out all the pink.


https://img1.etsystatic.com/023/0/5468081/il_570xN.540320213_719c.jpg


Giant money pocket. Will fit all bills. maybe even an i-phone. lol

I still wanted to break up all that PINK and found this dragonfly. He ended up a little to the right but I was getting kinda silly in the sewing room by then. I'm happy she's flying this wallet.


Last few notes::
I did add some sf-101 interfacing to the taffeta. With a press cloth. Almost melted it in one place.

I had some 1/4" dark pink double fold bias tape I used up for the individual sections of pockets. I didn't have any pink that was wider so used my black grosgrain which is an awesome finish for fraying fabrics. It's also a little tougher on the edges than bias tape which would wear through faster.


 I don't know why I added the elastic cord loop except it was in the sack of materials so I must have had another inspiration somewhere. Not sure what you would hook on there but it does look awesome so maybe it's just 'the look' I was after.


Four hidden slip pockets. One under both card sections. Another under the coin section and a final one under the ID pocket. One can never have enough pockets.


We'll see if Colleen can use this or not. No pressure. It was fun to make.


forgot to mention:::colleen is the only gal in her household.