Showing posts with label cotton. Show all posts

19 April, 2018

Knitting Project Bag


 My blogging buddy in the UK made a zippered pouch utilizing the Pythagorean theorem
With this method the sides stand straight-up-vertical instead of sloping up towards the zipper.

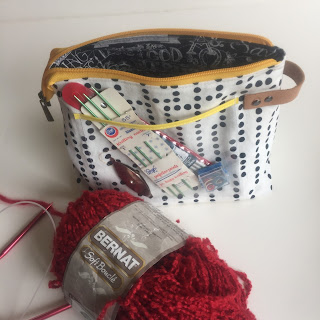
I ended up with a tall zippy pouch with a somewhat narrow opening that would be perfect for a knitting project bag.

This, of course, was never my intention, as I rarely knit.

But it's tall-ish and has plenty of room for that sweater/shawl plus an outside clear vinyl pocket for knitting stuff.


To offset all that tallness. I added a riveted leather strap and to made the proportions work very nicely.

I cannot re-create this.

On the outside I used some awesome fabric from Ikea - yes! Ikea sells fabric.
The lining fabric is a gospel quilting cotton that I bought too much of for a fabric swap.

The two fabrics pounced on the sunny yellow zip because we're all tired of grey, drizzly days.  (or, the infamous minnesota blizzard, if you're over that way).

For some mid-weight structure, I quilted the inside lining. As I was winging it, I free motion quilted after I attached the zipper. this is not a recommended technique.

Finish measurement is about 9" long x 5" wide x 8" tall.
I didn't add enough sub-structure so my sides don't stand up straight and vertical, but they are.


 And, here it is. In my hand.


And, In my etsy shop, RunningWithHandmade


09 October, 2016

Can You Stand More Rope Bowls


My friend, Pencil Girl, hand dyed some more clothesline for me.
I scored on the styling end as I happened to have some hops and white pumpkins in my kitchen table centerpiece. They offset the autumnal colors of the clothesline perfectly.


 I just love all the random swirls this method of dying creates. She keeps the hank of clothesline intact and uses a tall vase for dying.

I will say, I wasn't as enthused about this orangy and dusty purple combo when she handed it to me. I loved the blue/green combo she dyed for me before, so these colors weren't as exciting to me.

But my friend hand-dyed it for me, so I jumped in and fell in love with the autumnal colors that emerged as I designed as I zigzagged along.


I wanted to do those loopy things again  - for no particular reason.


 There was enough left to do a small saucer which is just darling.


  I had in mind a black & white version and what emerged from the sewing machine is another piece of awesomeness. It doesn't scream black and white as much as my vision but I did a couple of new techniques on this one.

For more color at the top, I did a final round of zigzagging so it shows more.
I also made my three knots looser and just attached them with the sewing machine for a cleaner finish.

I also discovered when turning it inside out, I like the loops inside and I also like the top edge rolled down.

You might say, I have found my groove.
So much fun and quick to do.


If you search for Rope Bowl over on my sidebar (web version - won't appear on the mobile version), you can see all the posts I've done on Rope Bowls.

I am amazed I haven't gotten tired of making these yet. They are super quick to do -- less than two hours, and they come off the sewing machine all different. Very organic designing - very freeing.

17 July, 2016

Rope Tricks


 No. 4 Rope Bowl

Omg, I made a sailor's hat!    Is this too cute or what?
These bowls are totally reversible.

I sewed this one in shades of turquoise with just white on the outside. Believe it or not, I ran out of every bit of my tiny supply of off-white thread. White works too.

I was aiming for an ombre effect.


Then I used up the last of my 3/8" wide cord.
I had just under 10 feet of the 7/32" left and added it to the top of the bowl.

This ombre bowl measures about 8 inches across by 3 1/2" high - a medium-small size.
All scraps used up!

In the photo below, you can just see that change of color cord in the last two rows at the top.

I added a knot for the join and to finish the bowl off organically and hand-tacked it in place.


This is No.3 -- A Study in Orange.
This sold within a day of listing it in my Etsy shop.

I thought to add some loops to the outside and it worked quite well. This was in the 3/8" wide cording. I had to go back and re-do several spots that didn't quite catch.


 I actually quite like the heavier 7/32 on the top - it acts as a rim to the bowl.

 Rope tips;

1. I liked the 7/32" wide cotton clothesline to begin with. The 3/8 (6/32) was a tad more fiddly. It was a different brand as well.

2. In my little town, I have four stores that sell cotton clothesline. Varying in price, thickness, and strength. Buying for me and a few 'skeins' for friend in Japan has emptied the town. Yes, I could buy online. For cheaper. But I feel clothesline is one of those staples that if we buy online, we help close another brick & mortar store. {opinionated} I made four bowls out of what I bought. I'll wait until someone re-stocks to have another go at it.

3. A wide zigzag of 4.0 to 4.5 is good for catching both cords as you sew the bowl together. Again, the larger 7/32 cording was a great starter.

4. Your white or off-white thread disappears into the clothesline weave. If you wobble off your join line, go back and have another go at it.

5. I have a Pinterest board to help focus my 'organic' rope sewing.

6. While out researching my town, I was tempted by some turquoise para-cord but -- I don't like the feel of the polyester stuff and I can't imagine having a para-cord bowl sitting on my counter unless a grandchild made it and I had to. Neutral, organic, cotton clothesline gave me the feel I was after.


7. Have fun. Use up some thread spools.


I'll leave you with this.


10 July, 2016

Rope Bowl


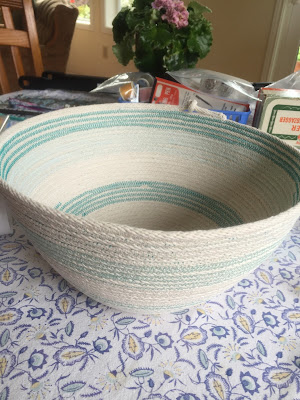
I had this on the back burner in my head for many months and finally stopped at Ace Hardware and bought the cotton cording. This cording is about 1/4" in diameter and flexes quite nicely as you sew round and round.

If you would like to make one yourself, I can assure you they are addicting as well as slightly hypnotic (endless circles). There's no one right way to make these and certainly no wrong way.
I have a Pinterest board where I keep some photos of some nice ones that were created.


 To start a circular bowl, you'll need to wind your cord in a circle and stick some straight pins through from the side to secure. Then carefully start zigzagging so the stitch catches both coils.
At the beginning,  take two stitches, lift your presser foot, pivot, and sew another two stitches and repeat. At about 2 1/2" wide (see photo) you don't have to lift your presser foot so much and can start feeding it through on the curve.

I tried to sew over my pins at the beginning and ended up hitting one and breaking my needle. This is really the trickiest part of making the bowl. Keeping the bottom coils flat enough as you zig zag in stops and starts. Maybe pull your pin out enough as you pass and then stick it back in. The pins are only there for a few rounds.

I'm not real OCD here. The tutorial I read indicated she was (ocd) and, if you are OCD as well, then you'll want to count stitches, lift the presser foot, pivot the coil, sew the same count as before so your stitching ends up a little more even than mine.

I can assure you, no one will notice and, usually, there will be an apple or two hiding the bottom anyway.


At 6" across on my flat bottom is where I started lifting the bowl up, thus creating the bowl effect. A couple of rounds of stitching and it's starting to look like a bowl.

I ran through about five bobbins of thread and switched from aqua to off-white. I also didn't match the outer to the inside. I wanted the more vibrant aqua inside with a quiet turquoise-green on the outside.  The cording is already off-white and contrasts beautifully with any color you choose. The five stripes of aqua as I sewed up the bowl cleaned out a bobbin-worth of thread.


 Based on the Pinterest tutorials that I saved, I went with a 4.8 width to my zig zag and a 3.0 length. You can adjust a teeny bit, like me to 4.3 width but any abrupt changes will show. It's up to you if that bothers you.

I will tell you, as you are going round and round, you want to make more of these to incorporate any changes you dream up.


 I wanted the sides to be a bit more straight here so I had to lift up with my left hand.
This particular cording fed very nicely allowing my right hand to keep the coils centered and the rope evenly feeding.


You can see my soft aqua on the outside here. Subtle change in color.


How to finish.

Well - you have to eventually. I liked a knot here so I sewed up to the knot as close as I could get and then back-stitched the end in place.

I've seen handles. Holes left purposely to make handles, etc.
You just sew to the place where you want a handle in place and run your zigzag so it doesn't catch the upper coil for 3 or 4 inches (5?). The handle will be a bit fuller than the previous coil so when you want to end the handle hole, you bring the outer coil down with enough give to create a visible hole. Move your zigzag stitch back so it catches both coils.  Continue sewing to the other side and repeat. It probably would be helpful to mark those places with a pin or wonder clip.


I used up nearly all of the 100 feet. Maybe 90 ft and made a good-sized bowl.
 

 My rope at Ace Hardware was not on sale and cost me $14.99. Ouch.

On the search for a cheaper alternative because now I need to send this rope to my friend in Japan so she can play too.


A close-up of my bottom - ha! not mine, the bowl's bottom. That first darker teal is where I broke the needle. The second is where I ran out of bobbin thread and started again. The thread tail got caught up in the stitching.


 I used a butt-load of thread in this project. Good thing I find lots of spools at garage sales.
Maybe five bobbins too. I filled as I went because I didn't really have a plan other than the aqua stripes. If you are organized, you could pre-fill your five bobbins beforehand.


About the stripes: I arbitrarily did five rounds ( an odd amount) but also this is where a bobbin would run out. 

The OCD person didn't like the looks of the starts and stops of the color switches all randomly around the bowl and wanted these all in the same line up the bowl. Thankfully, I don't see the stops and starts and that means I'm doing okay with my auto-immune, 'cuz OCD is a symptom when I am really stressed.


One very awesome sturdy decorative bowl.