Showing posts with label thread. Show all posts

09 October, 2016

Can You Stand More Rope Bowls


My friend, Pencil Girl, hand dyed some more clothesline for me.
I scored on the styling end as I happened to have some hops and white pumpkins in my kitchen table centerpiece. They offset the autumnal colors of the clothesline perfectly.


 I just love all the random swirls this method of dying creates. She keeps the hank of clothesline intact and uses a tall vase for dying.

I will say, I wasn't as enthused about this orangy and dusty purple combo when she handed it to me. I loved the blue/green combo she dyed for me before, so these colors weren't as exciting to me.

But my friend hand-dyed it for me, so I jumped in and fell in love with the autumnal colors that emerged as I designed as I zigzagged along.


I wanted to do those loopy things again  - for no particular reason.


 There was enough left to do a small saucer which is just darling.


  I had in mind a black & white version and what emerged from the sewing machine is another piece of awesomeness. It doesn't scream black and white as much as my vision but I did a couple of new techniques on this one.

For more color at the top, I did a final round of zigzagging so it shows more.
I also made my three knots looser and just attached them with the sewing machine for a cleaner finish.

I also discovered when turning it inside out, I like the loops inside and I also like the top edge rolled down.

You might say, I have found my groove.
So much fun and quick to do.


If you search for Rope Bowl over on my sidebar (web version - won't appear on the mobile version), you can see all the posts I've done on Rope Bowls.

I am amazed I haven't gotten tired of making these yet. They are super quick to do -- less than two hours, and they come off the sewing machine all different. Very organic designing - very freeing.

12 July, 2016

Second Rope Bowl


 And the handle theory worked.

I was gonna throw the remaining rope out to the garage to tie up some raspberries - or something. Noticing that maybe I only used 80 feet for the big bowl, why waste the remainder of this cotton rope in the garden?

Re-threading, I tried out some metallic thread. Another tutorial had problems with it and I did at the edge of the bottom when it suddenly broke. Good time to re-thread, so I tried a variegated purple and I love how this smaller bowl turned out.


My african violet likes the bigger bowl?


 See how much smaller this bowl is?

This is how I sewed it, but I actually liked it better flipped inside out. The red at the bottom is more vibrant. This was a regular red thread in my bobbin. The metallic adds a subtle degree of sparkle but it was banished to the bottom as being too subtle.


I managed to get the handles equidistant but one was bigger than the other.

There are no mistakes with this bowl making. I threw it back under the presser foot and sewed the handle to the body for perhaps 3/8" and Ta-Da!

Beautiful.

Kathy's notes::::  This smaller bowl sewn with 4.8 width on the metallic, with 4.5 on thread change-over.    Length was 3.0 - 3.5


****Sandra was also thinking about sewing a rope bowl and had some good questions:::

Her inquiry;    "I've seen different versions of those bowls on Pinterest and I've been dying to try making one, if I can find the supplies for a reasonable price (which isn't always an easy job here in $$Canadaland$$!).  Yours is gorgeous - did you just know automatically (by feel, maybe) when to start shaping and how much to angle the rows, or did it take a while for your brain to work it out?  How hard was it on your hands and shoulders?  I get terribly hunched shoulders when I freemo quilt (although I haven't done it now in years) but my main problem now is my hands - they tend to get cranky. "

My long-winded answer:::
It took a solid hour - maybe 1 1/4 hours to make the first one. The smaller one took 15 minutes.

 I had been thinking about it for months. I knew I did NOT want to try the fabric wrapped version. Other than securing the bottom and angling the bowl 'plate' UP at 6". it was very organic. Look again at my Pinterest board. I added some ideas. Odd # stripes is from landscaping and window dressing advice: group in 3's and/or 5's.

You can only sew until your bobbin runs out. I used five on the the large bowl, most of two on the small bowl.

The body hurt is all at the beginning where you are hunched over trying to get the zigzag to catch both coils. When you angle the bowl up and start the shaping, then you can consciously sit tall in your sewing chair, relax, and find your sewing rhythm. My clear foot has two red dots on it on either side of the center 'opening' (toes). I working on letting the dots guide me.

Easier to get tense at beginning because of the curve sewing.

Because of the bobbin changes, it's easy to take breaks. The design was very organic.

I would say the body hurt of FMQ is way worse. All of these people who have awesome quilts send their quilts OUT to be FMQ'ed. They don't do all the work themselves.

Good questions!


**** lucky me: I have four places in my small town to buy cotton clothesline. 2nd and 3rd places were cheaper. I am trying some 3/16" wide stuff now. The first rope was 7/32" diameter - so a little bigger. I'll hit up the 4th place in the next day or so.

10 July, 2016

Rope Bowl


I had this on the back burner in my head for many months and finally stopped at Ace Hardware and bought the cotton cording. This cording is about 1/4" in diameter and flexes quite nicely as you sew round and round.

If you would like to make one yourself, I can assure you they are addicting as well as slightly hypnotic (endless circles). There's no one right way to make these and certainly no wrong way.
I have a Pinterest board where I keep some photos of some nice ones that were created.


 To start a circular bowl, you'll need to wind your cord in a circle and stick some straight pins through from the side to secure. Then carefully start zigzagging so the stitch catches both coils.
At the beginning,  take two stitches, lift your presser foot, pivot, and sew another two stitches and repeat. At about 2 1/2" wide (see photo) you don't have to lift your presser foot so much and can start feeding it through on the curve.

I tried to sew over my pins at the beginning and ended up hitting one and breaking my needle. This is really the trickiest part of making the bowl. Keeping the bottom coils flat enough as you zig zag in stops and starts. Maybe pull your pin out enough as you pass and then stick it back in. The pins are only there for a few rounds.

I'm not real OCD here. The tutorial I read indicated she was (ocd) and, if you are OCD as well, then you'll want to count stitches, lift the presser foot, pivot the coil, sew the same count as before so your stitching ends up a little more even than mine.

I can assure you, no one will notice and, usually, there will be an apple or two hiding the bottom anyway.


At 6" across on my flat bottom is where I started lifting the bowl up, thus creating the bowl effect. A couple of rounds of stitching and it's starting to look like a bowl.

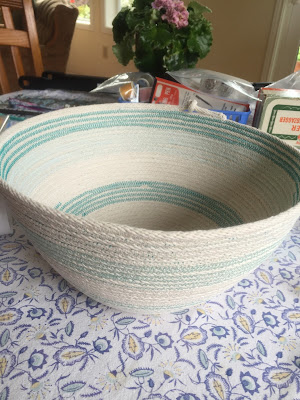
I ran through about five bobbins of thread and switched from aqua to off-white. I also didn't match the outer to the inside. I wanted the more vibrant aqua inside with a quiet turquoise-green on the outside.  The cording is already off-white and contrasts beautifully with any color you choose. The five stripes of aqua as I sewed up the bowl cleaned out a bobbin-worth of thread.


 Based on the Pinterest tutorials that I saved, I went with a 4.8 width to my zig zag and a 3.0 length. You can adjust a teeny bit, like me to 4.3 width but any abrupt changes will show. It's up to you if that bothers you.

I will tell you, as you are going round and round, you want to make more of these to incorporate any changes you dream up.


 I wanted the sides to be a bit more straight here so I had to lift up with my left hand.
This particular cording fed very nicely allowing my right hand to keep the coils centered and the rope evenly feeding.


You can see my soft aqua on the outside here. Subtle change in color.


How to finish.

Well - you have to eventually. I liked a knot here so I sewed up to the knot as close as I could get and then back-stitched the end in place.

I've seen handles. Holes left purposely to make handles, etc.
You just sew to the place where you want a handle in place and run your zigzag so it doesn't catch the upper coil for 3 or 4 inches (5?). The handle will be a bit fuller than the previous coil so when you want to end the handle hole, you bring the outer coil down with enough give to create a visible hole. Move your zigzag stitch back so it catches both coils.  Continue sewing to the other side and repeat. It probably would be helpful to mark those places with a pin or wonder clip.


I used up nearly all of the 100 feet. Maybe 90 ft and made a good-sized bowl.
 

 My rope at Ace Hardware was not on sale and cost me $14.99. Ouch.

On the search for a cheaper alternative because now I need to send this rope to my friend in Japan so she can play too.


A close-up of my bottom - ha! not mine, the bowl's bottom. That first darker teal is where I broke the needle. The second is where I ran out of bobbin thread and started again. The thread tail got caught up in the stitching.


 I used a butt-load of thread in this project. Good thing I find lots of spools at garage sales.
Maybe five bobbins too. I filled as I went because I didn't really have a plan other than the aqua stripes. If you are organized, you could pre-fill your five bobbins beforehand.


About the stripes: I arbitrarily did five rounds ( an odd amount) but also this is where a bobbin would run out. 

The OCD person didn't like the looks of the starts and stops of the color switches all randomly around the bowl and wanted these all in the same line up the bowl. Thankfully, I don't see the stops and starts and that means I'm doing okay with my auto-immune, 'cuz OCD is a symptom when I am really stressed.


One very awesome sturdy decorative bowl.

14 May, 2016

My Sewing Machine Area


 My sewing machine area.
It's gray and drizzly today, so I had to do some fancy schmancy photo editing to get to this photo.
My walls are painted a light turquoise.
Because I'm in a corner with no window, I utilize OTT lights for natural light above me when I sew.

I think we re-did the floors (hardwood) almost four years ago. When I put the sewing table in, I just propped the thread racks on the table.
And sewed around them.

I liked them there, but I was still getting a feel for how my room could work for me.
Then I found the black wire sewing machine thread rack (left hand wall) last summer at a garage sale.

It was also propped on the table behind my sewing machine - where the serger cones got in the way - in fact, all the thread was in  my way.

I've had this week off, but can't go anywhere because of the 14 1/2 year old Lab, Rusty, who keeps on trucking. Well no, he can't go trucking because he can't get into a car. He's still living but has episodes with his pancreatitis that keep us up all night with him pacing it off.

On the bright side, I was able to piddle away at some of those chores that get put off because of the day job and I have felt quite productive this week. Admittedly, the thread racks have been put off for three years - time flies!

After living with the problem so long, it was a relief to get the serger cones off to the left of the serger machine where they are in no one's way. The regular thread is mostly on the two racks that end about 8 inches above the table - so my big projects have ROOM.

Don't worry, I have more thread - mostly duplicates that don't need to be left out to get dusty.


My Bernina serger is on the left and sees weekly use, as does my regular Pfaff on the right.
Way on the left sitting on a stool is my coverstitch (Hems/binds knits). The cover stays on because it's not being used at this time.

Behind my serger is  a small stack of plastic drawers I've had forever. The machine manuals and extra feet, the oil are stored here. As well as elastics and other notions.


Even after nearly four years - maybe it's only three, I'm not fully integrated into ONE ROOM.
I keep trying.


My other job today was hanging the zippers. They were in a drawer all neat until someone had to paw through them - several times. I keep finding zippers at estate/garage/rummage sales, so this became a huge jumbled mess. I found a couple of ideas on pinterest and Instagram and tucked them into the back of my head  - for later.

So - I was at a rummage sale today at the Baptist Church when not one, but three!!! possible solutions for zipper storage were within five feet of each other.

One was a cork board. It didn't have hanging hardware - but an easy fix.

Then I saw a metal pet grate that goes into the back of a car to keep pets corraled in the back. The grid looked rife with possibilities, but it was heavy.

Next to it was a stack of large picture frames and a couple had a metal grate inserted - see photo below.
Lightweight, easy to hang, done deal.

To hang my zippers, I used little curtain hooks - shaped like the number 2 - with one end that's sharp to pierce the back of the curtain and the round part to go over a rod.

Then I used binder clips to hold ten or so zippers and just slid the round end over the curtain hook.


I actually had to go to the store to buy binder clips as I only had five in my house. I used 20.
'Cuz I have a buttload of zippers. I sorted them by metal teeth, nylon teeth, short, long, big teeth (#5), little teeth ( #3).


This organizational frame hangs behind the door.
It's not pretty enough to be wall art but this was a good spot.

 Never fear, these are not all my zippers!
The old zipper drawer holds the zippers still in their covers and my 'small' collection of very short zippers.


I can now see at a glance that I need to be sewing more with zippers, which kinds, and which colors. Much easier and EFFICIENT!


And, there's room to add more if I find more at the next sale.

Sometimes it pays to procrastinate...


I haven't found a place to hang this small wall mirror. It's chalk painted a gray-blue over white over grey. I bought it locally and when I got home, found it to be the perfect place to hang some mini birthday bunting from my friend in Kyoto. I thought it would look good in my sewing room but I'm at a loss as to where it needs to hang.
Sigh... another small job to add to the list...
A glance back at when I first put together my sewing room
I just went and had a look back. Wowza. I've actually managed to stuff more into this room and had to expand into a bedroom dresser for my japanese fabric haul. I need to sew more. Use up more. Seriously.

You might as well read this sewing room post too.

Which all directly translates into requiring more time off the day job.

06 March, 2016

Random Notes On A Sunday

I found Lance. Fifty cents worth of make-me-smile.

I went to a church rummage sale Friday morning and found treasures!


Wooden thread spools, Cath Kidston pencil pouch, Star Wars fabric, quilt batting.
Patterns, fabric, trims. A Bear with an airplane.


I've had great success separating the wooden spools by color and selling them as a grouping.


I give out stickers to kids at work and made a super deal of a giant handful of sticker sheets for two bucks. I may have whined.

Trivia cards about Oregon.
Various sewing trims. Embroidery cloth.


I threw this into the wash and it came out like new. All the pencil dust washed out.
Twenty five cents. Cute retro alarm clocks


Adjacent to the church is a cemetery and this headstone stopped my car.
I may re-think my cremation plans. Love this memorial. The beads around the base are from University of Oregon Ducks.


It was such a gorgeous morning. As I drove to the sale, I passed new lambs gamboling in the green fields and a beautifully clear Mt. Hood in the distance. I thought about stopping to take photos but I know my phone camera isn't up to far-away shots.


Last week, I pruned my grapes and raspberries. These are ever-bearing raspberries. I get the first crop on last years canes in July and another crop on the new canes in September.

Very easy to start canes. If you live close by, I'd be happy to dig you some. These make awesome raspberry jelly.

The burn pile in the background where my garden 'gnome' hustles the detritus over when burning is allowed. The old canes magically disappear....


This morning, I captured Mr. Hummingbird.
These are my best photos so far.
Inside, at the kitchen window.

If I go outside, they will only buzz me and make angry chirpy noises telling me to go back inside and make more sugar juice.

(btw: 1:4 ratio of sugar to water. or. 1/4 cup sugar to 1 cup water. Boil. Let cool)


My front door. Spring blooming primroses.


I sent my first birthday cake.
Cupcakes to be honest.

Unfrosted.

Everything to frost them was inside as well.

It arrived intact and much appreciated by the birthday boy.