Showing posts with label pinterest. Show all posts

11 October, 2016

The T-Shirt Hack


https://blogger.googleusercontent.com/img/b/R29vZ2xl/AVvXsEiSvd-UVj9txqyzo_CtmHRn7o2yxJIJTSr-XTBhWPjT8yVkIBvBn-enGZZIO_rt12vYU48S7qUtzzEdW1IQHmCCku_7e3zP5SHZN0eLK9kW6GDoTpskGAY485YDxIof9g2VSCJOcPAtH0g/s400/IMG_1717.JPG

https://blogger.googleusercontent.com/img/b/R29vZ2xl/AVvXsEhMLZYeafy2uw0R9B_mGwkD452Ux8DefZ8ls9-SUpmBLLjiuZFNe64fo9NUFOf5HiUZiBBk8wb8mybbwOXBbM-V7NRSnWM2YkA66NZSdM6Qb1uRFe9PILqsixgJnwsP2VFOWWA7SPuNjJ0/s320/IMG_1744.JPG


 My dear friend sent me this tshirt from Japan in a size large. Its a men's large. It fit me through the shoulders but the tummy area was bunched up and tight.

I needed a tshirt hack because I liked this color on me and it came from Japan!
So I started a Pinterest board. Pinterest helps me focus by being able to easily organize photo inspirations. The photos link back to where you found them, so if there is a tutorial, it's easy to find again by clicking on your saved photo.

I started a Pinterest board called Tshirt hacks and I latched onto the long vertical triangle of added lace under the arm to give  me room for my tummy.

Brown cotton lace - how hard could that be to find? If we were still in the late 70's - no problem. Here we are in the current year with only a few colors of cotton lace to be had.
Dyeing white to brown is more difficult than you know. Polyester lace would work for the look but is way too itchy.

I met up with Pencil Girl at Mill End Store in Beaverton, where we spent over an hour the year before to find some lace for her to try her tshirt overlay. It took just under an hour to find this camo knit instead.

I didn't mind a lace insert at the bra strap area because normally you aren't holding your arms above your head to flash people, although some people are more comfortable with flashing.
Also, the insert, right there at the bra strap area, would be pretty narrow. The point of the insert is a wider triangle at tummy and hips to allow for more room there.


Side seam insert.
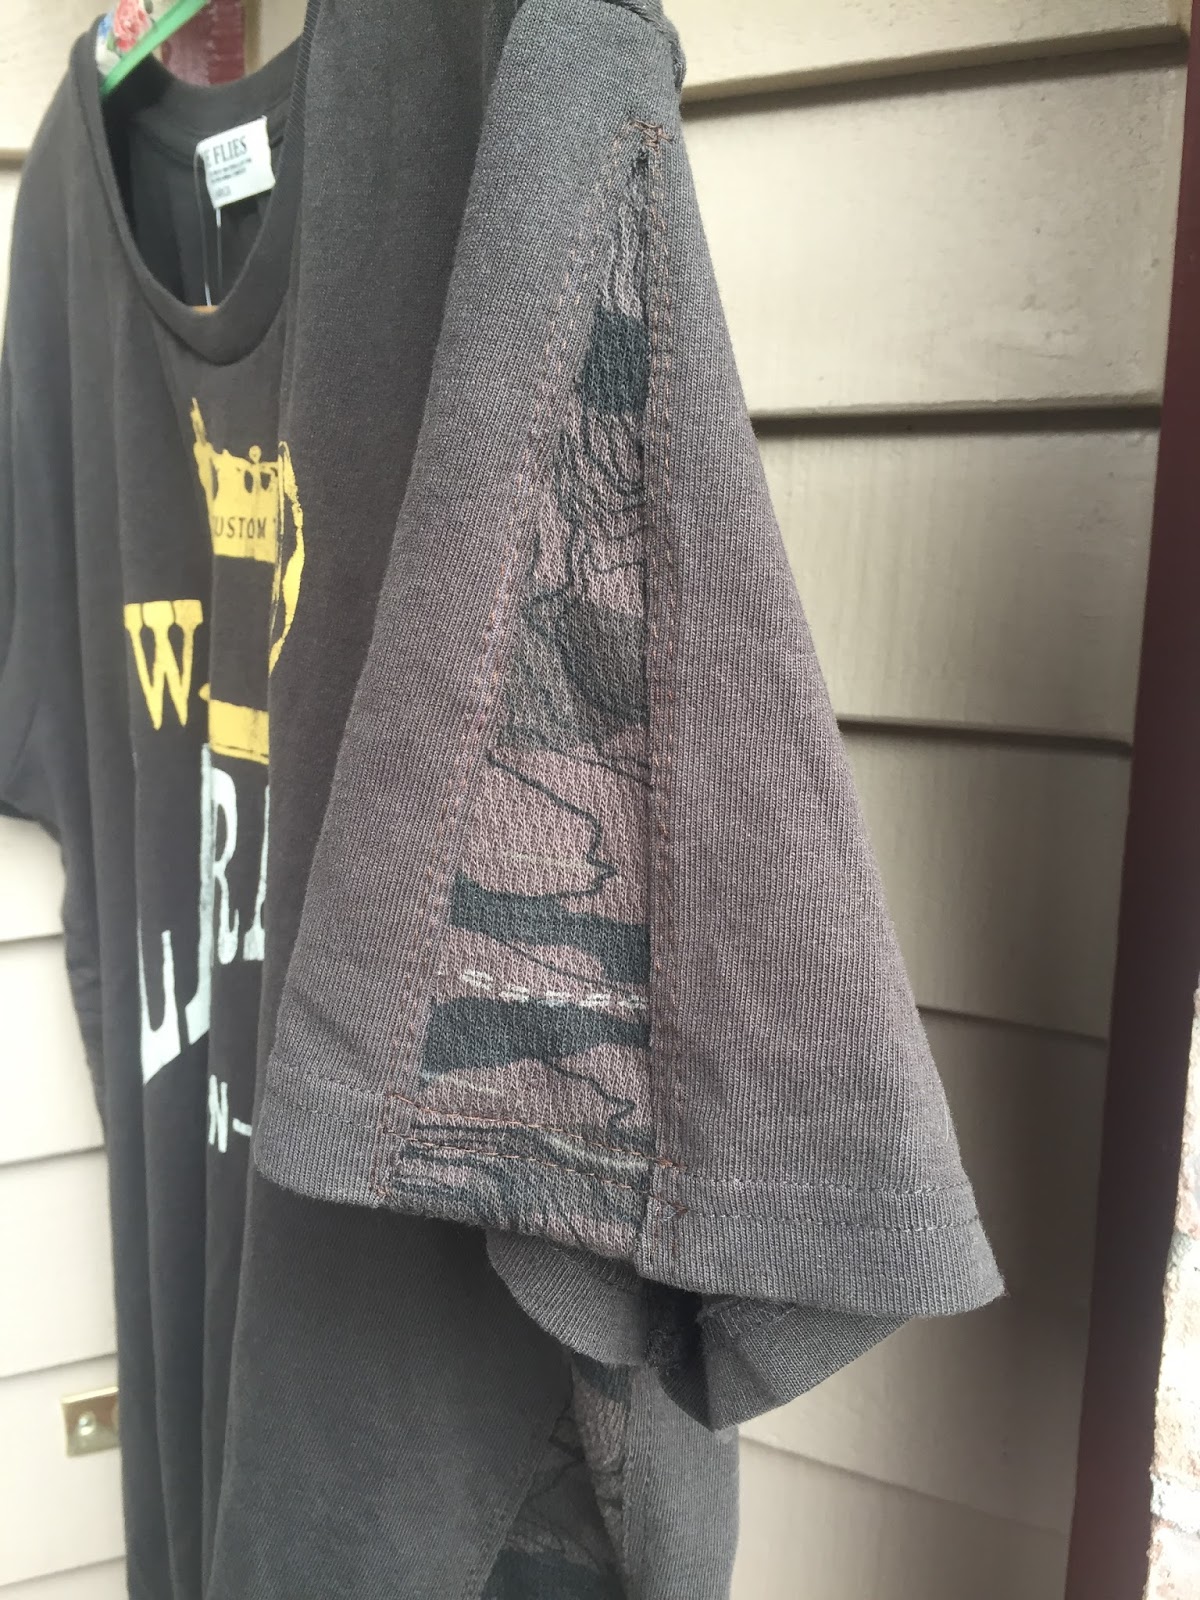
Sleeve insert

It went in so easily. I decided to add a godet to the sleeves too. Godet - word of the day, pronounced Go-day. And it means a triangular piece of material inserted in a dress, shirt, or glove to make it flared or for ornamentation.


The side seam godet was for fitting better and the sleeve godet was purely for ornamentation.

Feeling pretty smug, I attacked the neckline too.


 Don't you love this color brown? Except it's not brown as we discovered in the fabric store, it's a dark olive. Anyhoo, like all dark colors, it's a beast to photograph clearly.

1. I cut along the side seam from the hem up to about 1 inch from the sleeve seam.

2. Knits don't fray, so I decided to just sew closely on the edge of my tshirt fabric onto the godet.

3. I placed my tshirt onto my ironing board and laid a 5 inch wide piece of the godet fabric underneath. Maybe 1/2" above my top cut but below the sleeve seam, extending down past the hem. We bought 1/2 yard of this material because of the way the camo pattern ran. 18" x 5".

4. I started pinning. Very close to the edge and just eyeballing that my triangular line was straight.

5. On the side with the serged commercial seam, I trimmed it off at this point, cutting close to the stitching.

6. My hint? Run your pins down one side in one direction and up the other side in the opposite direction. I sewed from the hem up to the sleeve seam on the right side, pulling pins out as I did.
However, when I came around the top, my pins were now backwards to being able to pull them out head first. So place your pins in opposite directions.


Bye, Bye, Care label


7.  I used a long stitch length - a basting length. There would not be any stretch going down but usually when you stitch on knits, making the length longer helps with the feed dogs and how the material feeds through. Almost forgot - I used a stretch needle too.

8.  I had some concerns my new seam would curl on the edges inside and make me crazy wearing it, so I stitched another line of stitching about 1/8" away and then later  trimmed the excess of my godet fabric close to that seam.

9. My godet width at the bottom of the hem ended up being 3 1/2" wide. I simply turned up my godet fabric a matching amount to my tshirt hem and sewed  it down using that same 4.0 stitch. Again, not a lot of stretch here. If you're concerned, you can get out your cover stitch and make a more commercial stretchy hem finish.

10. Finally, trim off your excess godet fabric.


You can see the double stitching here on the sleeve


On a roll, I decided to attack the neckline too. Guys t-shirts hit me at the neck making me crazy. I don't like things around my neck. 

I had pinned a hack showing how to turn a round neckline into a v-neckline. The technique said, and it's true, you can re-use the neckline binding up to 2 inches more stretch to make that deeper vee.

My machine design on the front of the shirt came close up on the neckline. I decided to keep the round shape but 1/2 - 3/4" lower.
And it worked. Remember, tshirt knit doesn't fray!

I snipped close to the binding from shoulder seam to shoulder seam (leave the back neck attached - just fooling around with the front side).

Then I folded my shirt in half, matching the shoulder points. I started cutting from the bottom about 1/2" - 3/4" down and just tapered my eyeball curve back to the original shoulder points. I might have been able to cut a little deeper except for  my design. (Don't cut that off...).

Then I wonder clipped my neckline back onto the binding right on top of the serged edge.
I matched the centerpoint of the shirt to the binding centerpoint and also about 3" up on both sides of that. The binding is smaller than the shirt so you have to stretch the binding as you sew.

I basted it on with a 5.0 stitch on my pfaff. Looked at it. Awesome. Then I took it to my serger which had to be re-threaded in a dark color. I used black as I don't own dark brown serger cones. And I re-serged that seam.

All of these hacks took less than an hour to do. Yes. An hour.
Time Flies on the logo


The hem is a little long and I might change that, but since I'm working overtime, I haven't had a chance to wear it yet. Trying it on - it fits! So much better.

The most difficult part of t shirt hacking is finding the right fabric to coordinate.

Thanks for the shirt, Janine!
The camo knit  matches so well, no one will be able to tell that I custom tailored it to my body.


***December 2016 update. This shirt is so soft. It was worth fussing around for an hour to make this fit me. None of the cut/sewn edges are curling, nor are they bugging me.

17 July, 2016

Rope Tricks


 No. 4 Rope Bowl

Omg, I made a sailor's hat!    Is this too cute or what?
These bowls are totally reversible.

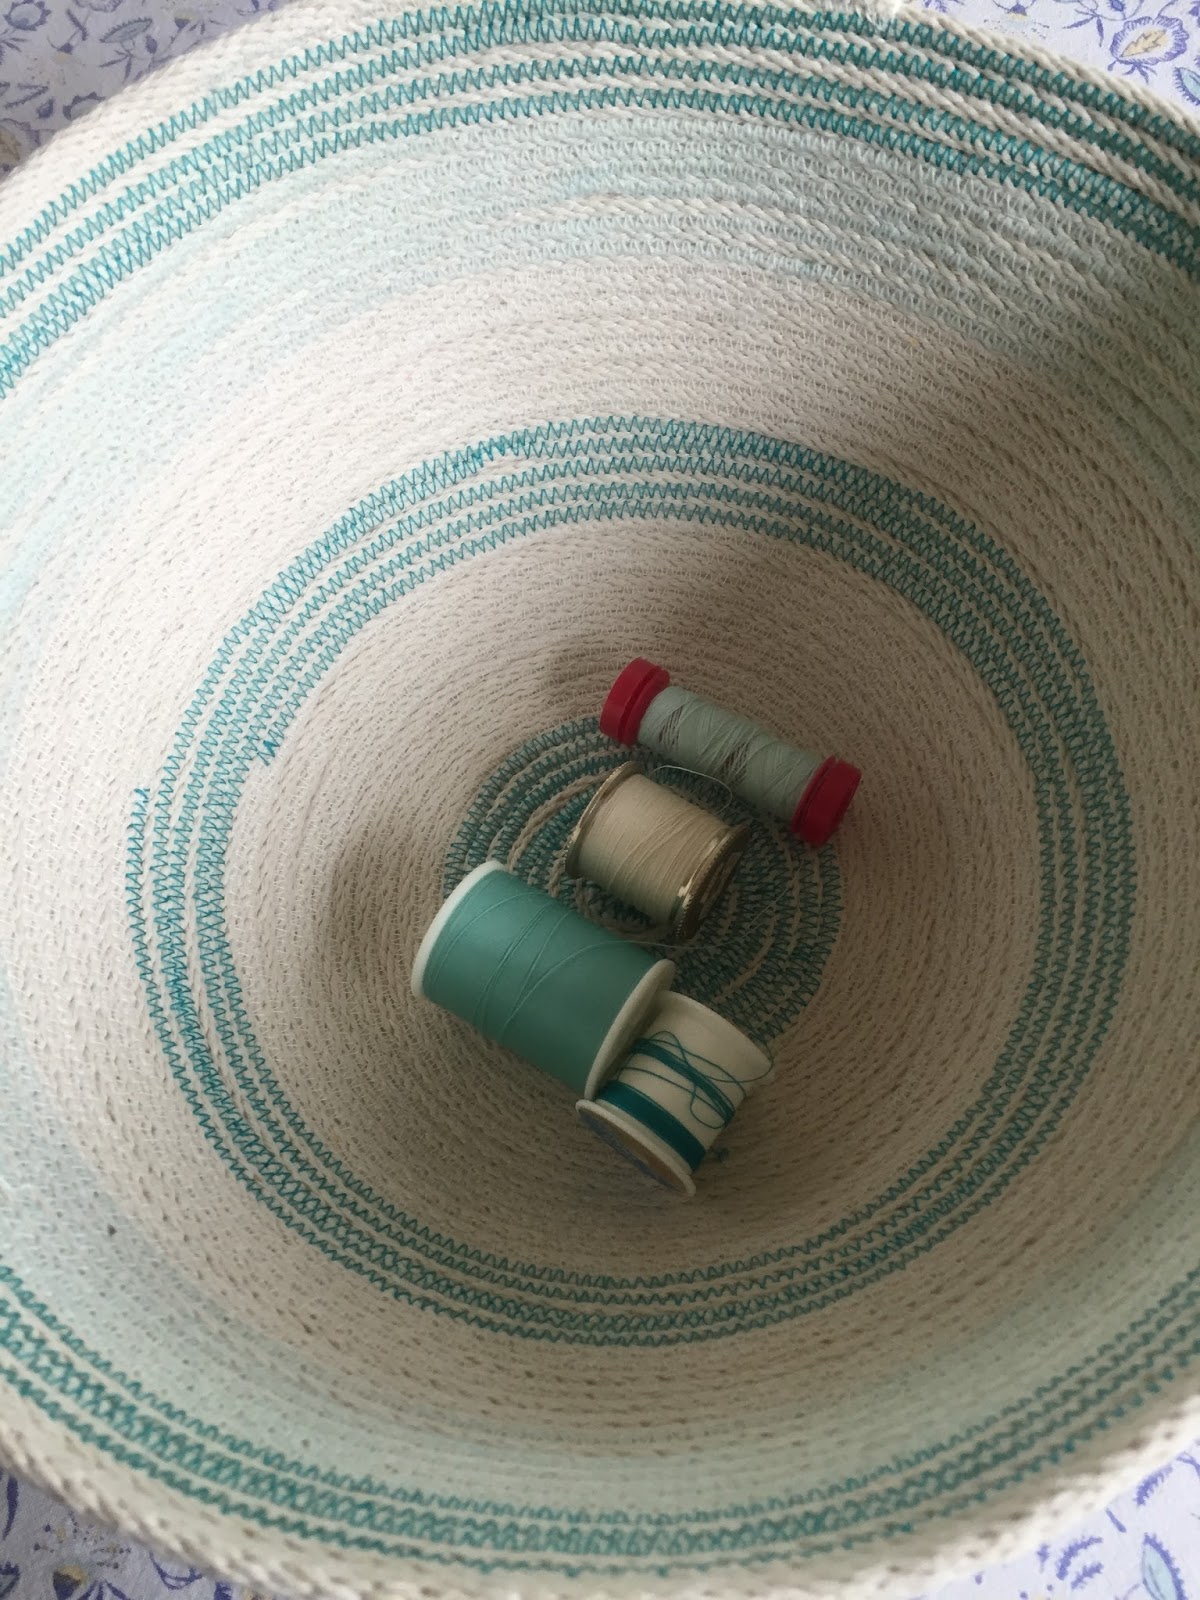
I sewed this one in shades of turquoise with just white on the outside. Believe it or not, I ran out of every bit of my tiny supply of off-white thread. White works too.

I was aiming for an ombre effect.


Then I used up the last of my 3/8" wide cord.
I had just under 10 feet of the 7/32" left and added it to the top of the bowl.

This ombre bowl measures about 8 inches across by 3 1/2" high - a medium-small size.
All scraps used up!

In the photo below, you can just see that change of color cord in the last two rows at the top.

I added a knot for the join and to finish the bowl off organically and hand-tacked it in place.


This is No.3 -- A Study in Orange.
This sold within a day of listing it in my Etsy shop.

I thought to add some loops to the outside and it worked quite well. This was in the 3/8" wide cording. I had to go back and re-do several spots that didn't quite catch.


 I actually quite like the heavier 7/32 on the top - it acts as a rim to the bowl.

 Rope tips;

1. I liked the 7/32" wide cotton clothesline to begin with. The 3/8 (6/32) was a tad more fiddly. It was a different brand as well.

2. In my little town, I have four stores that sell cotton clothesline. Varying in price, thickness, and strength. Buying for me and a few 'skeins' for friend in Japan has emptied the town. Yes, I could buy online. For cheaper. But I feel clothesline is one of those staples that if we buy online, we help close another brick & mortar store. {opinionated} I made four bowls out of what I bought. I'll wait until someone re-stocks to have another go at it.

3. A wide zigzag of 4.0 to 4.5 is good for catching both cords as you sew the bowl together. Again, the larger 7/32 cording was a great starter.

4. Your white or off-white thread disappears into the clothesline weave. If you wobble off your join line, go back and have another go at it.

5. I have a Pinterest board to help focus my 'organic' rope sewing.

6. While out researching my town, I was tempted by some turquoise para-cord but -- I don't like the feel of the polyester stuff and I can't imagine having a para-cord bowl sitting on my counter unless a grandchild made it and I had to. Neutral, organic, cotton clothesline gave me the feel I was after.


7. Have fun. Use up some thread spools.


I'll leave you with this.


12 July, 2016

Second Rope Bowl


 And the handle theory worked.

I was gonna throw the remaining rope out to the garage to tie up some raspberries - or something. Noticing that maybe I only used 80 feet for the big bowl, why waste the remainder of this cotton rope in the garden?

Re-threading, I tried out some metallic thread. Another tutorial had problems with it and I did at the edge of the bottom when it suddenly broke. Good time to re-thread, so I tried a variegated purple and I love how this smaller bowl turned out.


My african violet likes the bigger bowl?


 See how much smaller this bowl is?

This is how I sewed it, but I actually liked it better flipped inside out. The red at the bottom is more vibrant. This was a regular red thread in my bobbin. The metallic adds a subtle degree of sparkle but it was banished to the bottom as being too subtle.


I managed to get the handles equidistant but one was bigger than the other.

There are no mistakes with this bowl making. I threw it back under the presser foot and sewed the handle to the body for perhaps 3/8" and Ta-Da!

Beautiful.

Kathy's notes::::  This smaller bowl sewn with 4.8 width on the metallic, with 4.5 on thread change-over.    Length was 3.0 - 3.5


****Sandra was also thinking about sewing a rope bowl and had some good questions:::

Her inquiry;    "I've seen different versions of those bowls on Pinterest and I've been dying to try making one, if I can find the supplies for a reasonable price (which isn't always an easy job here in $$Canadaland$$!).  Yours is gorgeous - did you just know automatically (by feel, maybe) when to start shaping and how much to angle the rows, or did it take a while for your brain to work it out?  How hard was it on your hands and shoulders?  I get terribly hunched shoulders when I freemo quilt (although I haven't done it now in years) but my main problem now is my hands - they tend to get cranky. "

My long-winded answer:::
It took a solid hour - maybe 1 1/4 hours to make the first one. The smaller one took 15 minutes.

 I had been thinking about it for months. I knew I did NOT want to try the fabric wrapped version. Other than securing the bottom and angling the bowl 'plate' UP at 6". it was very organic. Look again at my Pinterest board. I added some ideas. Odd # stripes is from landscaping and window dressing advice: group in 3's and/or 5's.

You can only sew until your bobbin runs out. I used five on the the large bowl, most of two on the small bowl.

The body hurt is all at the beginning where you are hunched over trying to get the zigzag to catch both coils. When you angle the bowl up and start the shaping, then you can consciously sit tall in your sewing chair, relax, and find your sewing rhythm. My clear foot has two red dots on it on either side of the center 'opening' (toes). I working on letting the dots guide me.

Easier to get tense at beginning because of the curve sewing.

Because of the bobbin changes, it's easy to take breaks. The design was very organic.

I would say the body hurt of FMQ is way worse. All of these people who have awesome quilts send their quilts OUT to be FMQ'ed. They don't do all the work themselves.

Good questions!


**** lucky me: I have four places in my small town to buy cotton clothesline. 2nd and 3rd places were cheaper. I am trying some 3/16" wide stuff now. The first rope was 7/32" diameter - so a little bigger. I'll hit up the 4th place in the next day or so.

10 July, 2016

Rope Bowl


I had this on the back burner in my head for many months and finally stopped at Ace Hardware and bought the cotton cording. This cording is about 1/4" in diameter and flexes quite nicely as you sew round and round.

If you would like to make one yourself, I can assure you they are addicting as well as slightly hypnotic (endless circles). There's no one right way to make these and certainly no wrong way.
I have a Pinterest board where I keep some photos of some nice ones that were created.


 To start a circular bowl, you'll need to wind your cord in a circle and stick some straight pins through from the side to secure. Then carefully start zigzagging so the stitch catches both coils.
At the beginning,  take two stitches, lift your presser foot, pivot, and sew another two stitches and repeat. At about 2 1/2" wide (see photo) you don't have to lift your presser foot so much and can start feeding it through on the curve.

I tried to sew over my pins at the beginning and ended up hitting one and breaking my needle. This is really the trickiest part of making the bowl. Keeping the bottom coils flat enough as you zig zag in stops and starts. Maybe pull your pin out enough as you pass and then stick it back in. The pins are only there for a few rounds.

I'm not real OCD here. The tutorial I read indicated she was (ocd) and, if you are OCD as well, then you'll want to count stitches, lift the presser foot, pivot the coil, sew the same count as before so your stitching ends up a little more even than mine.

I can assure you, no one will notice and, usually, there will be an apple or two hiding the bottom anyway.


At 6" across on my flat bottom is where I started lifting the bowl up, thus creating the bowl effect. A couple of rounds of stitching and it's starting to look like a bowl.

I ran through about five bobbins of thread and switched from aqua to off-white. I also didn't match the outer to the inside. I wanted the more vibrant aqua inside with a quiet turquoise-green on the outside.  The cording is already off-white and contrasts beautifully with any color you choose. The five stripes of aqua as I sewed up the bowl cleaned out a bobbin-worth of thread.


 Based on the Pinterest tutorials that I saved, I went with a 4.8 width to my zig zag and a 3.0 length. You can adjust a teeny bit, like me to 4.3 width but any abrupt changes will show. It's up to you if that bothers you.

I will tell you, as you are going round and round, you want to make more of these to incorporate any changes you dream up.


 I wanted the sides to be a bit more straight here so I had to lift up with my left hand.
This particular cording fed very nicely allowing my right hand to keep the coils centered and the rope evenly feeding.


You can see my soft aqua on the outside here. Subtle change in color.


How to finish.

Well - you have to eventually. I liked a knot here so I sewed up to the knot as close as I could get and then back-stitched the end in place.

I've seen handles. Holes left purposely to make handles, etc.
You just sew to the place where you want a handle in place and run your zigzag so it doesn't catch the upper coil for 3 or 4 inches (5?). The handle will be a bit fuller than the previous coil so when you want to end the handle hole, you bring the outer coil down with enough give to create a visible hole. Move your zigzag stitch back so it catches both coils.  Continue sewing to the other side and repeat. It probably would be helpful to mark those places with a pin or wonder clip.


I used up nearly all of the 100 feet. Maybe 90 ft and made a good-sized bowl.
 

 My rope at Ace Hardware was not on sale and cost me $14.99. Ouch.

On the search for a cheaper alternative because now I need to send this rope to my friend in Japan so she can play too.


A close-up of my bottom - ha! not mine, the bowl's bottom. That first darker teal is where I broke the needle. The second is where I ran out of bobbin thread and started again. The thread tail got caught up in the stitching.


 I used a butt-load of thread in this project. Good thing I find lots of spools at garage sales.
Maybe five bobbins too. I filled as I went because I didn't really have a plan other than the aqua stripes. If you are organized, you could pre-fill your five bobbins beforehand.


About the stripes: I arbitrarily did five rounds ( an odd amount) but also this is where a bobbin would run out. 

The OCD person didn't like the looks of the starts and stops of the color switches all randomly around the bowl and wanted these all in the same line up the bowl. Thankfully, I don't see the stops and starts and that means I'm doing okay with my auto-immune, 'cuz OCD is a symptom when I am really stressed.


One very awesome sturdy decorative bowl.

30 November, 2014

Putting Together A Puzzle


I started this Thanksgiving Day

 - it's about to implode and take me with it - where I can't stop fitting puzzle pieces until I'm done.


The journaling had become one more thing to do and I had to take some blogging time off.

My work schedule is a bit better next week. I don't have to go in until 11am - I have all my mornings on a consistent schedule. Next week will be different.


Thanksgiving turned out way better than expected. Daughter is in Guatemala for the winter so I had to make do with the son. He was lavished with 10 dz chocolate chip cookies amongst other food items (when do you get over thinking that your child might starve if you don't provide goodies?)


I did manage to meet Pencil Girl at RCT Fabrics in Portland recently. She had a quarter beef for me to put in my freezer. We looked at fabrics, discussed projects, caught up on our busy lives, and then went to coffee.


We both bought this burn out knit, me in the lightest pink, she in the brown. This is the store example with the brown knit 'piping'.


The day job has included too much overtime since June (again) and now we are starting the Christmas rush.

We moved my Mom & Dad this summer - all 45 years accumulation from their 3500 sq ft house on the hill down to a  much smaller single level 1300 sq ft house. They not only changed their address but also their phone number. They are in their 80's and this was a Herculean task.


They insisted on moving the pool table from the basement for the use of the two grandkids who visit once a year from Minnesota. There was a moment when I told my dad, "You are crazy".
Very stressful but their old house sold in 7 weeks, they are ensconced in their new house and finding their way.
My sis, the MN whirlwind, came a few weeks ago and helped hang pictures, figure out furniture placement and help meet the neighbors.


I did manage some of the local christmas bazaars.
 

 Above: Paper cones swirled into an ornament.
Below: Magnets made of old maps, origami folded.


I didn't buy much - just looked and enjoyed.


I pinned this folded star trivet and planned on making two for Christmas presents.

 I managed to make one for my MN Sis so she could haul it back in her luggage - (saves me the shipping). So - one more to go.
 

Too busy to snap a photo but it is in similar red and aqua colors.


I have ideas on what I want to do with this Sashiko stitching.

 I made two of these! The first one was completed and lost over at my friend's house this summer. She has now found it and will send it to me.
I liked the design so much, I ordered another and it was much faster to stitch the second time around.


Going to camp out in my sewing room this afternoon. Got another pendleton pillow to sew.