Showing posts with label t-shirt. Show all posts

11 October, 2016

The T-Shirt Hack


https://blogger.googleusercontent.com/img/b/R29vZ2xl/AVvXsEiSvd-UVj9txqyzo_CtmHRn7o2yxJIJTSr-XTBhWPjT8yVkIBvBn-enGZZIO_rt12vYU48S7qUtzzEdW1IQHmCCku_7e3zP5SHZN0eLK9kW6GDoTpskGAY485YDxIof9g2VSCJOcPAtH0g/s400/IMG_1717.JPG

https://blogger.googleusercontent.com/img/b/R29vZ2xl/AVvXsEhMLZYeafy2uw0R9B_mGwkD452Ux8DefZ8ls9-SUpmBLLjiuZFNe64fo9NUFOf5HiUZiBBk8wb8mybbwOXBbM-V7NRSnWM2YkA66NZSdM6Qb1uRFe9PILqsixgJnwsP2VFOWWA7SPuNjJ0/s320/IMG_1744.JPG


 My dear friend sent me this tshirt from Japan in a size large. Its a men's large. It fit me through the shoulders but the tummy area was bunched up and tight.

I needed a tshirt hack because I liked this color on me and it came from Japan!
So I started a Pinterest board. Pinterest helps me focus by being able to easily organize photo inspirations. The photos link back to where you found them, so if there is a tutorial, it's easy to find again by clicking on your saved photo.

I started a Pinterest board called Tshirt hacks and I latched onto the long vertical triangle of added lace under the arm to give  me room for my tummy.

Brown cotton lace - how hard could that be to find? If we were still in the late 70's - no problem. Here we are in the current year with only a few colors of cotton lace to be had.
Dyeing white to brown is more difficult than you know. Polyester lace would work for the look but is way too itchy.

I met up with Pencil Girl at Mill End Store in Beaverton, where we spent over an hour the year before to find some lace for her to try her tshirt overlay. It took just under an hour to find this camo knit instead.

I didn't mind a lace insert at the bra strap area because normally you aren't holding your arms above your head to flash people, although some people are more comfortable with flashing.
Also, the insert, right there at the bra strap area, would be pretty narrow. The point of the insert is a wider triangle at tummy and hips to allow for more room there.


Side seam insert.
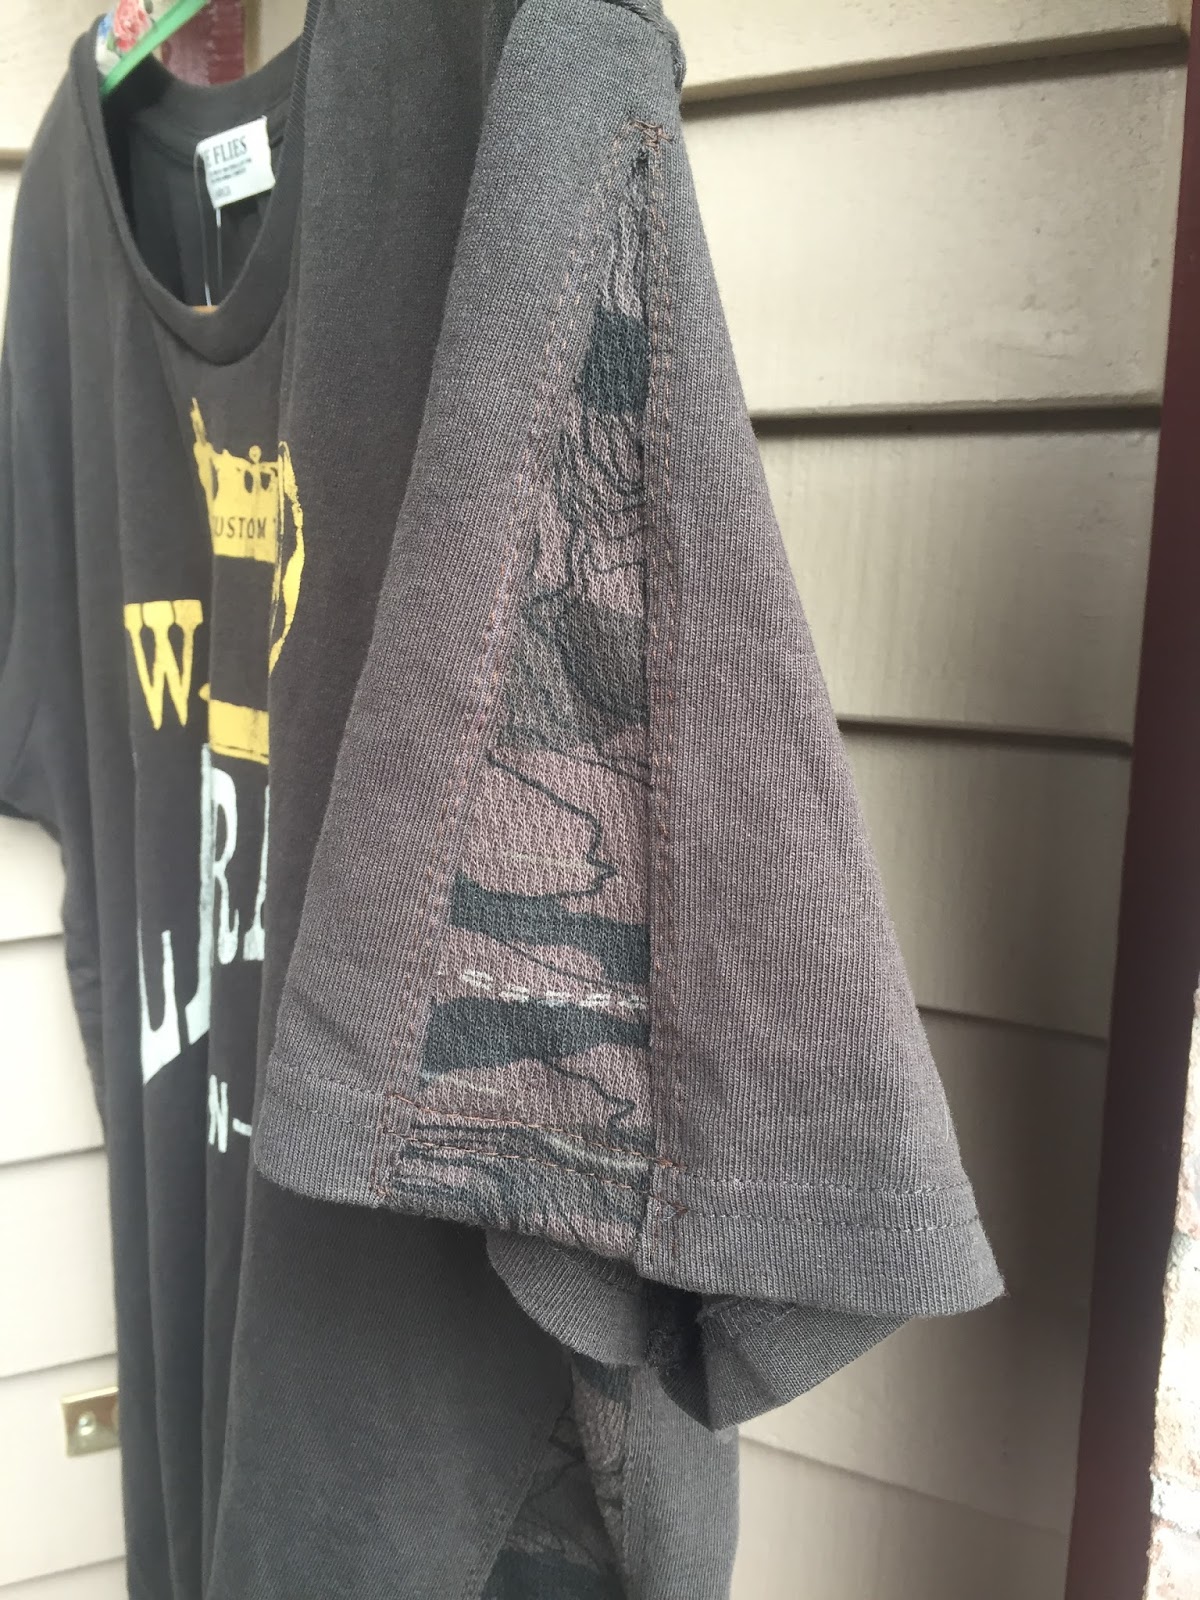
Sleeve insert

It went in so easily. I decided to add a godet to the sleeves too. Godet - word of the day, pronounced Go-day. And it means a triangular piece of material inserted in a dress, shirt, or glove to make it flared or for ornamentation.


The side seam godet was for fitting better and the sleeve godet was purely for ornamentation.

Feeling pretty smug, I attacked the neckline too.


 Don't you love this color brown? Except it's not brown as we discovered in the fabric store, it's a dark olive. Anyhoo, like all dark colors, it's a beast to photograph clearly.

1. I cut along the side seam from the hem up to about 1 inch from the sleeve seam.

2. Knits don't fray, so I decided to just sew closely on the edge of my tshirt fabric onto the godet.

3. I placed my tshirt onto my ironing board and laid a 5 inch wide piece of the godet fabric underneath. Maybe 1/2" above my top cut but below the sleeve seam, extending down past the hem. We bought 1/2 yard of this material because of the way the camo pattern ran. 18" x 5".

4. I started pinning. Very close to the edge and just eyeballing that my triangular line was straight.

5. On the side with the serged commercial seam, I trimmed it off at this point, cutting close to the stitching.

6. My hint? Run your pins down one side in one direction and up the other side in the opposite direction. I sewed from the hem up to the sleeve seam on the right side, pulling pins out as I did.
However, when I came around the top, my pins were now backwards to being able to pull them out head first. So place your pins in opposite directions.


Bye, Bye, Care label


7.  I used a long stitch length - a basting length. There would not be any stretch going down but usually when you stitch on knits, making the length longer helps with the feed dogs and how the material feeds through. Almost forgot - I used a stretch needle too.

8.  I had some concerns my new seam would curl on the edges inside and make me crazy wearing it, so I stitched another line of stitching about 1/8" away and then later  trimmed the excess of my godet fabric close to that seam.

9. My godet width at the bottom of the hem ended up being 3 1/2" wide. I simply turned up my godet fabric a matching amount to my tshirt hem and sewed  it down using that same 4.0 stitch. Again, not a lot of stretch here. If you're concerned, you can get out your cover stitch and make a more commercial stretchy hem finish.

10. Finally, trim off your excess godet fabric.


You can see the double stitching here on the sleeve


On a roll, I decided to attack the neckline too. Guys t-shirts hit me at the neck making me crazy. I don't like things around my neck. 

I had pinned a hack showing how to turn a round neckline into a v-neckline. The technique said, and it's true, you can re-use the neckline binding up to 2 inches more stretch to make that deeper vee.

My machine design on the front of the shirt came close up on the neckline. I decided to keep the round shape but 1/2 - 3/4" lower.
And it worked. Remember, tshirt knit doesn't fray!

I snipped close to the binding from shoulder seam to shoulder seam (leave the back neck attached - just fooling around with the front side).

Then I folded my shirt in half, matching the shoulder points. I started cutting from the bottom about 1/2" - 3/4" down and just tapered my eyeball curve back to the original shoulder points. I might have been able to cut a little deeper except for  my design. (Don't cut that off...).

Then I wonder clipped my neckline back onto the binding right on top of the serged edge.
I matched the centerpoint of the shirt to the binding centerpoint and also about 3" up on both sides of that. The binding is smaller than the shirt so you have to stretch the binding as you sew.

I basted it on with a 5.0 stitch on my pfaff. Looked at it. Awesome. Then I took it to my serger which had to be re-threaded in a dark color. I used black as I don't own dark brown serger cones. And I re-serged that seam.

All of these hacks took less than an hour to do. Yes. An hour.
Time Flies on the logo


The hem is a little long and I might change that, but since I'm working overtime, I haven't had a chance to wear it yet. Trying it on - it fits! So much better.

The most difficult part of t shirt hacking is finding the right fabric to coordinate.

Thanks for the shirt, Janine!
The camo knit  matches so well, no one will be able to tell that I custom tailored it to my body.


***December 2016 update. This shirt is so soft. It was worth fussing around for an hour to make this fit me. None of the cut/sewn edges are curling, nor are they bugging me.

20 February, 2012

I Sewed Myself A Top


It is very easy for me to get derailed from bigger projects by the allure of smaller projects.
Sewing clothing for myself is a big project. I might as well call it a huge project.
From determining the best size, to cutting out large pieces of fabric, to determining the best way to sew them with my Singer, my Serger, and/or the Coverstitch machine. A lot of thought goes into a garment.
I sat down yesterday and traced out the t-shirt with a 'U' shaped neckline from Ottobre 303.
This pattern is not for beginners although if you had someone telling you the order of tracing, cutting, and construction then, yes, of course, a beginner could make this t-shirt.


Last fall, I sat down and traced out the v-neck version of this tee and made a muslin out of some thin knit. I'm a size 16. Some knits drape well over the girls and the 'rolls' but other knits cling in all the wrong places.

My friend, Pencil Girl, and I met up last fall at the NW Quilting Expo and she found this fabric for me. I was suffering under the delusion that I had entirely too many knit fabrics and not enough pressure to sew them up. She held the fabric up to my face and it was a fantastic match for my hair and skin color.


This pattern, because you take multiple measurements, fit me with no alterations. The pattern sheet folds out into a bedsheet size and all the patterns pieces are a puzzle maze of lines. They are done in heavy lines so it is easy to take the swedish tracing paper and lay everything out on the kitchen island and puzzle trace out a pattern. -- if you know what the pattern piece might look like than it's that much easier - lol.
This time I used the "U" neckline. I had a vision of something I wanted to do for embellishment in my mind but found out after I made the tee that it would be too busy for this pretty fabric.


Sherril's Sewing saga. Beautiful Flower embellishment.

The Beautiful flower embellishment is gorgeous but maybe next time on a solid color. Sherril tells how to make the flowers here. Her other pattern reviews are here.
It's always nice to see a tee made up on somebody similar in size.


For the neckline, I used the binding pattern piece from the Ottobre 303 and divided it into quarters and pin-stretched it into place. I placed the right side of the binding against the right side of the neckline. I sewed with my reg. machine a 1/4" seam and then wrapped the binding up and over the neckline. I pinned it into place and also decided to hand-baste it to cut down on the number of pins coming into contact with my coverstitch machine. Then I sewed the band down from the front side of the garment - like top-stitching. This caught the back side of the binding.
I don't own any binders (neckline banding) yet, nor do I own the clear foot for the coverstitch. My stitching wanders a tad but only I would ever notice.

I made the sleeves 3/4 length. I have always run a little warm but this last year or two - when my auto-immune is kicking up, I get cold. I am always pushing long sleeves up so 3/4 is a good compromise.
This pattern has you hemming the sleeves right away but I waited until I attached them to the body pieces so I could see how much I needed to cut off. Which was nothing, surprisingly. Either I have longer arms than I thought or the long sleeves Ottobre drafted are short. They sit about 3 inches above my wrist which turned out perfect.

Side view with sleeve.


I used my coverstitch machine to hem the sleeves and the front and back sections before I sewed the side seam from the tip of the sleeve on down to the hem. My little problem is that I don't own enough cones of black thread yet to thread both my serger and the coverstitch. I did deviate a little from the instructions in order to keep from re-threading more than I had to. I think more thread cones will go on the birthday list (hint, hint).

This fabric is from some unknown vendor and it was labeled as 1 1/2 yds @10.95 ($16.40), 60"  wide , Slinky Acetate.

Beautiful colors, gorgeous drape. This tee is on me as I write this.
I am so pleased with how this material worked for me.
It was fairly easy to sew with no curling and only a smidge of slippage.

I love how this Ottobre pattern fits me as well. The vee-neck  muslin that I sewed  - the vee is a little on the high side but that's easy to adjust on the pattern piece. The "U" neckline is perfect for me. It sits just above the cleavage.
Ottobre also drafted the pattern so the front side seam is longer than the back. This is so you can baste some ease where the girls sit.  This is a great fitting sewing pattern for women.

31 January, 2010

Flower T-Shirts To Match Her Skirt

They only make Onesies for size 12 months. Why is that? Why can't you find a t-shirt for the little ones? I'm guessing the moms who buy baby stuff really go for the neat onesie look and they must really like snapping those crotch snaps.
Seriously, my niece is starting in on the potty training for the 14 month old and onesies would tragically miss the moment.


I was requested to make the matching shirt a T-Shirt.
Fred Meyers, Target, Macy's and finally, Walmart. --I found a long sleeved red t-shirt in the 18 month size!

Plan B: Cut off the onesie flap and hem like a t-shirt. Worked like a charm too.

I really wanted to work on a white t-shirt. Although the red long-sleeved shirt is now sporting one flower near the shoulder.


I needed a new work apron as well. The front panel takes a lot of wear and tear. My idea is to just replace the front panel when it starts looking 'unprofessional'.


On the left - 'unprofessional'.    On the right, totally spiffy. Flat-out Springy.
Yes - this is the same denim on both. These photos were taken within a minute of each other in the same lighting. The left apron is faded, worn through at the mid-section, and stained.

If you look closely, you'll see the neck strap and ties do not match. I took them off a previous apron and just added them to my new one.
This is my last piece of denim. I bought it here and I would not recommend the quality of their denim to anyone. But I did sew three aprons out of the 1 yard piece. This denim only lasts about three months.
By utilizing a front panel - where most of the wear happens, I managed to make the second one last six months. Here's hoping this one will make it to six months as well.

The pocket at the top is for my Ipod.