Showing posts with label janine. Show all posts
10 September, 2017
Drying Laundry
My niece just moved back to the states after living in Singapore for the last year and a half. She brought back a folding laundry rack cuz no one uses/has a dryer over there. Nor does much of the world. But, here in the states, we all have electric clothes dryers.
After my trip to Japan two years ago, I lusted after a simple drying solution. But all the outdoor drying tools in the USA were permanently attached to your house or inconveniently placed as an umbrella in the lawn. All vetoed by the other person in the household.
All amazon sells is the tiny version of the foldable rack above - suitable for drying lightweight items like lingerie.
I was raised to be environmentally conscious. I compost, re-use what I buy for other purposes, try to keep my (destined-for-the-landfill) garbage to a minimum and generally leave the planet a better place for my children.
So I wanted this foldable, small footprint rack above bad enough to beg my friend in Kyoto to send me two. They are each big enough for a medium load of laundry.
In Singapore and Japan, they also have rods across their patios for hanging big stuff and these racks just hook over them.
I still want to install a big rod across my patio but I have found a way to use these racks year-round just by hanging it off my kitchen chair.
What I have found in nearly two years of using them?
1. My knit tshirts stay long and no longer shrink "up".
2. Less pilling and everything lasts longer.
3. duh - less energy usage.
4. In the summer, most items are dry by the end of the day. In the winter, inside my house, they are dry in less than two days.
5. Planning ahead if you want to wear that favorite shirt/shorts on a certain day skillset.
6. I still have a dryer for emergencies.
7. In my two person household, in the winter, I use the dryer once a month for sheets and towels. In the summer, they go outside.
8. With my auto-immune bloating tummy, I love the fact that my tshirts stay the original length still.
9. It only takes 5 -10 minutes to clip everything on to the rack.
10. Pencil Girl asked if clothing got musty in the winter and I haven't found it to be so.
This very quickly became my routine and I don't really think about doing it differently.
It's easy to do - my first indicator of success.
Can't recall if I showed pictures of the two planes in the hangar. Still doo-hicking around with the J-5. Still hasn't gone on it's maiden voyage.
And the big old Stearman biplane.
Hope you hop over to my IG feed - RocketGirl50. I just figured out how to use my gorilla tripod to take a video of me skinning tomatoes. Exciting times, I tell you.
20 May, 2017
May Madness
May has been super busy and I think The Daily Drizzle is finally fizzling out. Another of my favorite Iris above with the Bearded Iris close behind. That will be the end until next year.
My friend from Kyoto sent me some special items for my birthday earlier this month.
She is getting to be an awesome airplane spotter.
She found a keychain of the Torii Gates which was one of my favorite sites in Kyoto.
My sis sent me a Marimeko plate. Also, the cute dish towel on the left.
I had to have a huge talk with myself. I've been hoarding pretty dish towels lately because a certain someone in the household doesn't understand kitchen rules. I made myself put it out anyway. And I ended up shout-ing it, as there are already scorch marks and tumeric from our curried chicken. (le sigh)
I made two more Clothesline bowls for easy peasy gifts and they were well received.
| My iphone isn't great at capturing Mt. Hood in the distance. Lots of snow this year. |
If you've ever had the joy of dividing bamboo... I took a sharp shovel with me and got a teeny bit of four of her varieties. The black bamboo would have needed a pick ax. ...and maybe very strong young men.
Nearby her is an old favorite restaurant of mine (and hers). My hubby and I came on the very first warm and sunny day and ate our dinners.
The sliding doors were open to the dappled shade along the Sandy River (very high this year).
My hubs had the famous chicken and dumplings. Which I can no longer eat (flour). My dinner was very tasty too. For the life of me, writing this, I can't recall what I ate.
I got to some of my weeding during my week off, but there is still lots to do.
Below are three medium sized blueberry plants. It has been so soggy that this section had to wait until the ground dried out a bit. Maybe in a week or two.
Right to the left of the weedy area is a section that looks all pretty in it's new barkdust coat.
The other morning, I awoke to this pretty picture out my bedroom window.
The Stearman got pulled out for some air.
The pink early morning air with my lovely Weigelia in front
I had forgotten how much I love volunteering. With my job, it's nearly impossible to commit to anything except getting through the long work days.
This one vendor, who is local, makes these awesome crowns. Because I was The Most Awesome Volunteer - ever-.
I have some escalating family problems, one in crisis mode. I also have one of the four clerks MIA for an indefinite time at work. Overtime will be the norm as if it wasn't already.
I am going to unblog for a while. I'll still be on Instagram more frequently (RocketGirl50). If you want to see my photos, that's a good place right now. I am seriously time challenged right now.
Trying to find time for sewing and unleashing my creative juices just got harder. If I do find a chance to make anything, I will try to blog just because I like the documentation and my notes.
Next week, I'll be visiting DD in Alaska, so I may have another go at blogging by iphone. Or, not. Photos seem to be more permanent on the blog (as a storage solution). We'll see how it goes.
We plan to go halibut fishing out of Homer and also a flight seeing trip around Denali. I'm especially looking forward to Denali as this has been an awesome snow year up there as well.
Keep well and have a delicious summer.
11 October, 2016
The T-Shirt Hack
My dear friend sent me this tshirt from Japan in a size large. Its a men's large. It fit me through the shoulders but the tummy area was bunched up and tight.
I needed a tshirt hack because I liked this color on me and it came from Japan!
So I started a Pinterest board. Pinterest helps me focus by being able to easily organize photo inspirations. The photos link back to where you found them, so if there is a tutorial, it's easy to find again by clicking on your saved photo.
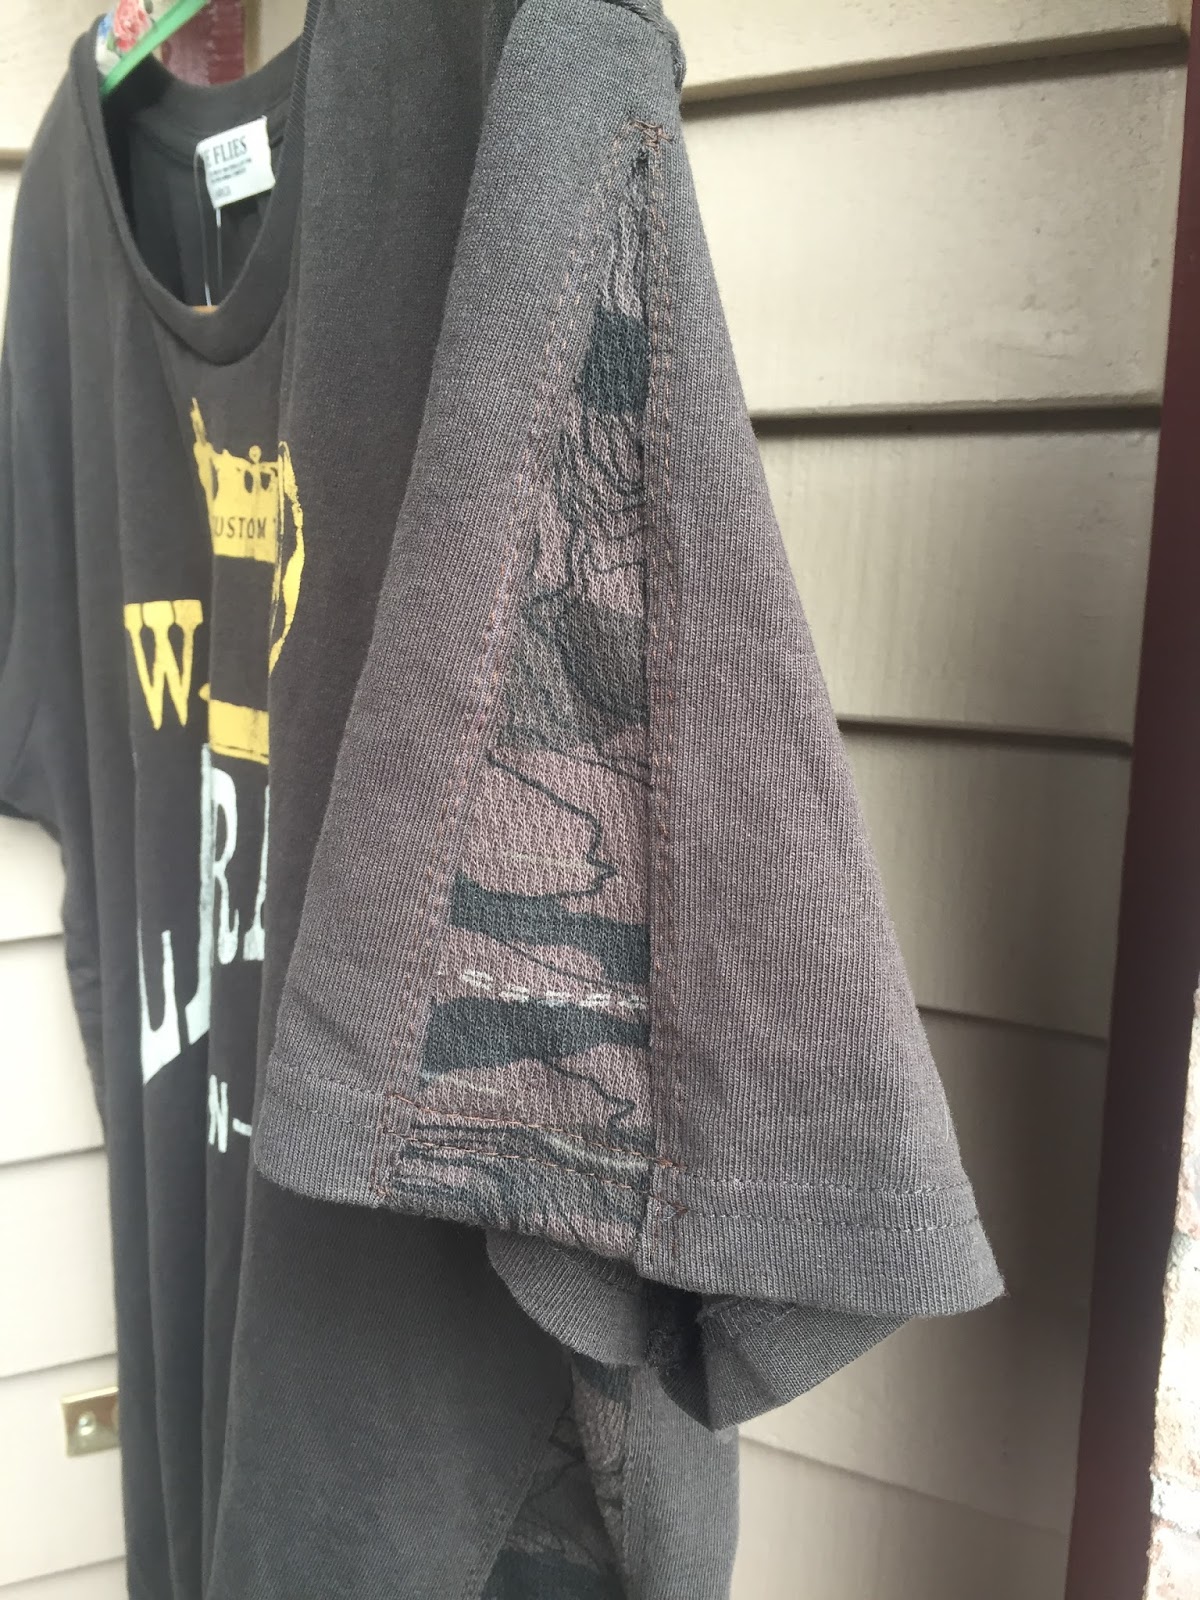
I started a Pinterest board called Tshirt hacks and I latched onto the long vertical triangle of added lace under the arm to give me room for my tummy.
Brown cotton lace - how hard could that be to find? If we were still in the late 70's - no problem. Here we are in the current year with only a few colors of cotton lace to be had.
Dyeing white to brown is more difficult than you know. Polyester lace would work for the look but is way too itchy.
I met up with Pencil Girl at Mill End Store in Beaverton, where we spent over an hour the year before to find some lace for her to try her tshirt overlay. It took just under an hour to find this camo knit instead.
I didn't mind a lace insert at the bra strap area because normally you aren't holding your arms above your head to flash people, although some people are more comfortable with flashing.
Also, the insert, right there at the bra strap area, would be pretty narrow. The point of the insert is a wider triangle at tummy and hips to allow for more room there.
| Side seam insert. |
| Sleeve insert |
It went in so easily. I decided to add a godet to the sleeves too. Godet - word of the day, pronounced Go-day. And it means a triangular piece of material inserted in a dress, shirt, or glove to make it flared or for ornamentation.
The side seam godet was for fitting better and the sleeve godet was purely for ornamentation.
Feeling pretty smug, I attacked the neckline too.
The side seam godet was for fitting better and the sleeve godet was purely for ornamentation.
Feeling pretty smug, I attacked the neckline too.
Don't you love this color brown? Except it's not brown as we discovered in the fabric store, it's a dark olive. Anyhoo, like all dark colors, it's a beast to photograph clearly.
1. I cut along the side seam from the hem up to about 1 inch from the sleeve seam.
2. Knits don't fray, so I decided to just sew closely on the edge of my tshirt fabric onto the godet.
3. I placed my tshirt onto my ironing board and laid a 5 inch wide piece of the godet fabric underneath. Maybe 1/2" above my top cut but below the sleeve seam, extending down past the hem. We bought 1/2 yard of this material because of the way the camo pattern ran. 18" x 5".
4. I started pinning. Very close to the edge and just eyeballing that my triangular line was straight.
5. On the side with the serged commercial seam, I trimmed it off at this point, cutting close to the stitching.
6. My hint? Run your pins down one side in one direction and up the other side in the opposite direction. I sewed from the hem up to the sleeve seam on the right side, pulling pins out as I did.
However, when I came around the top, my pins were now backwards to being able to pull them out head first. So place your pins in opposite directions.
| Bye, Bye, Care label |
7. I used a long stitch length - a basting length. There would not be any stretch going down but usually when you stitch on knits, making the length longer helps with the feed dogs and how the material feeds through. Almost forgot - I used a stretch needle too.
8. I had some concerns my new seam would curl on the edges inside and make me crazy wearing it, so I stitched another line of stitching about 1/8" away and then later trimmed the excess of my godet fabric close to that seam.
9. My godet width at the bottom of the hem ended up being 3 1/2" wide. I simply turned up my godet fabric a matching amount to my tshirt hem and sewed it down using that same 4.0 stitch. Again, not a lot of stretch here. If you're concerned, you can get out your cover stitch and make a more commercial stretchy hem finish.
10. Finally, trim off your excess godet fabric.
| You can see the double stitching here on the sleeve |
On a roll, I decided to attack the neckline too. Guys t-shirts hit me at the neck making me crazy. I don't like things around my neck.
I had pinned a hack showing how to turn a round neckline into a v-neckline. The technique said, and it's true, you can re-use the neckline binding up to 2 inches more stretch to make that deeper vee.
My machine design on the front of the shirt came close up on the neckline. I decided to keep the round shape but 1/2 - 3/4" lower.
And it worked. Remember, tshirt knit doesn't fray!
I snipped close to the binding from shoulder seam to shoulder seam (leave the back neck attached - just fooling around with the front side).
Then I folded my shirt in half, matching the shoulder points. I started cutting from the bottom about 1/2" - 3/4" down and just tapered my eyeball curve back to the original shoulder points. I might have been able to cut a little deeper except for my design. (Don't cut that off...).
Then I wonder clipped my neckline back onto the binding right on top of the serged edge.
I matched the centerpoint of the shirt to the binding centerpoint and also about 3" up on both sides of that. The binding is smaller than the shirt so you have to stretch the binding as you sew.
I basted it on with a 5.0 stitch on my pfaff. Looked at it. Awesome. Then I took it to my serger which had to be re-threaded in a dark color. I used black as I don't own dark brown serger cones. And I re-serged that seam.
All of these hacks took less than an hour to do. Yes. An hour.
| Time Flies on the logo |
The hem is a little long and I might change that, but since I'm working overtime, I haven't had a chance to wear it yet. Trying it on - it fits! So much better.
The most difficult part of t shirt hacking is finding the right fabric to coordinate.
Thanks for the shirt, Janine!
The camo knit matches so well, no one will be able to tell that I custom tailored it to my body.
***December 2016 update. This shirt is so soft. It was worth fussing around for an hour to make this fit me. None of the cut/sewn edges are curling, nor are they bugging me.
31 August, 2016
Japanese Laundry Hangers
I received Happy Mail last week on a very difficult day.
It is amazing what a little package can do.
Kyle, from Vacuuming The Lawn, sent me some labels to sew into a bag.
PLUS, a turquoise leather tassel that she made and some chalkoners - chalk markers that she bought because she likes them- she thought I might too. These chalk markers are to transfer different lines on your sewing pattern to your fabric. As you 'wheel' along, it dispenses chalk in a nice even line. The different colors are for dark and light fabrics. White won't show up on light colored fabric, so you could use the red or blue instead.
I have a white one from forty years ago that is very similar, but now they come in colors!
Now, I need to sew up a tote bag to do this tassel proud!
This is my other happy mail. While I was in Japan, I noted how everyone does laundry there and really liked the portability and the storability of these hangers.
Back in Oregon, can I find them? Only the tiny lingerie sized ones. Maybe 16-20 pegs.
These are around 50 pegs. They both fold up to about 16 inches square by 3" deep. Easy to store by the washer.
I had wanted a clothes umbrella tree for years to dry my laundry outside. This is not usual in the states as we all have electric dryers.
Looking for a place to put a line up, or an umbrella, or anything, it was always gonna be in the way. Of people's heads, of airplane clearance, in the way of the other person in this household.
What I like about these is the small footprint. I can hang them out on my patio and then take them in when the clothes are dry. They are in absolutely no ones way. Nor are they permanent.
The footprint is much smaller than a fold out laundry tree. My wind tunnel would blow over anything not secured - which just makes you cranky as you pick up laundry off the ground. Since these Japanese laundry hangers hook over something, they won't blow over.
I bought one in an aluminum frame. My friend in Kyoto and I both think this one will last the longest. The second one is plastic and the UV just kills these, making them brittle with age. The aluminum one also has clips that look like I can fix with household parts if they break.
I finally took the plunge and asked my Japanese friend to purchase two for me and I am so happy I did. Each rack will hold a small to medium load of laundry which is normal in my house nowadays. I can even hang them inside if a case of Oregon rain comes by.
And you get a peek at my laundry.
***last day......SALE continues in my friend's Etsy Shop;
CraftyTokyoMama on etsy. Use Coupon code AUGUST20 throughout the month of August to get 20% off your purchase.
Don't forget about Etsy Love - even if you don't buy anything - just hover over the heart on each listing and tap on it. (thanks!)
12 August, 2016
My Friend In Kyoto Is Having A Sale

I met my friend in Kyoto via the SewMamaSew Blog.
We have so much in common with her growing up near where I live now. Her family lives in Oregon but she met and married a Japanese
She has lived in Tokyo as well as other cities in Japan. She now makes her home in Kyoto which I visited a year ago in March of 2015.
She is in the process of building a house in Kyoto which is seriously different than building a house in Oregon. She blogs about it occasionally - the frustration of wanting a bathroom counter at "high" american standards instead of the lower japanese standard.
We both like to sew. And any other handcraft, for that matter. We love nature. When she travels back to the states to see her family, they make a beeline to camp out at Detroit Lake and make a family reunion of it.
She's having a sale in her etsy store this August of 20% off. Which is a really good deal.
Featuring many items made of Japanese fabrics, she can make you anything. She's that amazing. She usually adds something special to the package and will add Japanese stamps (better variety than in the states) to reflect your interests. I often see airplane stamps on my envelopes. Packaging is definitely an awesome superpower of hers.
The sale code is AUGUST20. Her store is called CraftyTokyoMama on etsy.
One item she makes is well-made shopping totes - Tight 'n Tidy Totes. I have two and they have lasted quite well. I keep one rolled up in my purse for amazing garage sale luck. Some of the people running sales are so amazed at my tote bag filled with goodies that they start offering me discounts right and left. lol
I notice her store is at 883 sales today. I had a goal of 1000 sales by Christmas last year and reached it in January 2016. I am passing this goal along to her.

Janine makes and sews Japanese Notebooks, book covers, shopping totes, handbags, etc.
She also knits and crochets.

I bought this adorable hedgehog fabric from her.
She also sells some of the amazing japanese fabrics she finds.
Here is my garage sale bag I keep rolled up in my purse.
It easily unfolds to a large size tote.
I get the best deals when I use this bag.
Even if you can't make up your mind what to buy, could you show Janine some etsy "Heart" love? Just hover over the heart on each photo in her etsy shop and tap on it. This "hearting" really helps move things up the queue in the etsy algorythms. (thanks!)
CraftyTokyoMama on etsy. Use Coupon code AUGUST20 throughout the month of August to get 20% off your purchase.
I would like to see her get to 1000 sales too.
30 July, 2016
Fabric Wrapped Rope Bowl
Complete with threads hanging off.
Benta and Janine challenged me to tackle fabric wrapped clothesline bowls.
I dreamed about it.
A red, white & blue bowl....
Actually, they didn't challenge me. They just thought about it. lol
This is how I start my bowls. I wrap it tight into a spiral and push straight pins in to secure.
This particular rope is a cheap one -- $5 for 100 feet, which will make a good sized bowl. It's cotton braided around a styrofoam core. I didn't have any problems sewing on it but I did use a size 14 needle. Anyhoo, my pins won't pierce the styrofoam so I insert them just enough to grab the cotton bits. The pins help to keep the spiral flat while starting the sewing.
I also put a spot of Fraycheck on the end so it doesn't 'fluff' up. You could use any glue.
I make my spiral about 2 inches in diameter and then zigzag around in tight circles and even going back over the initial circles twice and then start going round and round. It's important to have the tail come off on the right hand side so you can zigzag in a continuous spiral.
I really didn't want to mess with strips of fabric, getting tangled trying to wrap the cording.
And I was right. It is a bother.
So, in my dreams the other night, my bowl was designed with three rounds each of red, white & blue. With the rest of the bowl being the natural cotton clothesline.
I robbed my scrap basket - no real fabric was harmed in the making of this bowl. However, blue became turquoise, because there is no other color of blue in my scrap basket.
And just plain white up to my fabric strip colors felt wrong, so I switched threads and bobbin and put some red into the bottom of this bowl when the base was still flat.
I really like my knot finish on this bowl too. Three stripes, three knots?
Overall, I like this bowl. I'm not in love with it though.
It feels unwieldy big. And the contrast between the natural white and the fabric colors is more intense. Just using thread feels more modern and trendy.
I do like how the handles
I can't say that I'm done with these bowls. They are amazingly fast and give such awesome results. They feed my need to make a craft in my small amount of free time. This fabric wrapped bowl took just over two hours. Just using thread is half the time. Big bang for my creativity.
I still need to trim thread tails and this bowl will go on the completed pile.
My friend in Japan sent me an awesome t-shirt: SEW Elaborately Days - complete with vintage sewing machine.
Last, but not least, Fabric sale tomorrow in the church parking lot (??!!).
I'm gonna take my bike (3 miles into town) so I can behave myself.
With my tiny biking backpack.
hahaahahahahahahahahaha.
Subscribe to:
Posts (Atom)