Showing posts with label biplane. Show all posts

19 December, 2016

Candy Airplane Tutorial


I thought it was easy enough to look at my photos of my candy airplanes in order to make your own and then I got a couple of emails questioning how I put it together.

Supply list:
Fuselage: Baby Ruths or other 'stiff' long candy bars.
Wings: Air Heads
Wing support and tail empennage: Single Starbursts
Wheels: Rolos
Propeller: Taffy or mini Tootsie Rolls
Big pile of hot glue sticks
(and your hot glue gun).

You'll need a Baby Ruth or any other candy bar that is long like a fuselage. Almond Joys used to not work because they are two pieces and it's not stiff enough to use as a fuselage. I noticed last time at the store they have added a stiffer cardboard to the bottom for support.
I've used starbursts, Uno bars - anything that is long and will support the wings.

The AirHeads work well for the wings. In fact, sometime I make single wing aircraft. I haven't really found a substitute for these. In the USA, they are usually sold six strips to a pack - meaning you can get three biplanes out of a pack.

Starburst sold in the big pack. Alternatively, you can buy the single pack and use these. Less expensive to buy the big package. These will support your second wing and also look like a tail on the fuselage.

Rolos, individually wrapped in the big package. Haven't found an alternative for these either. They are round and look like wheels.

The propeller can be made with salt water taffy or mini tootsie rolls. Any candy with paper twisted at the ends will work.

Gather your candy and hot glue gun. It's usually cold when I make these so the glue gets brittle or doesn't bond well with the plastic candy wrappers. These are slightly fragile with tails popping off occasionally. Especially in transit, moving airplanes to their new homes.  Easy fix though.


I also used a (free) priority mailing box, kept flat, on my table to catch any hot glue.


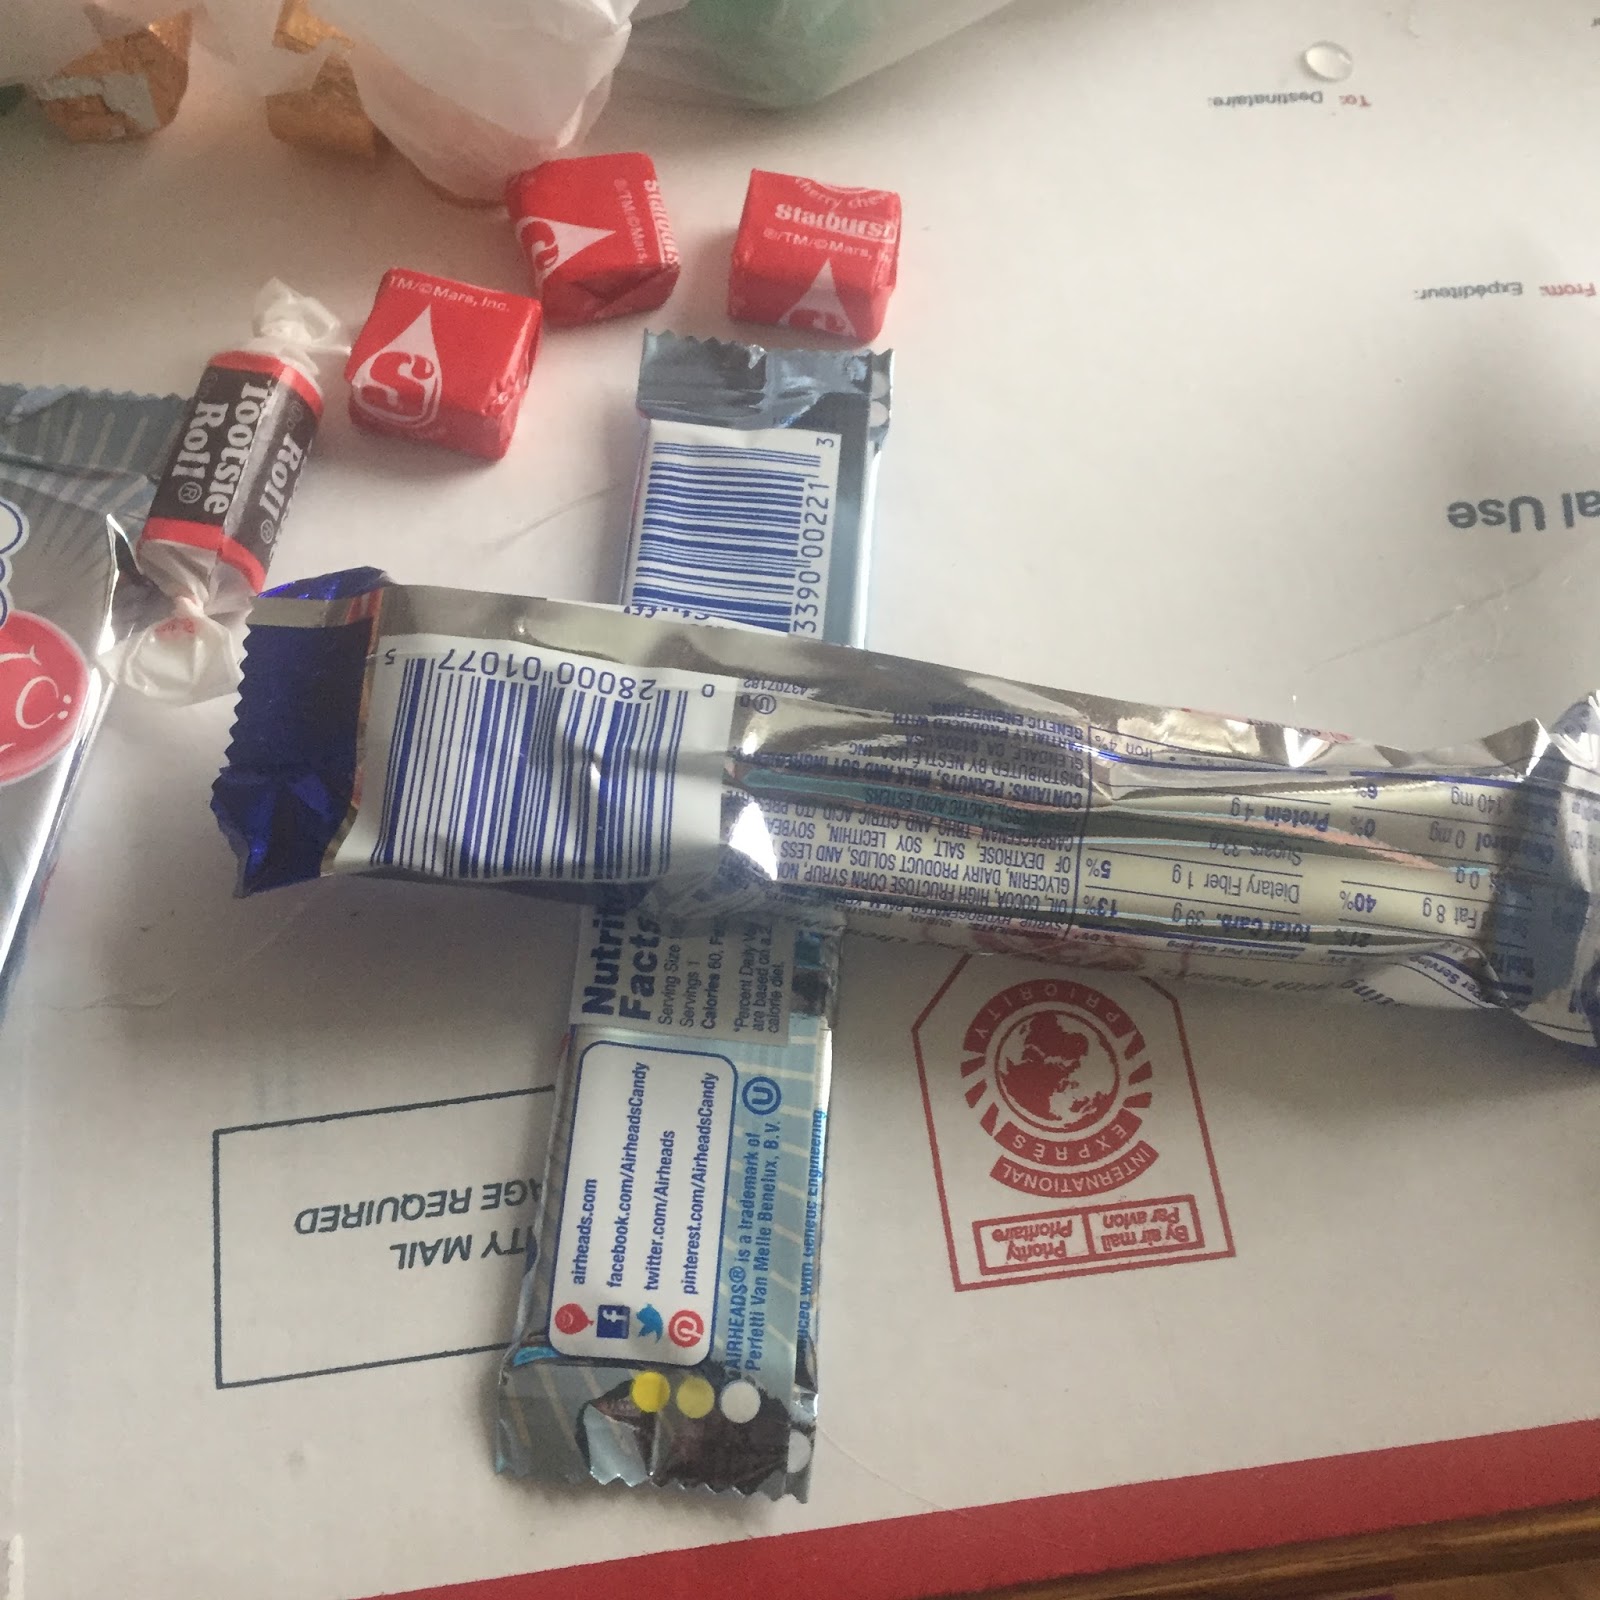
 Put a blob of glue on top of your candy fuselage about 2 inches from one end. Attach one Airhead strip. This is your top wing.


 Flip the candy bar over and attach a starburst not quite at the end of the wing.


 Blobs of glue on both starburst wing supports and also on the candy fuselage and attach bottom wing. Work quickly as glue doesn't really bond with wrappers. You need to place three blobs of glue and place that bottom wing on. I touch each place where the glue is underneath to make sure it connects.


Attach rolo wheels too on this bottom wing.
Either together or about an half-inch apart. Kinda on either side of the fuselage.

There's no wrong way or right way. If your rolos are turned the other way, it will still work.


 Turn plane upright. Add tootsie roll to front of fuselage candy bar.
 

Sometimes, there is empty space up there. In the case of the Baby Ruth, the wrapper was enough support for the propeller Tootsie roll. If it isn't, then use more hot glue to bring empty front space closer to main fuselage.

You're gonna use a lot of hot glue sticks.


 Finally, add another starburst to back of candy fuselage to indicate a tail empennage.


I don't buy candy ahead of time but I do look for the best deals. These babyruths were 2/$1.00 whereas regular candy bars are almost a dollar each.

The big package of starburst were enough to make nearly 50 biplanes.
The package of rolos would have been enough except someone got into them.
The airheads? Who eats these anyway? I actually cleaned out my fred meyers for awhile.
I've used salt water taffy before but I really like the look of the mini tootsie rolls.

There's no wrong way or right way.

Be creative with your candy choices.

Maybe go on to making trains and other funmobiles.

Train wheels are round Mints - York or Pearsons. Peppermints.

Image result for candy trains image

Image result for candy trains image

Image result for candy airplanes image

Image result for candy planes image

14 August, 2016

Route 66


 My host-sister, Maria,  is visiting the USA from Finland. She and her boyfriend are running motorcycles down Route 66 - from Chicago to LA.  She's been to the states before but never to Oregon.

She's coming in September and I am way past due on getting something out to her in time. One of these pouches is leaving Monday trying to get to her in time to use on her trip. On a good note, my last three international packages took only five days to Europe and Japan (faster than the normal 8 - 10 days).

I was an exchange student to Finland back in high school for an entire year.  When I visited Sweden and Finland a few years back, I stayed with both of my host-sisters.


 I sewed the turquoise atomic age bag first and then cranked out the two Route 66 pouches. I raided stash for everything except the Route 66 fabric. I bought this two months **cough** ago.

Unlike the turquoise Atomic Age bag, the Route 66 fabric is clearly not my normal colorway so I jazzed it up with pink candystripe lining and pin zippers.

One to mail and two for the etsy shop.


 Out in my garden this morning BEFORE it got hot, I weeded and watered and took these photos of one of my Swan Island Dahlias and my favorite rose; Just Joey. My great-aunt Ruby swore this was the best-smelling rose of all-time, so when I found one,  I jumped on it.


The Swan Island Dahlia Festival is cranking up for it's Labor Day festivities with Fun Runs and Photo competitions and etc. If you're nearby Canbyland, this is a wonderful, free event. You don't have to wait for the festival - the flowers are blooming their heads off already.


I tried to get Rusty to pose and he barked at me- telling me to stop pushing him around.


SALE continues in my friend's Etsy Shop;
CraftyTokyoMama
on etsy. Use Coupon code AUGUST20 throughout the month of August to get 20% off your purchase.

Don't forget about Etsy Love - even if you don't buy anything - just hover over the heart on each listing and tap on it. (thanks!)

11 May, 2016

Crafty Tokyo Mama Thank You


Way back in March, I received some early birthday gifts from my dear friend in Kyoto. She knows my fondness for airplanes and fabric and regularly indulges me.


How perfect is this biplane postcard? We never see such cuteness here in the states.

Except - after I put it together and was getting ready to toss the punchout, I noticed it was made by HALLMARK! In China. We have Hallmarks here. I think Hallmark originated here in the states. Do we have awesome biplane postcards? No.


 And she sent me a second biplane - from the DAISO store!
Daiso helps make some  sweet packaging. Everything Janine sends me is perfectly wrapped in kawaii cuteness.. Stitckers, patterned bags, you name it. I need a Daiso store of my own!
{I save all her packaging to re-use}


Even her postal stamps she chooses are perfect. 
Airplanes, japanese geishas, Mail boxes (Red cylinder at bottom left)


She covered a journal book in awesome airplane fabric and then gifted me with the same airplane timetables fabric to play with.  :-)

Look at that Kawaii airplane ribbon.


She always picks out items with birds in them too.
Her parakeet, Trixie, just passed away. Trixie was one extraordinary pet.


When I am putting together a gift to send to her, I keep a lookout for bird fabrics and western/patriotic items. TV series and movies.


 She sent me some socks, a tiny coin purse she sewed for me and two doilies she crocheted for me - such beautiful colors.

My gifts all comes with origami notes, cute notepaper that can fold into shapes. I think she sent me eight different happy mail items. I feel well loved by her thoughtfulness.

This is where we are not similar - I usually am cramming as much as I can into a flat rate package to send to Japan. I'm still learning to put washi tape on my etsy orders...


 She also sent me some Japanese patterns which are read right to left from the top to the bottom and then over to the left. You follow the pictures in numerical order.
This one was for the four pocket card case.


 This one is for a tissue holder.
 

In Japan, you must carry your own tissues and a cloth for wiping your hands for when You are out and about and need to use the restroom. Toilet paper and towels are a rarity in public bathrooms. Of course, you need cute tissue holder accessories.

Again, she sent me the extra fabric - you obviously notice the airplanes?


See the Hallmark logo in the bottom right?
 Janine and I met online via the SewMamaSew Giveaway Day. Several years ago now.

I read her blog, She read mine. We both sew. We both like old things. She grew up just south of where I live. Her family is all in Oregon. We had many similar ideas and dreams.

We managed to meet up here in Oregon a couple of times.

I visited her in Japan a year ago and got to see her for an extended time. You can view many of my blog posts about Japan during the last two weeks of March 2015 by looking in my blog archives (sidebar). Her time in Oregon is packed with family events so it was real delight to spend more time with her when I visited Kyoto. I feel like I've know her all my life.

My niece has recently moved to Singapore. To get there, most flights go through Tokyo. I am making plans for returning to Tokyo. {My niece has a Daiso store in Singapore}.


01 December, 2015

Jewelry Roll For Traveling


 This was my bigger project on Sunday for Bag It (Elm Street Quilts).
It's ginormous.


It folds up nicely though.

I did some patchwork on the front of the linen. This is where I was bogging down earlier. The fabrics I was choosing weren't giving the effect I was after and the trouble was - I didn't know the effect I was after.

I auditioned several fabrics knowing I wanted a background where jewelry didn't get camouflaged. I wanted the outer to look like you'd want to put it in your luggage. I finally settled on linen for the outer with some scrappy patchwork dressing it  down  up 
. I wanted each zipper to be a different color for easier organizing.

Sunday - I sewed this up and discovered it has a double layer of batting which makes it even more ginormous than just the size. I don't wear chunky jewelry. I wear small stuff and when I am traveling, I am attempting to carry less.  After finishing it, and writing this blog post, this is going straight to the etsy shop as a sample sale item.

 You can see some of my extensive collection of airplane jewelry swimming in this jewelry roll.


One of my favorite pieces, a bracelet of  airplanes with tow bars pulling them.

 You can use the ties to hang it vertically from a hotel hanger to see at a glance what you remembered to bring with you on your trip.


"I flew with Cap'n Mac" ( A doctor who gives biplane rides in the summer on the West Coast)

 I haven't pressed this, nor do I care. I was done even before I put the binding on.
I used this tutorial and, if, I were to make this again, I would size it down 50%. It's finished measurement is around 21" long x 12" wide. I lost some height by thinking my vinyl was going to be too long and I wanted the symmetry (same distance) from pocket to pocket.  In other words, I had a sewing panic attack.


I like the concept of a jewelry roll but I don't need one this big. If the idea is to separate your pieces to avoid entanglements, then this was a fail. Mostly because I am not a chunky jewelry wearing person. My little pieces are lonely.


I like my fabric choices though; the pins and earrings show up well on this turquoise fabric. The linen shows up as more elegant, the patchwork brings it down to my level.

I wish I had changed threads in my machine or even hand-sewn colored lines on the outer linen. I did four quilting lines in gold and they do not show up. They would look more awesome in heavier thread  - sashiko stitching across in orange and turquoise colors.

I used some pre-made vintage binding because I was already reading the signs on the wall on this project and it's sewn nicely but not neatly.


Although, one could use this to store electronic devices and all their assorted cords....

24 September, 2015

Last Flight 2015


The sky was just gorgeous with these streams of cottonball clouds.
I started taking photos from my back yard and decided to post most of them from our flight tonight.

Because the sky was outstanding. It outperformed itself.


First stop was fueling up the plane at a little strip just southwest of us. We pump our own avgas. I attach a cable to some random metal part of the airplane to ground it, so sparks don't have an electrical moment. Then I run the fuel nozzle hose over to the plane. Hubby has a board that straddles the front cockpit to stand on. The fuel tank is in the center section of the upper wing.

Keep looking at those clouds.


The lighting was good enough to get a sorry photo of Mt. Hood - still naked.


And off we go again. Sometimes, I wish I had a camera good enough to capture the almost full moon like Teresa does. I have a little Nikon Coolpix. It does alright. Most importantly, it has a strap. Because the slipstream is fierce outside the cockpit and will whip that camera out of your hand in a nanosecond.


I saw these two trees in a newly tilled field and look at the long shadows.


The lighting was great. Shadows on the wing, detail down below, not too much haze.


 Another of Mt. Hood. Dusk is a great time to take photos to avoid the haziest parts of the day.


We flew around for forty minutes or so, to get the engine oil all warmed up.
It's good for the engine, and for us.

Mostly, we flew south and east  and then back to Canbyland.

The sun started its descent and I started getting the best photos.


 The sun playing with those lovely clouds.


 Reflections off the wings.


 This might be my favorite shot tonight.


Almost home. That's my airpark - center in the photo above.
You can pick out the line of houses, in front of them is the grass runway (red line)
.
I'm near the end of the street, it's about 1/2 mile long.