Showing posts with label candy. Show all posts

01 October, 2017

M and M Bags


 I've made several of these lately. All scrap except for the zipper. I've made them with straight sides and a logo (bottom panel) stitched to the lining. I've boxed the corners for a softer, rounder, coin purse shape. This time, I kept my bag intact at the middle and did some fiddly zipper sewing. These lie flatter. Overall, I'm liking the resulting shape.

The candy people have encased their M&M's in plastic. I suppose it keeps the candy fresher - longer. I saw a tutorial about re-purposing these bags years ago but it involved iron-on vinyl to give strength to the paper/plastic bag. The plastic nowadays is pretty tough - especially for a novelty purse. Who wants to deal with possible melted plastic on their iron - glad to have skipped straight past a vinyl overlay.


That's my cut basil as a backdrop. We won't get a freeze until November so I'll probably get one more cutting in before the basil dissolves into mush.


 I am supposed to be finishing these lipsense bags with the cute hedgehog. But I hit a zipper end roadblock. I don't like how they appear, how they came together - at all. I think I have figured out what to do to make them work, but it involves seam ripping and a few choice words.


This is my first end. It disappears into the side seam, but could flip up raw if you were, somehow, to push up into that corner.


 My second end - I sewed a fabric tab onto the end of the zipper. It's all bulky and bunches up there.
Don't like that one neither.

 I'm gonna try my third thing to remove some fabric bulk and then just get on with my life.

These bags are for Lipsense Lipsticks and will be sold in my etsy shop. That's why I'm making my sewing life miserable. I want these to look awesome - like the first one I sold. I'm over-thinking these zipper ends - that's for sure. Why I derailed for sewing candy bags.


Some fall garden photos.


Volunteer Putunia

 My exciting still life of fresh tomatoes and purple grapes nestled on a bed of basil. yep.


Ice Cream sundae Hydrangea


Cosmo plus some awesome raspberries

We've had some recent rains which helps to throw everything onto the ground.
Most of the sunflowers are in resistance.  This dahlia is so much fun. It has been my favorite this year.


  I had a chance to attend my local library book sale and really hit the jackpot. This is my first haul. Some are destined to be Christmas presents, Some will wing their way over to Japan. Some will be read. And one will be sold on Amazon to pay for the lot.

I actually went back when I had to return to work in the afternoon and got a second (and much bigger) haul. It was a really good sale.

Linking up with Elm Street Quilts - 2017 bag competition.

19 December, 2016

Candy Airplane Tutorial


I thought it was easy enough to look at my photos of my candy airplanes in order to make your own and then I got a couple of emails questioning how I put it together.

Supply list:
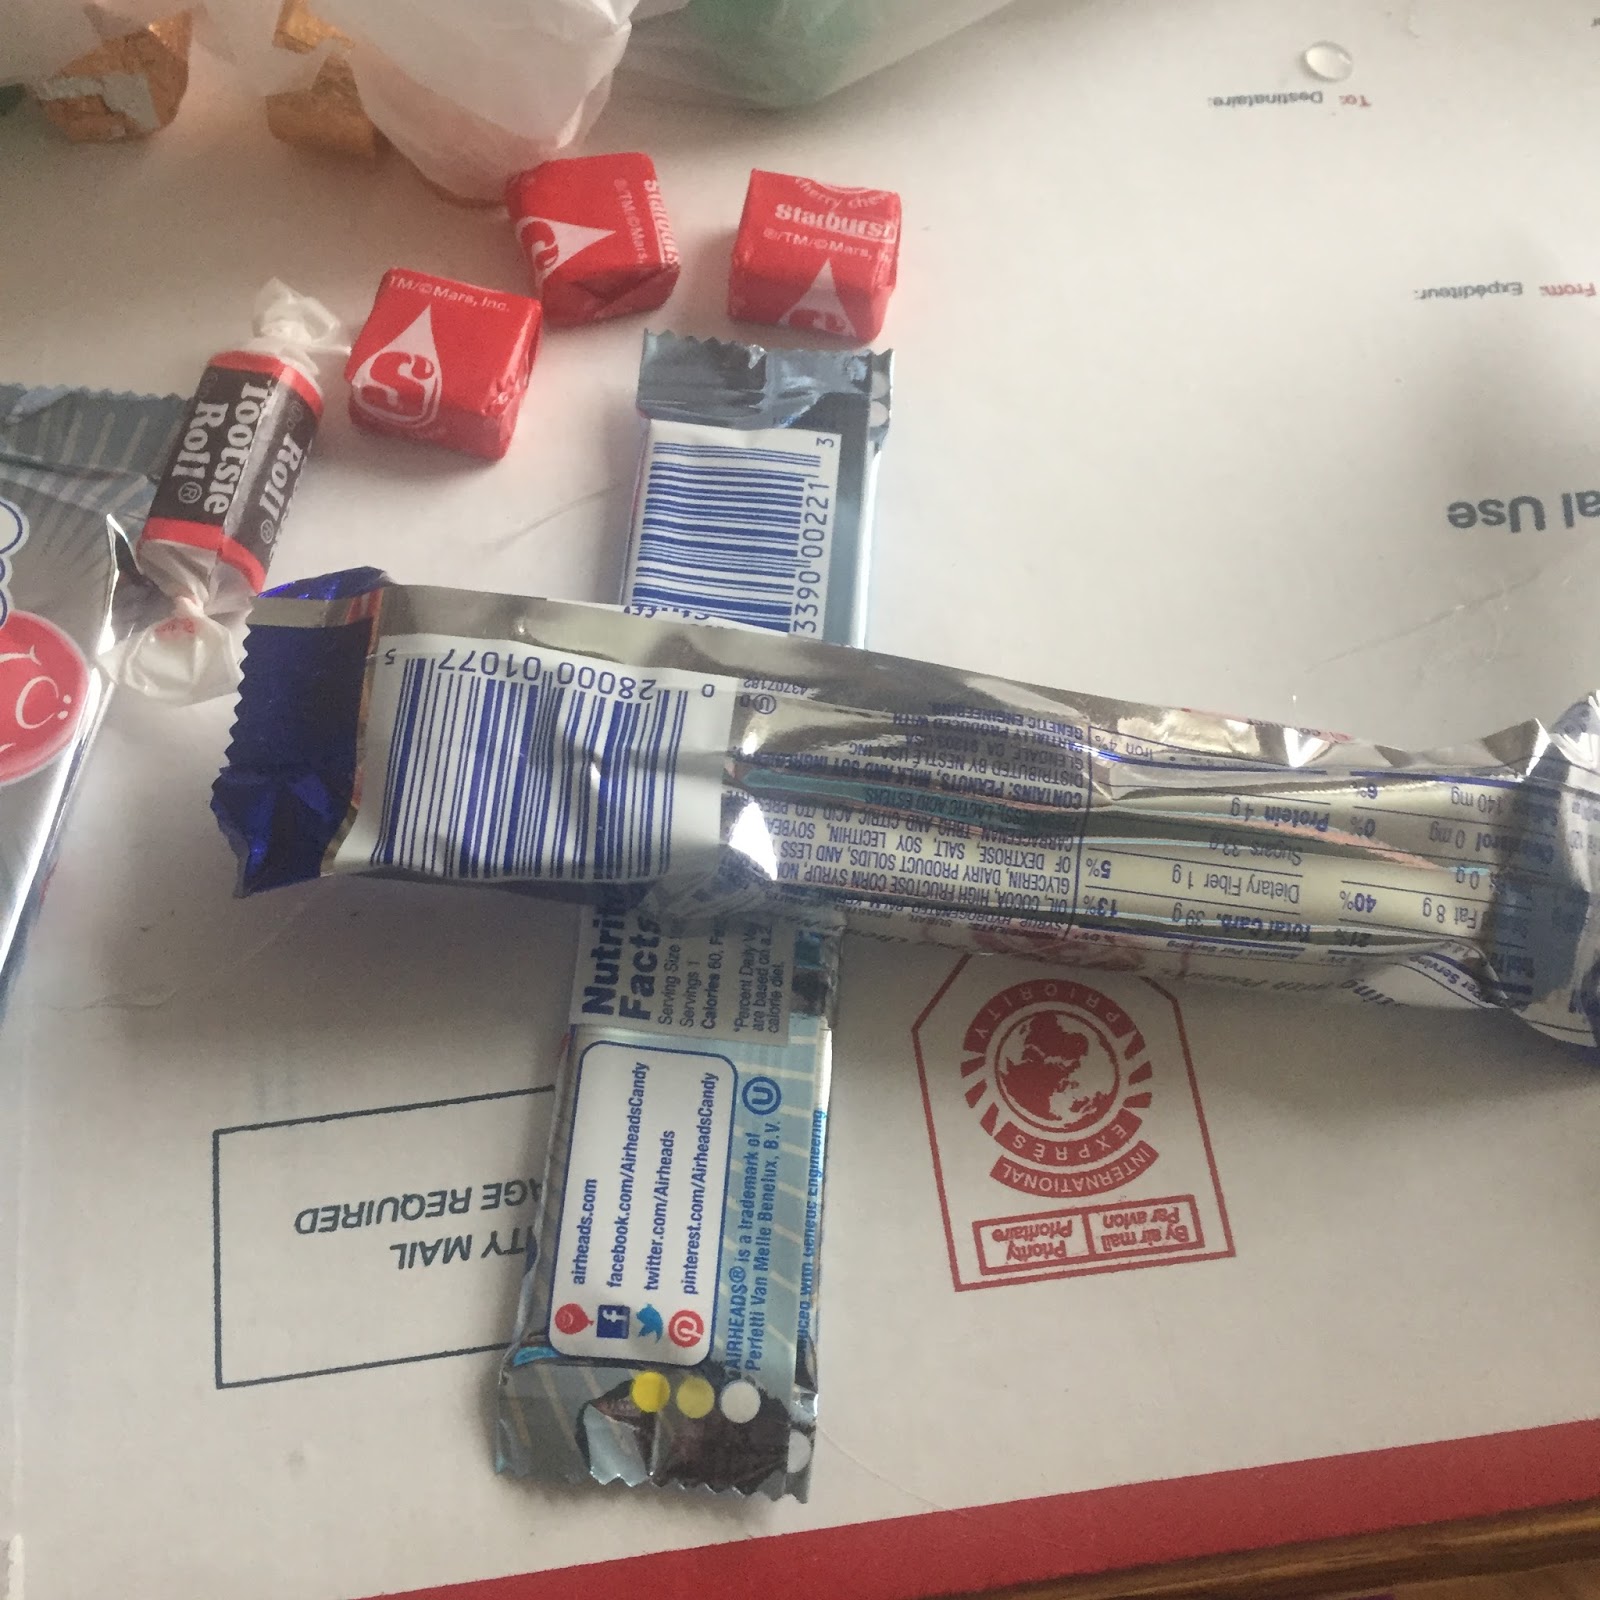
Fuselage: Baby Ruths or other 'stiff' long candy bars.
Wings: Air Heads
Wing support and tail empennage: Single Starbursts
Wheels: Rolos
Propeller: Taffy or mini Tootsie Rolls
Big pile of hot glue sticks
(and your hot glue gun).

You'll need a Baby Ruth or any other candy bar that is long like a fuselage. Almond Joys used to not work because they are two pieces and it's not stiff enough to use as a fuselage. I noticed last time at the store they have added a stiffer cardboard to the bottom for support.
I've used starbursts, Uno bars - anything that is long and will support the wings.

The AirHeads work well for the wings. In fact, sometime I make single wing aircraft. I haven't really found a substitute for these. In the USA, they are usually sold six strips to a pack - meaning you can get three biplanes out of a pack.

Starburst sold in the big pack. Alternatively, you can buy the single pack and use these. Less expensive to buy the big package. These will support your second wing and also look like a tail on the fuselage.

Rolos, individually wrapped in the big package. Haven't found an alternative for these either. They are round and look like wheels.

The propeller can be made with salt water taffy or mini tootsie rolls. Any candy with paper twisted at the ends will work.

Gather your candy and hot glue gun. It's usually cold when I make these so the glue gets brittle or doesn't bond well with the plastic candy wrappers. These are slightly fragile with tails popping off occasionally. Especially in transit, moving airplanes to their new homes.  Easy fix though.


I also used a (free) priority mailing box, kept flat, on my table to catch any hot glue.


 Put a blob of glue on top of your candy fuselage about 2 inches from one end. Attach one Airhead strip. This is your top wing.


 Flip the candy bar over and attach a starburst not quite at the end of the wing.


 Blobs of glue on both starburst wing supports and also on the candy fuselage and attach bottom wing. Work quickly as glue doesn't really bond with wrappers. You need to place three blobs of glue and place that bottom wing on. I touch each place where the glue is underneath to make sure it connects.


Attach rolo wheels too on this bottom wing.
Either together or about an half-inch apart. Kinda on either side of the fuselage.

There's no wrong way or right way. If your rolos are turned the other way, it will still work.


 Turn plane upright. Add tootsie roll to front of fuselage candy bar.
 

Sometimes, there is empty space up there. In the case of the Baby Ruth, the wrapper was enough support for the propeller Tootsie roll. If it isn't, then use more hot glue to bring empty front space closer to main fuselage.

You're gonna use a lot of hot glue sticks.


 Finally, add another starburst to back of candy fuselage to indicate a tail empennage.


I don't buy candy ahead of time but I do look for the best deals. These babyruths were 2/$1.00 whereas regular candy bars are almost a dollar each.

The big package of starburst were enough to make nearly 50 biplanes.
The package of rolos would have been enough except someone got into them.
The airheads? Who eats these anyway? I actually cleaned out my fred meyers for awhile.
I've used salt water taffy before but I really like the look of the mini tootsie rolls.

There's no wrong way or right way.

Be creative with your candy choices.

Maybe go on to making trains and other funmobiles.

Train wheels are round Mints - York or Pearsons. Peppermints.

Image result for candy trains image

Image result for candy trains image

Image result for candy airplanes image

Image result for candy planes image

30 November, 2016

Random Makings


I made over 20 biplanes Saturday while watching the new Gilmore Girls special on Netflix. I need to make about ten more. Most will go to my co-workers so they remember Santa delivers in an airplane, as we all know.

 I also finished Miss Peregrine's Home For Peculiar Children.  I feel I am ready for the movie now. My DD told me the second book was so-so. I am giving myself a pass at slogging through this next book and returning to my winter reading. I am particularly into Peter James right now. He writes police detective books out of the UK. I've read two so far as it's been difficult to find at my local libraries.

Those two - Looking Good Dead & Love You Dead were good enough for me to have an ebay moment and I bought both for my mom as a Christmas gift. Powell's Book Store (might be the largest book store in the world - right here in Portland) did not have a single Peter James book.
 

 Because I also bought books through Powell's because their cyber/black friday special was free shipping plus 20% off. Deal!


 The dentist office had a few magazines - this one with two whole joke pages.
And the roses above. Blooming madly in our 50-60 degree November weather.


"Why is Cinderella so bad at Soccer? She's always running away from the ball"
I need more jokes for the kids at work. My co-workers too.


 DD with her inch of snow up in Alaska.

 In September with her cousins in Minnesota.


And the great-nieces in Singapore. They made that awesome turkey!

Lots  more randomness, but I am back working 12 hr days with a one hour lunch and I am tired. Co-worker has a dental emergency involving an IV drip, a hospital, and the eventual resolution of said crisis. Wouldn't wanna be her.

The last Christmas Bazaar in our area is the Red Mitten Bazaar. Opening tonight for a preview ($3/donation). Running two weekends -- Thursday through Sunday. All handmade wonders. No imported stuff.

16 November, 2016

Holiday Candy Dish


 I had a small ball of clothesline left over from my last rope bowl. As I was sewing a medium sized gift last Saturday, I kept bumping into it. And then I saw a rope bowl online that used small strips of fabric wrapping to provide color and Voila!  --- another 20 minute gift completed.

I used one- inch strips of fabric from my scrap basket. I originally pulled whatever colors that got my eye and then as I was sitting down, ruminating on the purpose of this gift, I decided to just do red strips.

These strips are between 4 and 5 inches long - little pops of color on the neutral base.

Finishing off, I did  a little loop with the intention of doing four more. My process is very organic. As I was marking those four spots for the loops, I decided it was such a small candy dish size bowl , that it just needed two loops, which organically, ended in the spiral thingy.

While photographing the bowl for this post, the candy dish looked slightly "off". In a massive "Aha!" moment, I stitched that weird spiral down against the side and now I am very happy with my newest rope bowl.


Styled with my beautiful persimmons. I am waiting for the persimmons to become ripe which actually occurred slightly after Thanksgiving last year. The yellow will  become more orange and there will be a slight give to the fruit when you handle them.