Showing posts with label bag it. Show all posts

01 December, 2015

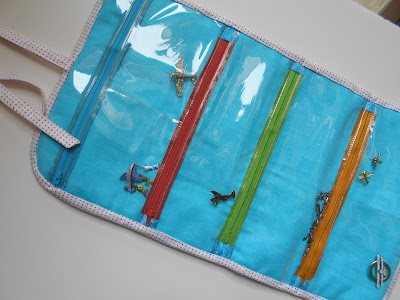
Jewelry Roll For Traveling


 This was my bigger project on Sunday for Bag It (Elm Street Quilts).
It's ginormous.


It folds up nicely though.

I did some patchwork on the front of the linen. This is where I was bogging down earlier. The fabrics I was choosing weren't giving the effect I was after and the trouble was - I didn't know the effect I was after.

I auditioned several fabrics knowing I wanted a background where jewelry didn't get camouflaged. I wanted the outer to look like you'd want to put it in your luggage. I finally settled on linen for the outer with some scrappy patchwork dressing it  down  up 
. I wanted each zipper to be a different color for easier organizing.

Sunday - I sewed this up and discovered it has a double layer of batting which makes it even more ginormous than just the size. I don't wear chunky jewelry. I wear small stuff and when I am traveling, I am attempting to carry less.  After finishing it, and writing this blog post, this is going straight to the etsy shop as a sample sale item.

 You can see some of my extensive collection of airplane jewelry swimming in this jewelry roll.


One of my favorite pieces, a bracelet of  airplanes with tow bars pulling them.

 You can use the ties to hang it vertically from a hotel hanger to see at a glance what you remembered to bring with you on your trip.


"I flew with Cap'n Mac" ( A doctor who gives biplane rides in the summer on the West Coast)

 I haven't pressed this, nor do I care. I was done even before I put the binding on.
I used this tutorial and, if, I were to make this again, I would size it down 50%. It's finished measurement is around 21" long x 12" wide. I lost some height by thinking my vinyl was going to be too long and I wanted the symmetry (same distance) from pocket to pocket.  In other words, I had a sewing panic attack.


I like the concept of a jewelry roll but I don't need one this big. If the idea is to separate your pieces to avoid entanglements, then this was a fail. Mostly because I am not a chunky jewelry wearing person. My little pieces are lonely.


I like my fabric choices though; the pins and earrings show up well on this turquoise fabric. The linen shows up as more elegant, the patchwork brings it down to my level.

I wish I had changed threads in my machine or even hand-sewn colored lines on the outer linen. I did four quilting lines in gold and they do not show up. They would look more awesome in heavier thread  - sashiko stitching across in orange and turquoise colors.

I used some pre-made vintage binding because I was already reading the signs on the wall on this project and it's sewn nicely but not neatly.


Although, one could use this to store electronic devices and all their assorted cords....

29 November, 2015

BAG IT Vinyl Sewing and Helpful Hints


For this last week of BAG IT with Elm Street Quilts, I have had little time to sew. I did enjoy a drama-free Thanksgiving at my house and I was thankful for those relatives who understand this is now a requirement.

I tried to sew on Thanksgiving as it was a day off work but got bogged down with fabric dithering and decided to just roll with it. Today, I managed to get myself into the sewing room where fabric choices were made quickly and sewing commenced.

My big project is a jewelry bag. I still need to hand-sew the binding down.
 

 I needed a quick & dirty project to 'cleanse my sewing palate' and these two small earbud pouches were sewn without too much fuss. I sized up on the second one as I don't need an earbud pouch. I like Erin's Circle Pouch better. I especially like the heart variation of her small circle pouch.

In any case, a larger see-thru vinyl pouch will be sure to fit in someone's stocking.


I totally stole Janine's idea, utilizing the lace zipper in these. 

It added a bit of polish to these easy bags.


I quilted the back - the diagonal stitching looks best.

Even with my teflon foot, the foot was grabbing at the vinyl during top-stitching, causing the threads to feed oddly. See bottom row of stitching. See those gold dots at bottom? This is the gold top stitching thread being pulled to the bottom. Lessening the bobbin tension might help?

 I had some trouble stitching on this vinyl and I have a little list that could help you sew with vinyl.

1. Sew vinyl with tissue paper underneath or on top or use fabric so vinyl doesn't get stuck on your feed dogs or machine foot. The tissue tears off easily.
Try to sandwich your vinyl in fabric.

2. Use a longer stitch length. This helps when you are navigating different thicknesses in your project. The longer stitch length also keeps things from going to perforated in a heart beat - where the vinyl has so many holes - it tears away from your project.

3. If you own a teflon foot, now is the time to bring it out. It tends to slide over the vinyl rather than your usual foot which grabs.

4. If you don't own a teflon foot, use some post its stuck on your sewing surface with just the feed dogs showing. Some people have used scotch tape on both the bed and underneath side of the foot.


5. My friend who sews with Michael Curry Design (Think giant disney characters and Macy's Thanksgiving Parade)has offered up using K-Y Jelly. You smear it on the vinyl so it doesn't stick and we are officially at TMI.


6. USE A SHARP NEEDLE - A NEW ONE. Don't use a dull one.

7. I had better luck with thicker vinyl bought at fabric store. It comes in guages - I have totally forgotten which one I bought but it's on the thicker side. When I first sewed with vinyl, I  used the vinyl bag I got bed linens in and had a lot of trouble sewing with that thinner vinyl.

8. Use your walking foot to help feed evenly. I have a pfaff which uses the IDT system. It helps keep things from grabbing so much too.

9. No Pins. Anything that leaves holes in the vinyl is to  be avoided. I like to use my Clover Wonder Clips - as long as they are used inside the seam allowance.


The little bag measures 5.5" wide x 4" tall.
The larger bag measures 6.25" w x 5" tall.


22 November, 2015

Retreat Bags


I cut into my cherished Echino Airplanes (Kokka).
They have been waiting to be used for several years. They were folded carefully and then tied off with twine.  Lovely to pet.

The blue jumped to be first up in making Retreat Bags. The Retreat Bag is a free pattern from Emmaline Bags. She has awesome bag bling too. The bag utilizes wire frames to keep the bag open wide


 Emmaline Bags carries those zipper ends. So much easier to use than sewing fabric tabs onto the ends. These look very polished. The airplane charm was traded for.


 Those wire frames really help to keep the bag open. I made a second one in the elephant fabric that i recently used in a boxy bag because it was out.

I made a New Year's resolution to use up fabrics once I took them out of stash. To keep sewing until it was used up. But I can't do it.

I was able to cut into my blue echino airplane but I can't cut anymore. I am overwhelmed with the need to save it and parsimoniously eke it out in various small projects to the end of time.


Similar sized bags with long zippers.
 

The boxy bag is  similar to a men's Dopp Bag. I really like the Retreat Bag better as it opens wide to allow you to see all the contents at once. The boxy bag can be a black hole.

Each bag has it's own version of a handle. I've added carrying handles to the Retreat bag before for my great-nieces. The Retreat Bag is easy to pick up and carry because of the wire frames.


 You can add two slip pockets. I added two in the airplane bag, one for the elephant, and none at all for the great-nieces.

You could dress it up with a zipper pocket inside and even on the outside. The bag starts out at 13 1/2" across but the available pocket room is around 6 inches (centered) x 4" deep.

For this Echino fabric - not a quilting cotton - more like a canvas - I wanted a zipper with metal teeth and I was a little frustrated that I couldn't find one in the right color. You have to understand I have at least 200+ zips in my stash. I scored a big zipper haul earlier in the summer at an estate sale. I was going to settle for an off-white one with #5 nylon teeth (big teeth) but then I found this orange which was the right orange.

There was a black zipper with humongous brass teeth that would have looked awesome but it was way too long and I would have struggled taking some of the teeth out. This one works. I can't really explain why the nylon one would not have worked  - this one worked better. The off-white was safe, the orange makes you think twice.


Thanksgiving is Thursday. I'm having 7 people here.  A bit small this year. We've never had giant gatherings - 13-15 is our average most years.

I cleaned house Saturday between work shifts so I could chisel out time to sew today.
I also wanted to make Apple Cider Caramels for my workmates and for Thanksgiving, along with Butternut Squash Soup for both dinners this week and as a starter course on Thursday.

Done.
Tired.
Working 12-hour split shifts through Christmas now.


 These are all cut up and wrapped, ready to be put into containers.
I actually made two batches this morning. My first went swimmingly until I poured it out -and realized I forgot to add the butter.


These bags were made to help me out at Christmastime and for Elm Street Quilt's BAG IT series this month. Patty has coughed up a very organized month of sewing bags with accompanying tutorials and tips and the whip (prizes!) to make you sew some fun bags.
This week was non-zippered bags  - storage box bags.

I didn't need any open storage nor could I thing of someone who would so I did my own thing. Which is normal for me and entirely fine for the BAG IT series.

15 November, 2015

Boxy Bags


This weeks mission on Elm Street Quilts'  BAG IT series was to make some boxy bags.
I still have a QAYG (Quilt As You Go) bag to make to get caught up.


The first one made was the Medium Formula One car racing bag. The suggested tutorial was this.
And as soon as I got to the corners, I recalled this tutorial with dislike. I'd been down this rabbit hole before.

Yes, it results in no seams inside. Yes, it results in a bag that works. But it takes hours to do and the lining is floating around in there - too big - with no way to adjust it. I want to tack the corners of the lining to the outer fabric but I am resisting. Because I have spent enough time on this bag.


My cute checkerboard lining.


 The small Formula One and the Elephant Bag are made with this video tutorial.
Which is how it's done in RTW.

The lining is attached to the outer fabric via the serged seams, providing a nice neat interior.

Actually, I studied my son's Dopp Bag last year and the inside seams are finished with grosgrain ribbon folded over those exposed seams. And the lining is fused to the outer fabric.


 I don't mind my serged seams either. (Yes, I powered over those nylon zipper teeth at the side seam.). I put a drop of Fray-check on the corners where I trimmed the serger thread. The insides of these two bags are really clean.

And - it took 20 minutes to cut, fuse, and sew this bag compared to the hours spent on the first Boxy Bag. Who has that much time? No one will ever notice the inside - except for how loose it is in the first bag.


Lining all bunched up and loose. No way to cut it smaller or adjust . I am not tacking it down at the corners.


With cute tassel - made by me too.


Boxy Bags made in three sizes.

Baby: started at 8" x 6".
Mama: started at 13" x 8"
Daddy: started at 15" x 10"


I was thinking of making a Daddy Formula One bag but I ran out of my checkerboard lining fabric and grabbed some home decor fabric instead.

06 November, 2015

Twisted Tuck Wristlet Clutch


Day two in the Bag It series by Elm Street Quilts.


I deviated. Of course I did. I had this Twisted Tuck Wristlet tutorial by Mahlica Designs vying for sewing time and it somehow squeezed into the Bag It month.

This wristlet/clutch is about 9" wide by 5 1/2" tall. Perfect for hanging onto.
I love the tuck detailing on the front.
 

Lazy me has been using this tan Sulky thread for all that serious matchstick quilting I've been doing. It has a bit of sheen to it. Anyway - it appears to look good on the suede as well. I'll keep it on the machine until I am forced to switch.
{I think the *mean* Bag it organizer wants us to do more matchstick quilting...on a bag that's coming up in the series.}

I used some faux suede fabric that's been in my stash forever - either from a child's Indian costume or a garage sale find. It sort of behaves like suede but doesn't have a recognizable nap one way or the other. It also doesn't fray! Which made for awesome fringe on that costume.


A blue plaid leaped into the inside lining, thus the blue zipper.


Back side.

Blue Plaid lining

Other side of lining with the slip pocket that extends all the way across.


Great tutorial from Mahlica Deisgns.


I am trying to do this bag a day thing but I will be posting some on my Instagram feed instead of trying to write a blog post every day. You can find me there by looking for RocketGirl50.

05 November, 2015

Road 15 Zippy Pouch


Cute zippy pouch from the Road 15 fabrics which were still out.
Doing a Bag It series with Elm Street Quilts this month.

Check it out. Great inspiration & great prizes.


 This little cutie patootie is only 6" x 4". I had my scraps out still from making my autumn table runner and decided to use some of the blacks in this line.

Evidently, I was not done with  matchstick quilting.
Although this little bag is so tiny, it went super fast with no insanity breaks needed.


 This is my jade plant. I married into it. Poor, sad, excuse for a house plant, I stuck it outside on the back porch intending it to move on to composting pastures. Every time,  Daisy, our new golden retriever puppy, brushed her tail against it as she gamboled around in the way new puppies do, another branch would come off.

A weird thing happened, as in you should prune your houseplants! -- new growth popped up all over.


I've had this jade plant now for 25 years. It started blooming a few years after it's metamorphosis when I brought it inside for the winter and I've nearly killed it once as you want to leave them out until the first frost (Willamette Valley banana zone - late october/early november). But it came back. You should prune your jade plants. Amazing things happen.

The blooms last 3 -4 months and are star white with a hint of pink. Tiny little things and all the more surprising because people don't expect it
.