Showing posts with label pillow. Show all posts

11 April, 2018

Sequin Pillows


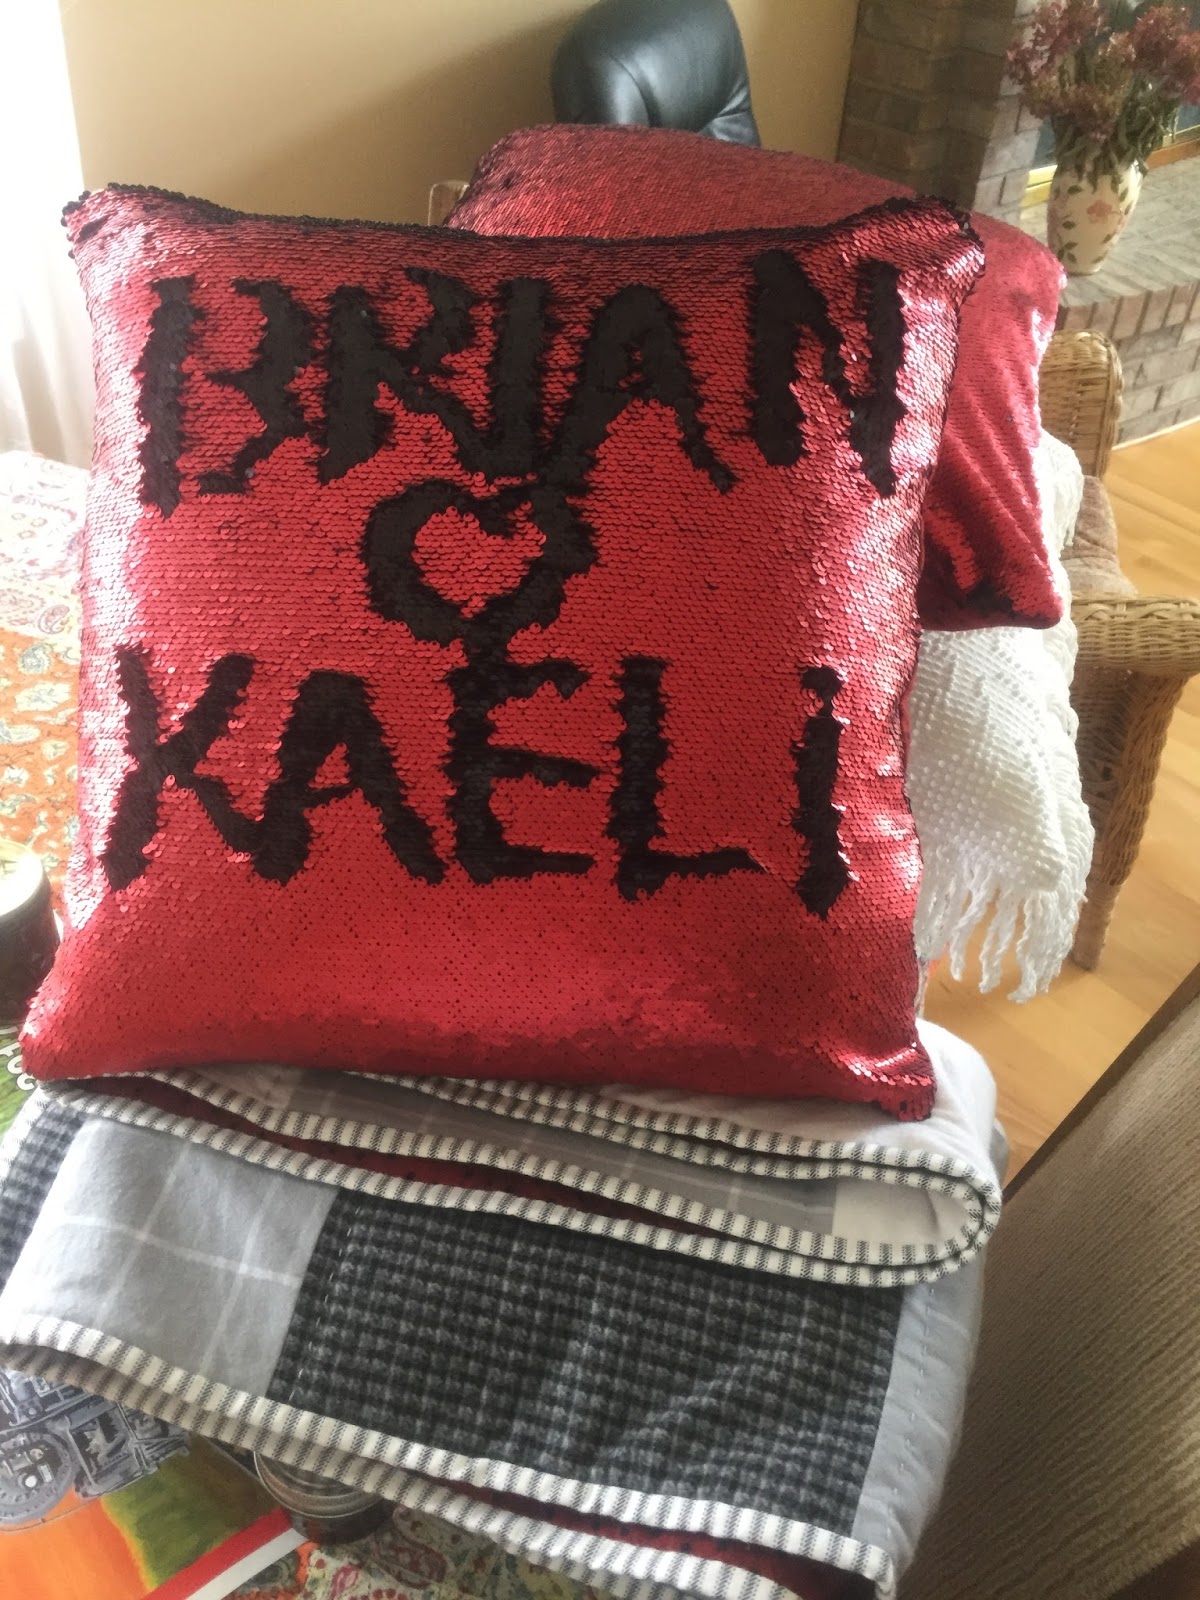
 When I was up at SewExpo this year, I found some of this sequin-flip fabric and I knew it would make my re-made quilt project shine. Perfect accessory for my son and his girlfriend.

What? You don't know about this sequin-flip fabric? I've been seeing it around in my IG feed and it's super fun to play with. Go ahead, write your stuff. With a flip of your hand, you can erase. The sequins are attached with a bigger circle punch to allow them to flip. This fabric is directional.

Once in my sewing room, I remembered my hobnail bedspread that I had meant to finish making more pillows from and I had even cut them out as 25" squares.

I decided to make them two of these pillows as well.

Well, actually, I was dithering on the sequin flip pillows. Should I do some big-ass piping around the perimeter? Should I piece the back with gingham to match the quilt? (big-ass brain)

Making the hobnail ones first allowed my over-active brain to calm it down and decide on simple zippered pillows.

I had to make the hobnail ones zippered as they are huge at 24". This size fits most modern day pillow cushy couches. I made one plain - hob nail on both sides so I could figure out the zipper (invisible). The second one has fringe and an invisible zipper as well.

The hobnail/chenille ones will be a decorating neutral with the smaller 20" sequin ones as the focus.


 You can see how the sequin ones go with the quilt backing.

For the sequin pillows I sewed the zippers at top. They aren't invisible but they are brown so they merge quite well. The bonus of keeping a large stash. Frankly, I didn't need to make zippered pillows as they aren't washable. You have to dry-clean those sequins. The flannel on the reverse will attract doggy hair. I could have just sewn them shut. But I had found the zippers in stash and I was on a zipper sewing spree.

I also sewed the sequin fabric to some cotton/poly fabric (stash) to help stabilize the slight stretch of the sequin fabric.

I used the rest of my red flannel quilt backing for the pillow backs. I had to piece the backs to get to 20" square. 
I could have made them elongated/rectangular but 20" and 24" pillow forms are much easier to find (and afford) than irregular sizes.

Even though I had these pillow forms in my stash, I plan to take just the covers when I visit in a few weeks. I plan to order the forms through Joann's or Hobby Lobby and have them ship them to the new house. Usually, I can find free shipping as well as a sale on pillow forms.


02 January, 2018

Another Super Quick Christmas Gift


 A Portland Timbers Soccer Team Pillow.
Done as a no-sew fleece cover.

 I had a 20" Ikea pillow form - which is not lofty enough folks. Instead, I used a pillow form from a garage sale acquired pillow that was fuller.

To begin with, I bought enough polar fleece fabric to cover the pillow with fringe.
20" plus 3" fringe all around. 20 + 3 + 3 = 26". Fleece is generally 60" wide. I bought 27" aka 3/4 yard and had enough to cover one pillow.


I squared up my two pillow sides (back and front) and started cutting my fringe. 1 1/4" wide snipping 3 inches in. I used tape to make my snips even.

Then I folded one fringette back and snipped a small hole in the middle of the four layers and fed the end of the fringette through, thus securing it.


 When you have three sides done, slip your pillow form inside. If you need to cut more to tighten up the cover, this is your chance. Mine was fine and I continued flipping the end of the fringettes through the small slits.
 Twenty minutes. Promise. Easy peasy.

And off it went, mailed to Alaska and the only Portland Timbers Soccer team fan up in the far north.


28 November, 2016

Parakeet Pillows


 My friend in Japan received her Christmas present in eight days. Not only was I super on the ball, sewing these up,  but the postal service (& customs) gods were smiling too.

A month or so ago, I saw this Parakeet fabric at Fabric Depot. I immediately emailed my friend a photo and she loved the fabric. We settled on housewarming pillows for her new house she is building in kyoto.


 These are the perfect neutral color with just a hint of pizazz in the matte metallic blue budgee.
Her pillows are 15" square so I made these 14.5" square with a two-inch flange.

I added a zippered backing for easy laundering. The back fabric is the same as the front but it's not the same. The original fabric I found at Fabric Depot is a Waverly home dec fabric. When I was at Joann's Fabrics to purchase more interfacing, I was looking around and here was the same design printed onto burlap!

Instant design decision to do the fine waverly weave on the front and the coarser burlap weave on the backside. Two different looks.


I have it stuffed full with a 16" pillow form to take photos as we don't have 15" forms in the usa.


I still have one more gift to finish that needs to fly off to Singapore. We'll see how long it takes now that the Christmas mailing rush is on.

17 February, 2016

Zipper Tabs Sewing Tutorial

Front: Hobnail bedspread - upcycled

Backside: Damask with lace trim covering a zipper opening


I made two 20" pillows last weekend. They have zippers on the back so you can take the covers off for cleaning (hello white!).

I used a vintage hobnail bedspread for the fronts and a semi-damask white cotton for the backside. The zippers came from stash and along with pillow forms in stash dictated the size of these pillows. The trim, loudly (seriously - it practically jumped into my hands), asked to be part of the pillow and was sewn to the zipper concealment flap.

There are two main ways to make large pillow covers. Those that come off via an envelope back or by way of a zipper. 

**Or you could just sew all four sides closed which then has to be unsewn for proper cleaning. These are typical of smaller pillows or commercially sewn decorative pillows. At 20" and above, it's easier to provide a zipper opening because I know how to sew.

I went with a zippered opening because it's more secure than an envelope back that can gape open.

To hide my zipper, I added enough material to cover it with a flap and trimmed the flap with this lovely ruffled lace trim. I plan on doing a tutorial on making a zipper flap too but I'm not too sure of my white on white fabrics showing up well.  Still looking at my photos to see if the idea comes across.

Today, I will show you how to add zipper tabs to the ends of your zippers.

I utilize all sorts of zippers. I love to find them at garage sales as they are expensive new. These two zips were more or less 20" long. But I don't like sewing the ends with metal thingies inside my seams. I add zipper tabs to the ends. This helps with managing the bulk in the seams and the aforementioned little metal thingies that break needles and hurt my machine.


Here are two tabs. Since I am hiding the zipper under a flap, I don't care if the tabs match. On top of a zippered pouch,  I care, a lot. Not so much here.

I can put these tabs  along the zipper to control length or just to make the ends pretty.


I learned this method from Nancy Zeiman - it's super easy. 

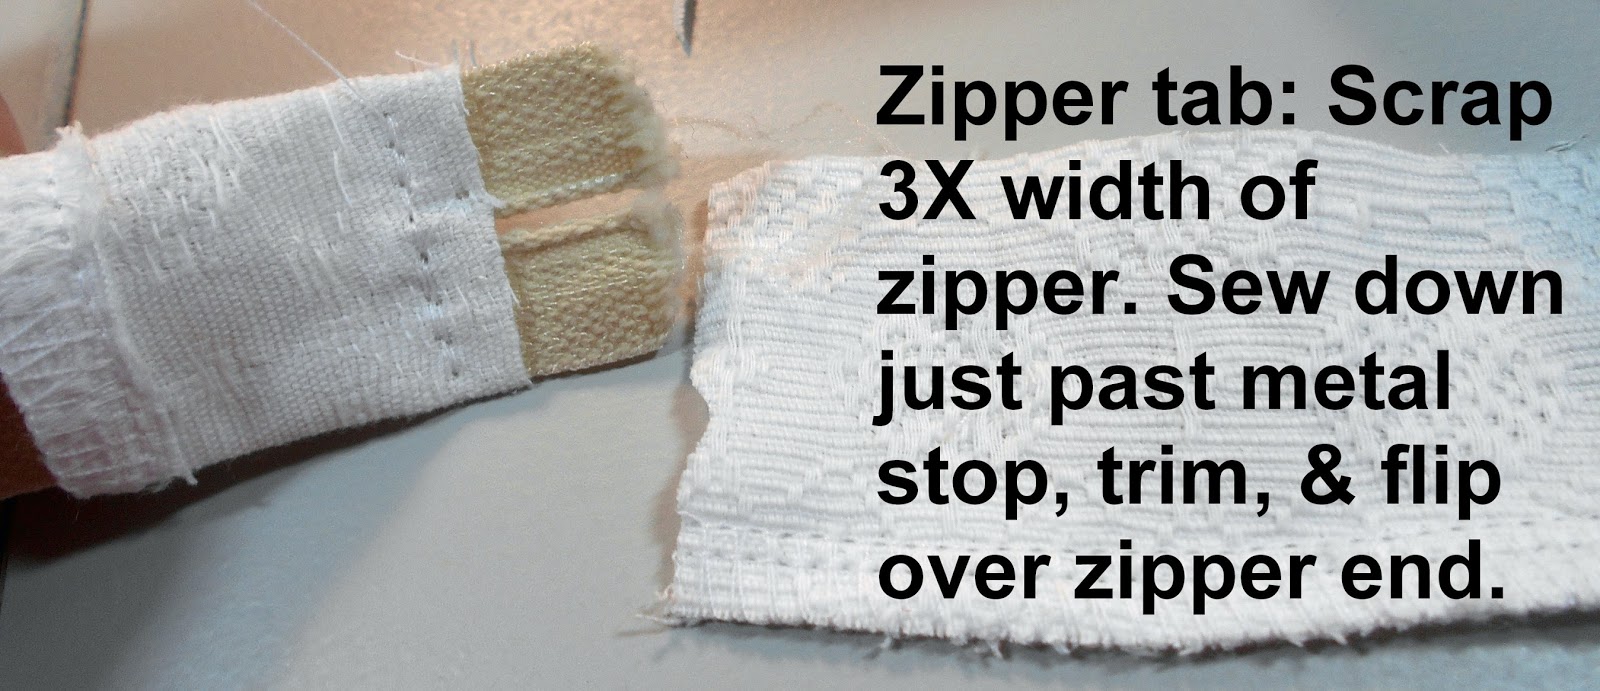
Grab a scrap rectangle piece of material that is 3 times the width of the zipper. Most zipper tapes are one inch wide. Your scrap would be 3" wide. It doesn't matter how long your scrap is, but generally, less than two inches.

Wrap this piece around the zipper tape with raw edges down. This piece lays on the zipper tape and will be flipped over the end. Your stitch line will be on the end of the zipper. If you can't visualize, please refer to the following photos.


Once I've stitched the scrap down,  I trim the little zipper ears off (end of tapes).
The tape is thick, by cutting it off, it's less bulk in your side seams.


 This particular zipper is short. I used a longer scrap to extend the length on the second end. I don't care that the tabs won't match as they will be hidden under my zipper flap. No one will ever notice, I promise you.

To determine the length of the zipper, I start by making a tab for the bottom of the zipper. The top with the zipper pull is the second tab. I usually sew my tab just above that bottom metal stop. This stop gets trimmed off when I flip the tab over.

Then I lay the zipper along my pillow fabric which has been cut to 20" wide. I place the bottom tab - where the raw edges are - in line with the raw edge of my fabric. I can see that my other end (with the pull) needs a longer zipper tab. You can trim these tabs easily so cut a scrap piece that is longer than you need. {3X width of zipper by length needed to get to edge (plus some)}


 I usually stitch across the zipper to keep zipper  tapes in place. Then I wrap my scrap around the zipper tape and sew at the end.


There goes the zipper ears and the metal stop.

Voila!    I flip that scrap over and we have a nice, pretty, & clean end to the zipper.

The raw edges will get serged into the pillow side seams so I don't bother trimming.


 Here is the zipper tab sewn into the pillow cover. How pretty is that?
Neat and tidy.


 Here is the zipper installed with flap trimmed with lace.
The lace trim is also sewn into the side seams so we won't be able to lift that flap up as much once the pillow is finished.


So - the main reasons to do this style of zipper tab is to keep bulk and metal parts out of my edge seams.


There are other methods to make zipper tabs. Especially on zippered pouches you will see a finished tab - no raw edges at the end. This style is used to keep the tab (and zipper) out of the side seam altogether. The stitching seam is sewn alongside the finished edge of the tab. Again, the main reason is to keep bulk out of the seam.


Rusty is still with us. My friend in Japan says it's illegal to put pets to sleep there. I cannot get my head around this. I was taught that it was our (human) responsibility to be humane with our pets. So interesting to hear other people's stories about losing pets. 


Rusty has rallied abit - we are currently managing his pain better, I think.  There have been some rough spots but we are all managing as best as we can.
Thank you for all of your kind thoughts and prayers. It has meant a lot.

16 December, 2014

Potter Pillow


Running - that's December for someone in the shipping industry.
This was a quick make one Sunday morning before I had to go into work.
Sent off to birthday nephew already.

Idea borrowed from here.


25 September, 2014

Pendleton Pillow Time


I had a request by the nephew to make a U of O pillow ;'()


He was here in the summer and saw one on the top shelf of my sewing room. I used to do holiday bazaars and still had a couple of Oregon State &  University of Oregon pillows leftover - need to photograph them and throw them into the etsy shop.


I thought while I was at it, I might as well sew some new pillows for the son's new place.
I had one 24" pillow form in stash - the others are a small 16". The 24" is nice and big for three young men.
You have to have a matched pair of pillows  - I certainly have enough wool. I may even go for a triplet set.
It's a great excuse to go to the fabric store to buy another 24" form. 


 I sewed some Pendleton pillows last fall for a friend and repeated it on a larger scale.
 
 Her's came out at 18" and they look kinda puny on today's humongous couches.

I picked up the red plaid shirting at the Pendleton booth at SewExpo this spring. The rest of the wool strips are from my stash. I've been sewing for 2 1/2 days straight from my stash and has it decreased in size???
{rhetorical question - do not answer}{{unless you have a joke about the size of stashes}}

Here is the U of O pillow case (18") folded into a ziploc bag. This is how I am mailing it.
Yes, you can mail in a see-thru ziploc bag. Use the freezer ones as they are thicker. Tape well - no loose edges.
The recipient (and me, too) gets ridiculously excited to see the actual item inside the packaging they are getting in the mail. Smiles all around!


Usually at 18", the envelope back will pop open (exposing the dirty underside of pillow business). I incorporate zipper installations to keep things square. My stash did not include a green nor a yellow zipper so I did a wide envelope back.


One side is cotton, the other is soft polar fleece.


28 January, 2014

Star Quilting


I don't do much quilting.

The exactness required is really exacting (excruciating) on my 'just sew it already' personality.
I saw this pattern on the SewMamaSew website and it grabbed me enough to derail some other sewing plans.

I used my Road 15 'layer cake' - my first ever quilting fabric pre-cut. A layer cake is 10" squares.
2 1/2" strips (jelly rolls) or squares (charms) scare me in their tinyiness and perceived lack of usefulness.


Involved were numerous 2 1/2" blocks - squares and HST's (half-square triangles).
Almost  90 in all - for a 18" square. It was 9 blocks across and down but you need to fill in those edges - just so - requiring a few extra.


These Road 15 fabrics really appealed to me as well. The fabrics are made up of real street addresses. street maps, neighborhood views. Not to mention the color palette of turquoises and wine red.

The turquoise reign seems to be over in favor of the 2014 pantone color of the year - Radiant Orchid.
Not sure how that's gonna work for me - although it may curtail buying way too much fabric which is always a noble goal.


I was *so done* trimming my 2 1/2" squares around number 45.
I had to suck it up and keep going.

It's like making 45 hotpads - another thing I am not good at (quantity sewing).


I had to search my stash for wine red crochet thread. Thank heavens - the nearest fabric store that carries this thicker ply thread is half-an-hour away in a direction I don't need in my busy life. Another reason to keep too much stash.

Notice on the black star "Oregon trail".


Stuck for now. I'm not a fan of endless quilted wallhangings. Most of the quilting blogs seem to be making new wallhangings each week. What do they do with them all? Do they gift them, like me & my sewing projects?

I do like this finished make, a lot!
However it doesn't quite go with my couches so I am re-thinking the pillow idea.

I ran out of enough of  my grey to make it into a pillow (Ha! another excuse to go to the fabric store). Debating whether to make this an envelope back pillow case, utilizing the extra blocks as a small design feature on the back. . .
Or, backing and binding to hang on my sewing room wall. . .This is my top choice because then the back doesn't matter as much. I could use another grey in my stash.

Thinking. . .

I'm doing some training at work so my hours have temporarily increased. Just luv that 8 minute commute because even with working more hours, the free time is still mind boggling.


Here's one of my three orchids - Radiant orchid -haha - reblooming.