 |
| Front: Hobnail bedspread - upcycled |

Backside: Damask with lace trim covering a zipper opening
I made two 20" pillows last weekend. They have zippers on the back so you can take the covers off for cleaning (hello white!).
I used a vintage hobnail bedspread for the fronts and a semi-damask white cotton for the backside. The zippers came from stash and along with pillow forms in stash dictated the size of these pillows. The trim, loudly (seriously - it practically jumped into my hands), asked to be part of the pillow and was sewn to the zipper concealment flap.
There are two main ways to make large pillow covers. Those that come off via an envelope back or by way of a zipper.
**Or you could just sew all four sides closed which then has to be unsewn for proper cleaning. These are typical of smaller pillows or commercially sewn decorative pillows. At 20" and above, it's easier to provide a zipper opening because I know how to sew.
I went with a zippered opening because it's more secure than an envelope back that can gape open.
To hide my zipper, I added enough material to cover it with a flap and trimmed the flap with this lovely ruffled lace trim. I plan on doing a tutorial on making a zipper flap too but I'm not too sure of my white on white fabrics showing up well. Still looking at my photos to see if the idea comes across.
Today, I will show you how to add zipper tabs to the ends of your zippers.
I utilize all sorts of zippers. I love to find them at garage sales as they are expensive new. These two zips were more or less 20" long. But I don't like sewing the ends with metal thingies inside my seams. I add zipper tabs to the ends. This helps with managing the bulk in the seams and the aforementioned little metal thingies that break needles and hurt my machine.

Here are two tabs. Since I am hiding the zipper under a flap, I don't care if the tabs match. On top of a zippered pouch, I care, a lot. Not so much here.
I can put these tabs along the zipper to control length or just to make the ends pretty.
I learned this method from Nancy Zeiman - it's super easy.
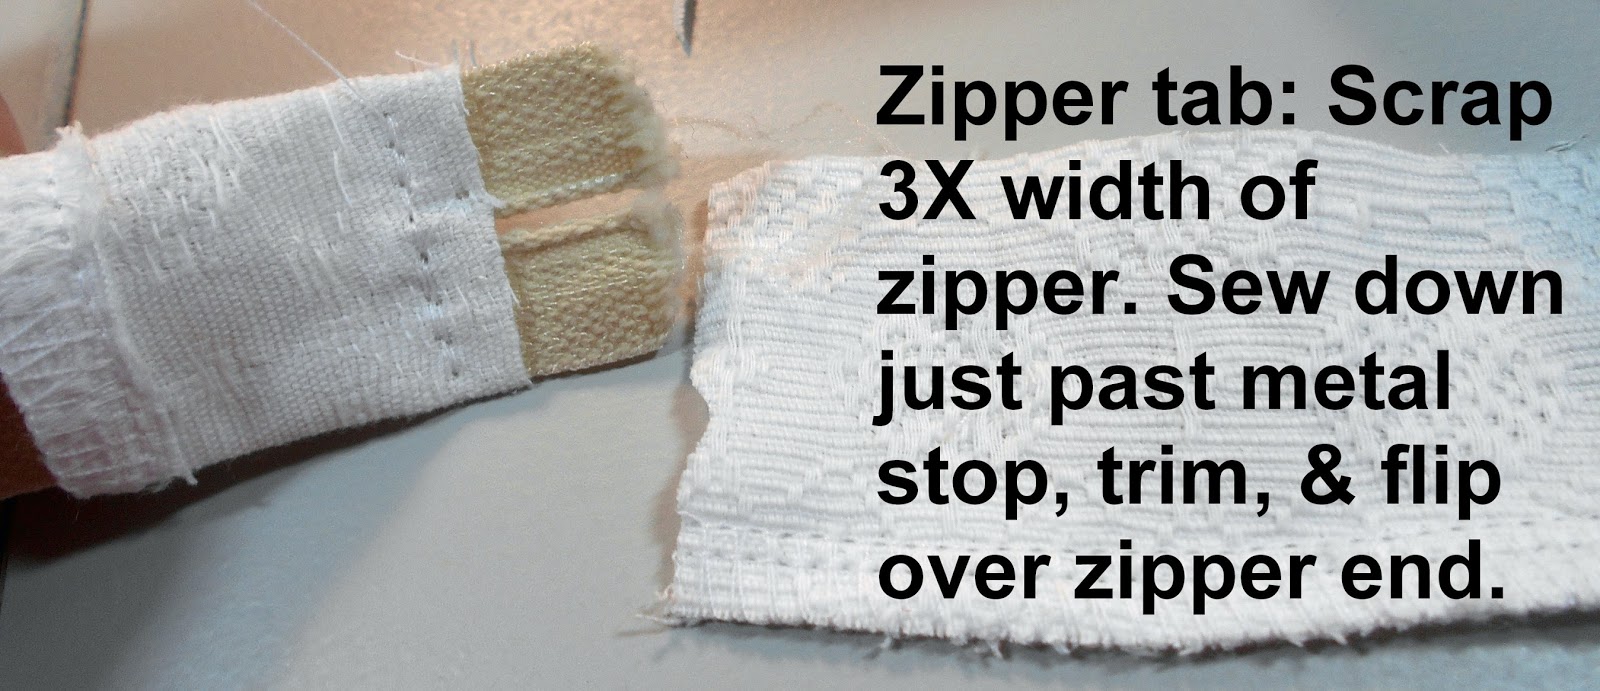
Grab a scrap rectangle piece of material that is 3 times the width of the zipper. Most zipper tapes are one inch wide. Your scrap would be 3" wide. It doesn't matter how long your scrap is, but generally, less than two inches.
Wrap this piece around the zipper tape with raw edges down. This piece lays on the zipper tape and will be flipped over the end. Your stitch line will be on the end of the zipper. If you can't visualize, please refer to the following photos.

Once I've stitched the scrap down, I trim the little zipper ears off (end of tapes).
The tape is thick, by cutting it off, it's less bulk in your side seams.

To determine the length of the zipper, I start by making a tab for the bottom of the zipper. The top with the zipper pull is the second tab. I usually sew my tab just above that bottom metal stop. This stop gets trimmed off when I flip the tab over.
Then I lay the zipper along my pillow fabric which has been cut to 20" wide. I place the bottom tab - where the raw edges are - in line with the raw edge of my fabric. I can see that my other end (with the pull) needs a longer zipper tab. You can trim these tabs easily so cut a scrap piece that is longer than you need. {3X width of zipper by length needed to get to edge (plus some)}


The raw edges will get serged into the pillow side seams so I don't bother trimming.

Neat and tidy.

The lace trim is also sewn into the side seams so we won't be able to lift that flap up as much once the pillow is finished.

So - the main reasons to do this style of zipper tab is to keep bulk and metal parts out of my edge seams.
There are other methods to make zipper tabs. Especially on zippered pouches you will see a finished tab - no raw edges at the end. This style is used to keep the tab (and zipper) out of the side seam altogether. The stitching seam is sewn alongside the finished edge of the tab. Again, the main reason is to keep bulk out of the seam.
Rusty is still with us. My friend in Japan says it's illegal to put pets to sleep there. I cannot get my head around this. I was taught that it was our (human) responsibility to be humane with our pets. So interesting to hear other people's stories about losing pets.
Rusty has rallied abit - we are currently managing his pain better, I think. There have been some rough spots but we are all managing as best as we can.
Thank you for all of your kind thoughts and prayers. It has meant a lot.


Thanks for all the zip tips! Pretty cushions, give rusty a hug from me xxx
ReplyDeleteGreat zipper tab tutorial. I love the fabric placement on the pillows. And that the trims jumped into your hands! Haha!
ReplyDeleteBest wishes to Rusty.
It seems like all our parents of baby boomers had those bedspreads on their beds.. they called them chenille bedspreads. It was fun to see you make pillows out of one. Enjoy them.. ((hugs)), Teresa :-)
ReplyDeleteNever fear, I have vintage chenille bedspreads too. Hobnail refers to the bumpy knot texture.
Delete