Showing posts with label hobnail. Show all posts

11 April, 2018

Sequin Pillows


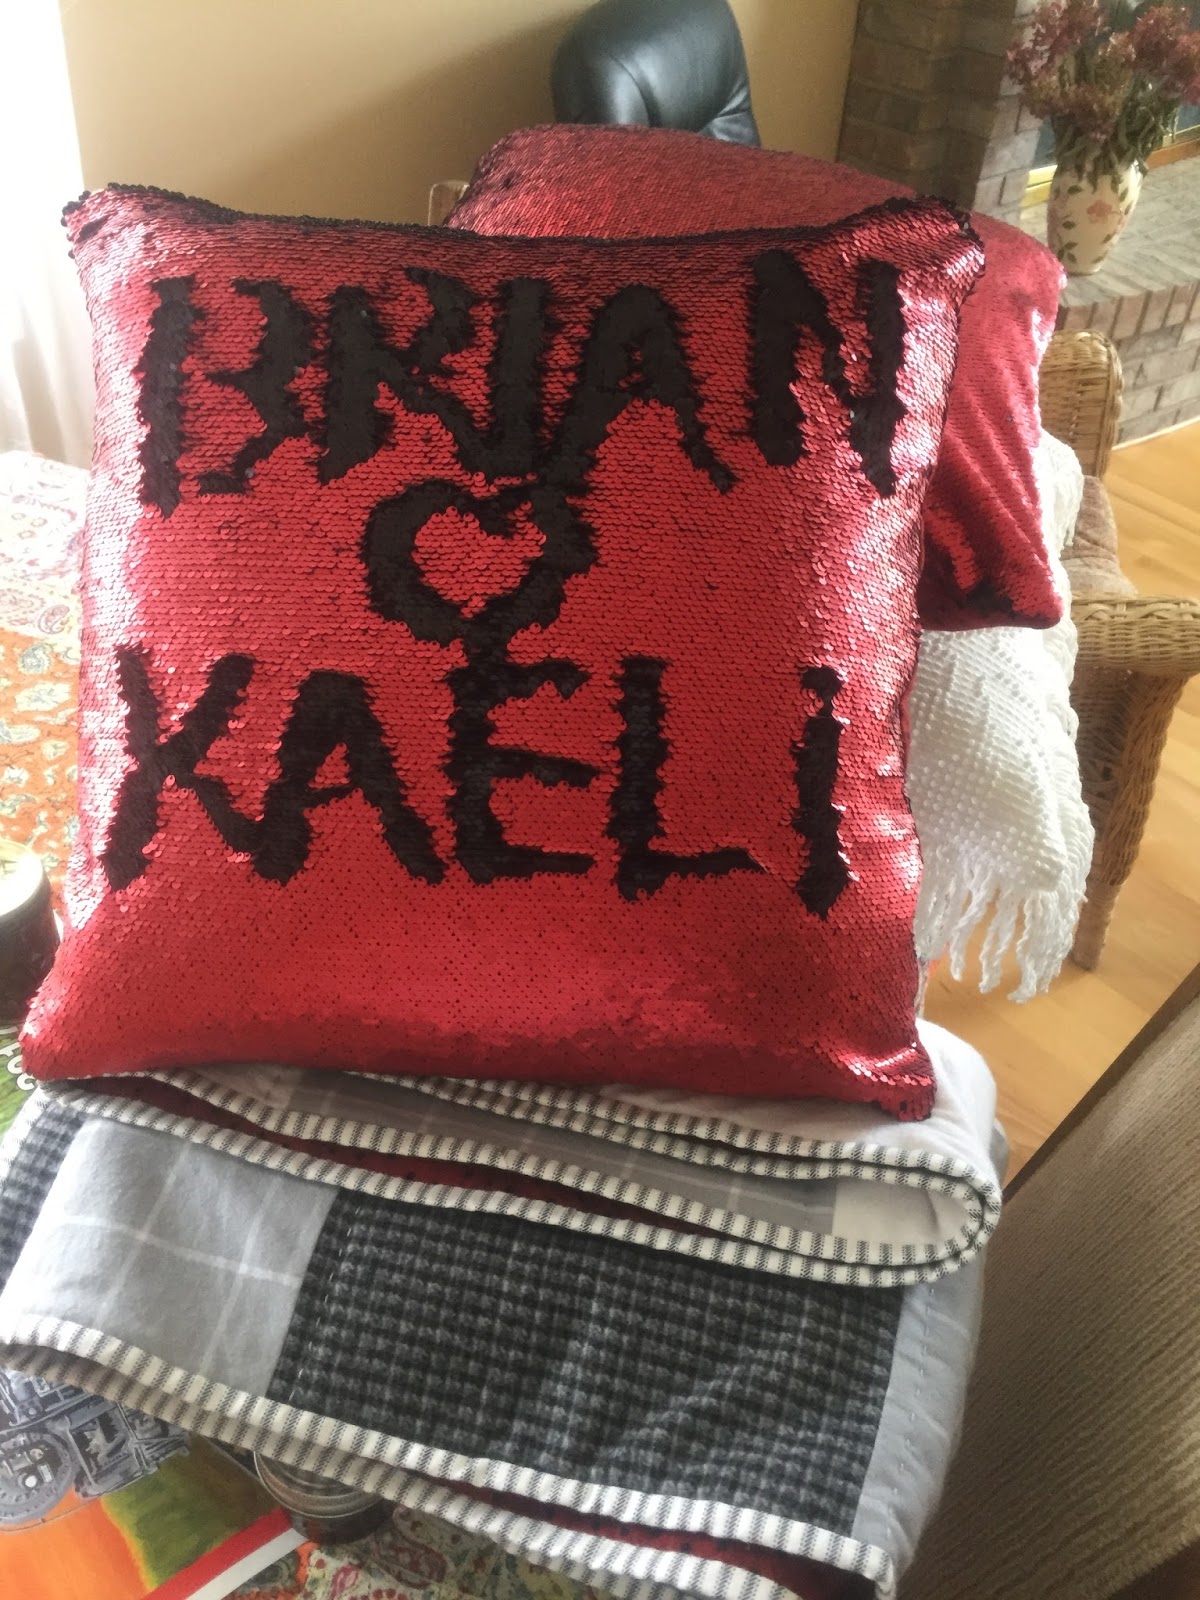
 When I was up at SewExpo this year, I found some of this sequin-flip fabric and I knew it would make my re-made quilt project shine. Perfect accessory for my son and his girlfriend.

What? You don't know about this sequin-flip fabric? I've been seeing it around in my IG feed and it's super fun to play with. Go ahead, write your stuff. With a flip of your hand, you can erase. The sequins are attached with a bigger circle punch to allow them to flip. This fabric is directional.

Once in my sewing room, I remembered my hobnail bedspread that I had meant to finish making more pillows from and I had even cut them out as 25" squares.

I decided to make them two of these pillows as well.

Well, actually, I was dithering on the sequin flip pillows. Should I do some big-ass piping around the perimeter? Should I piece the back with gingham to match the quilt? (big-ass brain)

Making the hobnail ones first allowed my over-active brain to calm it down and decide on simple zippered pillows.

I had to make the hobnail ones zippered as they are huge at 24". This size fits most modern day pillow cushy couches. I made one plain - hob nail on both sides so I could figure out the zipper (invisible). The second one has fringe and an invisible zipper as well.

The hobnail/chenille ones will be a decorating neutral with the smaller 20" sequin ones as the focus.


 You can see how the sequin ones go with the quilt backing.

For the sequin pillows I sewed the zippers at top. They aren't invisible but they are brown so they merge quite well. The bonus of keeping a large stash. Frankly, I didn't need to make zippered pillows as they aren't washable. You have to dry-clean those sequins. The flannel on the reverse will attract doggy hair. I could have just sewn them shut. But I had found the zippers in stash and I was on a zipper sewing spree.

I also sewed the sequin fabric to some cotton/poly fabric (stash) to help stabilize the slight stretch of the sequin fabric.

I used the rest of my red flannel quilt backing for the pillow backs. I had to piece the backs to get to 20" square. 
I could have made them elongated/rectangular but 20" and 24" pillow forms are much easier to find (and afford) than irregular sizes.

Even though I had these pillow forms in my stash, I plan to take just the covers when I visit in a few weeks. I plan to order the forms through Joann's or Hobby Lobby and have them ship them to the new house. Usually, I can find free shipping as well as a sale on pillow forms.


09 April, 2018

The Quilt Is Done


https://blogger.googleusercontent.com/img/b/R29vZ2xl/AVvXsEgunG_GcBDOswKYXPDEf6CId_a4-0g2hEwDuTK46G8YZeeHjc6sUb31h8Ez-6qgUcUvjjWW6b1vKslBb8m9TIW2PBsD_LWammzZMTWCbpzGfVJYkbOLSHfkg20MSfCZhGMWgDKgxILypx4/s400/IMG_8178.JPG


The Quilt is done.

It took just as long as the first time too.
The first photo is the 2nd quilt, the 2nd photo is the original.

This was my Christmas present to my son and his girlfriend.
A nice sized giant gingham quilt.

I mailed it off and the post office delivered it to a parcel locker at the apartment complex where they live. Who knows who got the parcel locker key? We discovered no keys were given out.

My sis sent a package that was delivered the same day. Also no key.

At first, we were suffering from disbelief. Days turned into weeks with crazy information. Lester the carrier, multiple supervisors/postmasters who would not call back, tampering with lockers, hope.    A package found in one of the lockers addressed to my son from more than two months back (also NO KEY).

We moved on to the online package inquiry debacle. Both my sister and I filled out the forms. The post office officiously declared it "delivered", therefore no insurance money.

Finally, on the same day I finished the binding on the second quilt, I received a check for $50 plus postage from the post office. This was after my third appeal - where I lost it.

 I almost didn't send the third appeal in. I was ready to move on. But then, I realized I was still enraged. I grabbed a piece of paper and let them have it! I may have mentioned NO KEYS!!! multiple times with lots of exclamations.

My sis hasn't seen her $50 yet.
I believe the system is designed to make you give up.

Both packages were sent priority mail which automatically gives you $50 insurance. I didn't insure my package 'cuz how can you put a price on handmade?

 Here's the backside. I mathed up additional yardage plus my three main fabrics didn't shrink as much as the original three flannels. My little gingham thingy turned out great.

One of the other problems I encountered was the fabric store had moved on from wintery flannel colors to springy colors. I persevered and found my wintry palette and then went home and floundered in the "I should have re-made this in a spring gingham" funk.

By the time they receive this, it will be Spring!


 Outside on a random 70' day. My japanese maples are leafing out joyously.


I also sewed up four zippered pillows. They just bought a house where they live and I will be transporting these pillow covers and quilt/throw in my suitcase. Just to be sure they receive them.

I'll talk about the awesome pillows in my next post.

Kaeli & Brian. Engaged 2018.


17 February, 2016

Zipper Tabs Sewing Tutorial

Front: Hobnail bedspread - upcycled

Backside: Damask with lace trim covering a zipper opening


I made two 20" pillows last weekend. They have zippers on the back so you can take the covers off for cleaning (hello white!).

I used a vintage hobnail bedspread for the fronts and a semi-damask white cotton for the backside. The zippers came from stash and along with pillow forms in stash dictated the size of these pillows. The trim, loudly (seriously - it practically jumped into my hands), asked to be part of the pillow and was sewn to the zipper concealment flap.

There are two main ways to make large pillow covers. Those that come off via an envelope back or by way of a zipper. 

**Or you could just sew all four sides closed which then has to be unsewn for proper cleaning. These are typical of smaller pillows or commercially sewn decorative pillows. At 20" and above, it's easier to provide a zipper opening because I know how to sew.

I went with a zippered opening because it's more secure than an envelope back that can gape open.

To hide my zipper, I added enough material to cover it with a flap and trimmed the flap with this lovely ruffled lace trim. I plan on doing a tutorial on making a zipper flap too but I'm not too sure of my white on white fabrics showing up well.  Still looking at my photos to see if the idea comes across.

Today, I will show you how to add zipper tabs to the ends of your zippers.

I utilize all sorts of zippers. I love to find them at garage sales as they are expensive new. These two zips were more or less 20" long. But I don't like sewing the ends with metal thingies inside my seams. I add zipper tabs to the ends. This helps with managing the bulk in the seams and the aforementioned little metal thingies that break needles and hurt my machine.


Here are two tabs. Since I am hiding the zipper under a flap, I don't care if the tabs match. On top of a zippered pouch,  I care, a lot. Not so much here.

I can put these tabs  along the zipper to control length or just to make the ends pretty.


I learned this method from Nancy Zeiman - it's super easy. 

Grab a scrap rectangle piece of material that is 3 times the width of the zipper. Most zipper tapes are one inch wide. Your scrap would be 3" wide. It doesn't matter how long your scrap is, but generally, less than two inches.

Wrap this piece around the zipper tape with raw edges down. This piece lays on the zipper tape and will be flipped over the end. Your stitch line will be on the end of the zipper. If you can't visualize, please refer to the following photos.


Once I've stitched the scrap down,  I trim the little zipper ears off (end of tapes).
The tape is thick, by cutting it off, it's less bulk in your side seams.


 This particular zipper is short. I used a longer scrap to extend the length on the second end. I don't care that the tabs won't match as they will be hidden under my zipper flap. No one will ever notice, I promise you.

To determine the length of the zipper, I start by making a tab for the bottom of the zipper. The top with the zipper pull is the second tab. I usually sew my tab just above that bottom metal stop. This stop gets trimmed off when I flip the tab over.

Then I lay the zipper along my pillow fabric which has been cut to 20" wide. I place the bottom tab - where the raw edges are - in line with the raw edge of my fabric. I can see that my other end (with the pull) needs a longer zipper tab. You can trim these tabs easily so cut a scrap piece that is longer than you need. {3X width of zipper by length needed to get to edge (plus some)}


 I usually stitch across the zipper to keep zipper  tapes in place. Then I wrap my scrap around the zipper tape and sew at the end.


There goes the zipper ears and the metal stop.

Voila!    I flip that scrap over and we have a nice, pretty, & clean end to the zipper.

The raw edges will get serged into the pillow side seams so I don't bother trimming.


 Here is the zipper tab sewn into the pillow cover. How pretty is that?
Neat and tidy.


 Here is the zipper installed with flap trimmed with lace.
The lace trim is also sewn into the side seams so we won't be able to lift that flap up as much once the pillow is finished.


So - the main reasons to do this style of zipper tab is to keep bulk and metal parts out of my edge seams.


There are other methods to make zipper tabs. Especially on zippered pouches you will see a finished tab - no raw edges at the end. This style is used to keep the tab (and zipper) out of the side seam altogether. The stitching seam is sewn alongside the finished edge of the tab. Again, the main reason is to keep bulk out of the seam.


Rusty is still with us. My friend in Japan says it's illegal to put pets to sleep there. I cannot get my head around this. I was taught that it was our (human) responsibility to be humane with our pets. So interesting to hear other people's stories about losing pets. 


Rusty has rallied abit - we are currently managing his pain better, I think.  There have been some rough spots but we are all managing as best as we can.
Thank you for all of your kind thoughts and prayers. It has meant a lot.