Dear daughter made a flying visit home. Sunday - after midnight until early wednesday morning.
Quick.
Too quick.
I haven't seen her since January when she met up with us in Hawaii.
She's working near Anchorage. At first, it was just a temporary gig but another job opportunity came her way in January and she needed a different wardrobe. I schlepped a duffle bag of office-worthy clothes to Hawaii and she took them from there.
Its been five months and she is really enjoying her job but wanted to meet up with some friends and raid the closet where she left some of her things.
She also brought some mending for her dear mother to fix. You can feel the love from here.
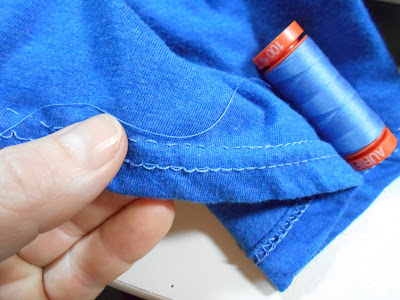
First up was this tank from Nicaragua. From the winter before last when she was traveling around central america. You can't just go out and buy another tank memento, so mending was the next best option.
Her hem gave out - the kind where you pull the thread and it all unravels.
I had the right color thread but it wasn't the right thickness to match. I could have hauled out my coverstitch machine ( the correct fix would have been to do this and buy new cones of thread to match). Which was not gonna happen.
Instead, I made do and mended with what I had on hand.
Most t-shirt hems are done with the coverstitch - which is three threads; two on the outside in parallel lines with the third criss-crossing behind. It's a very stretchy and mostly secure way to finish hems in knits.
The bottom thread was still kinda attached, so I took my thinner thread and couched that stitching down. Couching is mostly invisible stitching that goes over a thicker thread at regular intervals so the thicker thread lies on the surface of the material securely.
The top thread was mostly pulled out but not cut off!!!
So I threaded my needle with this thicker thread and did a running stitch along the line of stitching. The hardest part was not to pull the threads taut. You want this hem to remain stretchy somewhat.
It's not perfect, but it's mostly invisible to everyone else.
Next up was this lovely little sweater she bought here in Portland. Different wool colors are sewed onto a base sweater in the shape of a flower.
Some of the stitching had come undone.
Again, I did not have a thick enough thread to match. Well - I might, but it would require digging for hours. So - I used an off-white upholstery thread doubled up to mimic the texture and it worked fairly well.
Upholstery thread is thicker than sewing thread. Less likely to break under stress.
I cast on a blanket stitch and secured the three areas which were coming undone.
Not perfect, but from a distance, it all looks great.
And really, that's what mending is all about. Securing whatever has come loose in a way that doesn't call attention to the fixed part.

Where her pocket sits in front, the 'side seam' had opened up. So, instead of putting your hand inside the pocket, your fingers would catch on this opening (making it bigger).
I hand-stitched this closed with two lines of stitching for security(stress point). The first row is behind the seam under my thumb, the second is visible, meeting up with the original stitching.
The edge is a selvedge so was not turned under and sewn. A four inch area of the selvedge started fraying. I did this mending in a darning style.
About 1/8" from the frayed edge, I made a neat row of running stitches. Then I used my needle to help turn under the frayed edge, hiding my running stitches and stitched it down to the under fabric. The running stitches give this section a little strength. If you look closely, you can see the four inches that are turned down but it would take an eagle eye to spot it as these legs are --w i d e--.
I also added a drop of fray check at each end to help stop any more fraying.
Last was this pretty red-orange polka dot dress. The outer fabric is a sheer gorgette (?) over a thin satin. Gorgeous. Half of the hem fell down.
The bottom edge was serged to give hemming something to hang onto.
I was able to match the thread color but mine was too thick. I think a silk thread would have been more invisible but I didn't have any in this color. This was a fairly easy fix as well. Use a single strand of thread and use the serged edge to go through about 1/4 - 1/2" , then 'grab' a teeny bit of the overskirt in the red areas (not the white polka dots areas) and repeat. The trick is to get into a rhythm so the thread is evenly spaced and not pulling.
I don't mend often. There has to be a compelling reason for me to 'perform'. I was a little worried about the t shirt from Nicaragua but it worked in the end.
I learned to mend from my mother and Mrs. Necessity.
Here's a photo of dear daughter trying to 'steal' a Stetson Fedora I recently found at a community rummage sale for my dear son. We are torturing him as he's stuck in central Oregon this week. She's trading him the ball cap....hmmm...


What a good momma you are to do all that mending! And your daughter is absolutely gorgeous! Hope she comes back for a longer time next time. ((hugs)), Teresa :-)
ReplyDeleteI might not get to mending jobs as quickly as my family would like, but I really don't mind. Anyone outside the family - forget it. Great job with your daughter's mending.
ReplyDeleteMy mending pile seems to like to mature for s bit before I start, but if she's only home for s while ... Well done! Bet she was delighted!
ReplyDelete