A blogging friend, who used to live in Oregon, had a super bad fall last November. I wanted to send her a Get Well Soon card but because it was November, I was knee-deep in Christmas overtime at work. I settled for a regular card as a place-marker until I could get this card out of my head.
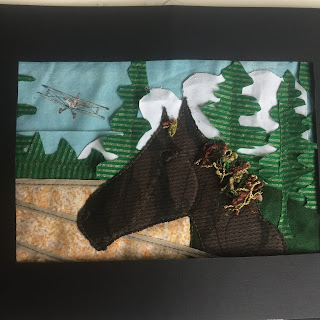
This is her horse, Nick. The image is one I 'borrowed' from her blog when I was looking for inspiration.
These type art cards are fun to execute. The drawing is worked from the background up. Finding fabrics, identifying shapes, sewing it down only took an hour on Saturday. I cut the cardstock 'frame' and trimmed it on Sunday. Mailed it Monday.
Grabbing fabrics takes the longest with the next step of cutting and placing shapes.The drawing/photo image gets simplified by necessity. In the original photo, there is actually another horse in the corral with Nick. He didn't make the cut. You want your focal image to stand out.
There's even room to do more with mixed media. Yarns, laces, paint. I reached my finish point - a card to send to my friend. She can either enjoy it as is or play some more with it.
 Next job was to hinge the art inside the black cardstock 'frame'. (I used a scrap piece of paper to figure out the opening by cutting the middle out until I had enough of the art showing.)
I just used regular scotch tape as this isn't a large piece. This type of hinging is not museum quality but is what's called "Conservation" in the picture framing industry. This type of hinge is removable with little distress to the artwork.
You start with 2 -3 pieces of tape about 3- 4 inches long and place them sticky side up. Place the art on top with half the tape lengthwise showing. The other half is sticking to the backside of the art.
The next step is to place the top cardstock frame over the art, positioning it 'just right' and pressing down over the tape when you subjectively decide.

Third step is to flip the frame and attached art over carefully. Take a longer piece of tape 4-5" long and place over the the sticky side. This piece of tape will extend past on three sides making a hinge that is no longer sticky.
You can see in the above photo that the artwork is attached to the top frame. This method makes it easy for the top cardstock frame to go where it best shows the artwork. The hinges allow the art fabrics to hang free. The fabrics and the paper expand and contract at different rates over time. This method allows non-restricted movement. And it's reversible with very little detriment to the valuable artwork. (lol).
This was my inspiration photo. Of course my blue sky (from my scrap basket!!) had an airplane flying over - checking over things. My way of saying my thoughts are with you.
I started with a large piece of backing fabric - muslin/scrap - something thin but sturdy.
Found some blue sky.
Some white for clouds,
Some green for trees.
The corral color is the wrong side of a old gold calico.
The rails are a thin flat ribbon.
The horse is from my t-shirt hack camo knit. Worked perfectly for horse texture.
Some fuzzy bits for a mane - ran out ---hmmmm.
basically - small bits and bobs from my scrap basket and an inspirational photo.
When I originally thought up this card, I was thinking a 5 x 7" card - haha - This turned out as a 8 x 11" card. Bigger - but easier to execute small cutting areas.
A very good piece of Happy Mail winging it's way south to my blogging friend.