07 May, 2020

Clothesline Bowl Tutorial


I've had a difficult time being creative right now at six weeks into our Oregon pandemic of Covid19. 

But a couple of FB sewing pals kept pushing and I designed something instead of just doing rote, run-of-the-mill making.

This bowl is oblong. I think it is easier to start with a circle. The oblong can be a bit unwieldy when starting out to maintain that oblong shape.

I use Cotton wrapped clothesline with a poly-core. 100% cotton can get limp. A work-around is denser zigzagging. I added a photo of the rope I typically buy at the end of this post.

A microtex 12/14 needle. Some people recommend a jeans needle. The only needle I've broken was when I tried to sew thru one of my anchoring pins. Do clean out your machine after bowl making - lots of dust fluff.

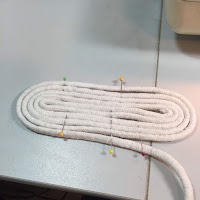
To start, wind your rope around on a flat surface until you get a circle or oblong about 3-4" wide. Stick straight pins at intervals to secure it while you begin. Most  rope has a poly core, so stick pins in just at the surface. On circles, I put a pin in at 12, 3, 6,& 9 o'clock positions.


 Once you have it secured, feed it under your presser foot so rope feeds off to the right towards your lap. 

We're going to use a wide zig zag. Maybe 4.5 - 5 mm wide for the Zig and 3.5- 4.5mm for the Zag. On my Singer Stylist, I used a 5 (no mm then) and a 12 for the Zag. You want it wide enough to catch both ropes and enough Zag to hold it together.

When using thread as color, by making the zigzag more dense (or closer together), You get more color. 

On this oblong, I also pushed my first rows together as I zigzagged. Not necessary on circle as much.

 I start in the center. On this oblong, I zigzagged twice down the first two rows.  On a circle, I may do a cross in the middle in a natural/white thread until it feels secure.

You can also do the entire middle with white/off-white thread (which hides everything)


Once, the middle is secure, I start zigzagging in earnest, moving pins out, then back in after I pass. Pivot at the tight points.

You can see below -- I started removing pins altogether once I did four or five rounds. The pins help with shifting as you start and stop on the middle tight curves.


On circles, I start pulling up the base to do the sides around 6". That's on my pfaff machine. I noticed on my Singer Stylist that the machine is skinnier on the left-hand side of the machine, allowing you to push up more evenly right away.

On this bowl, I started tipping it up around 4 1/2" wide.  Once you start tipping, you want to keep your hand fairly steady on the angle. By tipping, I mean nearly straight up.

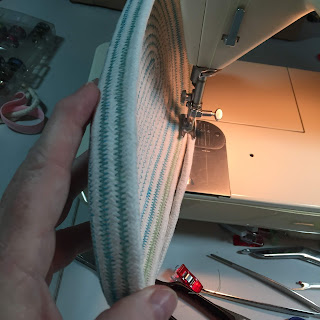
You can also see my presser foot is centered between the two coils for the zigzag to catch both at same time.


The thing I like most about these bowls is allowing my creativity to run amuck. I do keep a pinterest board on Rope Bowls (K8Hobbies), but that's mostly for finishes. Like - what kind of knot do you want at the end?

My thoughts, oh, blue looks nice, what about a blue/turquoise graduation. The home decor/gardening rule of 3's and 5's works very well visually. Zigzag three rows in blue, switch color on the bobbin, and stitch three more rows, or change both top thread and bobbin thread. Go wild. Sew until the bobbin runs out.

This is actually a great time to use up partial bobbins and nearly used up thread spools.

Or, do the whole thing in off-white thread. 


Oblongs can get wonky pretty fast. Whatever pressure you use on one end, you want to do the same on the opposite end. Get yourself into a rhythm. If you stray (cuz you got hypnotized), you can go back with natural thread and re-stitch. I promise no one will ever notice. And if your zigzag lines aren't perfectly parallel? No one has ever noticed.

Use the time of changing threads to stretch a bit, roll your neck, etc.


In this photo, I am actually pulling it away from the machine. If you want perfectly straight sides, the bowl needs to be perpendicular. I wanted my sides to taper out just a wee bit.

My inspiration bowl is below. I did pull it up at this point to see no thread color on the top rows (5+). She finished it with a round coil.


Photo credit - Lisa Maestas


 Getting close. 


Forgot to take photo of coil finish. I marked the centerline of the long side to zigzag to and just a wee bit past. Then I cut my rope at another 12" or so..

I pinned my 12" into a round coil with straight pins and zigzagged the coil while it was attached to the bowl. Yes, it required some machine acrobatics. I did this with off-white threads. It won't show anyway.

Then I eyeballed the coil against the centerline of the long side and pinned it in place. My button embellishment is actually an earring. I attached the earring  and hand-tacked the coil  down. I glued the earring down later. 


I also wanted the leather handles riveted on. In the above photo, I eye-balled my strap placement, then folded bowl in half to make sure they were even.

I've also used cork scraps to hide the end of the rope. Tied the end into a monkey's fist knot and stitched that down. You can search my blog for rope bowls or clothesline bowls to see past posts (Full web version, not the mobile version).

These are so easy to sew. You have complete do-over capability if you lose your way. If your coils are separating because you strayed with your stitching, go back over the area.


I buy this locally at Wilco Store with has a Tru Value Hardware store inside. I like 1/4" width. I sometimes use 7/32". I have some 3/8" rope I might try soon. 


03 April, 2020

Sterilizing Cloth Masks


No one is mentioning how to sterilize cloth masks.

A person breathes into a cloth mask for four hours and there is now an active colony of bacteria thriving in this warm, moist environment.

People are going to get sick from re-using these disposable cloth masks -from their own bacteria.

My mail carrier thought washing with a load of laundry was sufficient. 

It’s not. 

Your hot water heater does not get hot enough to kill bacteria, let alone virus exposure.


You must boil your cloth masks for ten minutes. 

Another method uses your oven for 30 minutes at 158’f. This only works if you have a digital temp gauge. I don’t.  Higher temps may cause cotton to burn. 

Lots of microwave misinformation out there too. You’re safest if you use 100% cotton. Most home sewists are using polyester threads which melt at lower temps than cotton, causing items to burst into flame in microwaves. ( anyone make potato bags?)

For those of you who can veggies and fruit? You are familiar with basic sterilization techniques. Boiling water bath, pressure cooker, etc.

You must boil them. 


Mask pattern from “For a nurse, by a nurse” on Instructables. Fast sew, good coverage, used 8” pipe cleaner, doubled over and twisted on itself, for nose coverage. This pattern is designed to fit over a 95 mask for extra protection. It fits nice and doesn’t make me sweat as much. Easiest for production sewing. 

Before sewing bias tape on bottom, I tucked pipe cleaner piece up at top-center and sewed a channel to keep it in place. It survived boiling just fine.


“Craft Passion” mask. 
Elastic has to go. 

Most sewists do not know elastic contains latex, which most health professionals are allergic to. 

It did survive my boiling but eventually breaks down. 
Ditch the elastic. 

Alternative is to use shoe lace-type length 44”+.
There are channels at sides with this mask to run tshirt tubing, shoelace, or cording through. Push cord thru bottom of channel up to the top, making a loop over to other side, running cord from top and out the bottom. 

Loop fits over top of head, ties are tied at neck.


This Craft passion mask is a longer sew. Fits nice, and magically creates this pocket to insert further protection material, such as vacumn cleaner bag micron filter material. It looks the most trendy, but I got hot immediately. Fog up the glasses hot.


These home-sewn masks are disposable. 
Period.

Stop sending out un-sterilized masks. Unless they are going to a medical facility that utilizes lasers, autoclaves, or whatever to sterilize. Most people do not know how to sterilize at home anymore. They will continue wearing this mask for days on end if you do not educate them. Not to mention the bacteria that is on our hands as we sew these masks.

People deserve to have a clean item next to their mouth and nose.
Think of sneezing and wiping your nose with a tissue. Letting the tissue dry and re-using. Ick.

Pre-wash your fabrics. No one wants to get sick breathing in the chemical finishes we have on quilting cotton.

Learn to sterilize. 
Masks should be boiled prior to giving them out.


To dry, I used a clean, dry towel and tongs to start the drying process. The tongs I used were boiled as well.  I laid a towel on top until they were mostly drained, then used tongs to set them on a clean, new, dry towel. 

I’m still researching best practices. Clean hands during construction helps too. 

Please don’t ask me to sew these for you. I have plenty of requests.

If you can't sterilize them, I'm betting the people you hand them out to won't either. Bacteria growing on your cloth mask might be more scary than Covid19.

Also advise, clean hands before taking mask off, clean hands again. Dispose of mask or set aside to boil clean for next wearing time.

Which means I gave my mail carrier five masks so she can trade off.


18 February, 2020

Grandma Alert


Off to Reno this weekend to give these baby booties to my son and daughter-in-law. 

Trying to restrain myself to making one baby item a month. (and not overwhelm the parents with an out of control grandmother).

01 February, 2020

Cotton UnPaper Towels Out Of Double Gauze


Yes! I've returned to my blog.

I have felt long-winded lately on Instagram, writing too much necessary stuff with the full compliment of photos. Today, while I was serge-zipping around these Unpaper Towels, my mind told me, It Was Time.

Anyway, a friend recently contacted me through our local FB crafting page to see if I could sew some unpaper towels.

They are all over on Etsy, averaging $20 for a set of 5-12 napkin/paper-towel size pieces of cotton gauze with a colored serged edge.

On youtube, videos are still old-school using two pieces of quilting cotton and toweling to sew, turn, and top stitch. And then add snaps to connect them together.  haha. I can see kids re-snapping them back together (dirty or not), but ain't nobody got time for that kind of sewing around here.


At first, I was thinking Rolled Hem. After half an hour fiddling with settings and finally getting a stiff edge that was unevenly rolling (thanks to the single layer double gauze), I re-thought and re-set my machine to a regular 3-thread overlock stitch.

My first ones were carefully lifted and turned around the corners. Still thinking how etsy peoples can sell 5-12 for $20. Quickly moved on to the rounded corner. Gauze tends to pull and stretch, so I did have to slow down around the corners, and make sure material was next to my blade.


If you pull too much making a round corner, you end up serging into the air, or half on, half off.
See my photo above?? I can't show you the bad corner because I've been IG indoctrinated - only the good photos can be seen.


My understanding is these UnPaper Towels are better at absorbing spills and water after washing them 5-6 times. Plus, they get softer, while remaining strong.

Since I've flown over the paper tree plantations in Idaho, I also realize, these cost not only more $$ but also more resources to make the cotton cloth. Growing cotton is notorious for high chemicals in order to grow but also loads of water to process. Paper takes less resources. The bleaching is bad for the environment for both products.

Would I use these?

I already use cloth napkins. But I like paper towels for cleaning up bacon grease, the husband (who wipes first, then washes), etc. I usually buy the half-sheet paper towels.

These double gauze towels are similar in size and feel (single layer). If it was just me, maybe. But these items stain and will look fairly ratty in about 6 months. I would rather use colors to disguise stains. Do I even want to make more in six months?


I have no clue how etsy sellers are making money with these. They are all-over, so pricing is pretty cut-throat. It took me over two hours to make 16, including serger fiddling time. Once, I got my system in place, I whipped these up pretty fast.
Say an hour to do 12?

$6/yard - I'll say $3/yard wholesale. You can make 8-12 towels per yard. I made mine squarish and about 13".

I like to pay myself $20/hour, so obviously, I need to speed up the overlocker./serger.
Or, I could just buy some factory made birdseye gauze diapers instead.

Any thoughts? Would you use these in place of paper towels?

To see Etsy listings, google search "Unpaper Towels".


#unpapertowels
#clothtowels
#doublegauzetowel
#reusabletowel
#sewyourown
#rocketstitches

14 May, 2018

New Purse For Me


 This is a cute little crossbody purse I made for myself.

Mostly the Sunshine Wristlet by Bagstock patterns, I added some hardware to add an adjustable strap.

I used some of my favorite cork fabric along with some cotton fabric that has a cork design.
This purse has an outside pocket for my phone and a zippered security pocket inside the zippered body. Perfect small size for me.

I took it on my trip to Reno to see my son.

I cut out another to sew up for my RunningWithHandmade Etsy shop. Must sew now.

I have decided straps are my least favorite part to make.


03 May, 2018

Double-Sided Clutch


 This was a fun make.
Detailed in one of my facebook sewing groups, this double-sided clutch was super easy in it's simplicity.

I've made three so far with these Ikea fabrics.

One sold to a special person so I added in some other Canby-made goodies: hand-crocheted face scrubbies and honeysuckle lotion.


The clutch has three pocket compartments so you stay organized. Very ingenious pattern idea.


On my second one, I decided to add a leather strap to the side, riveted on. Purely decorative. The leather strap was scavenged from a vintage leather belt.


My Bloodgood Laceleaf Japanese Maple is in full leaf. It's about 27 years old and huge. I could prune it up to see the twisted trunk but then you would need to do that every year. Too much work. I just trim up from the ground so it's fairly even. My old dog, Rocket, used to love lying underneath with his head peeping out.

I've got to find our original landscape plans. I swear this variety is Bloodgood but all the internet sites say bloodgood is an upright maple.

And here it is from the other direction with my dwarf purple bearded iris's and weigelia in the foreground. with the stinkin' purple violets getting all weedy in there.

I'm also getting my patio pots ready for the summer. The hanging baskets and the 'groupings'. We're getting some nice May weather with not too much rain so things are growing fast.
purple columbine


These rhodies were given to me free. The homeowner changed out her landscape and they've done quite well for me.


Morning dew on those delicate pink blossoms.