31 January, 2011

Pleating Mistakes

 I am sewing New Look 6473. My great-niece, Missy Sophea lives about an hour away. It's sometimes difficult to sew long-distance because of fitting issues but this dress did well. Sophea, who is two-years-old is wearing a child's size 2 and is mostly potty-trained. Dresses are pretty forgiving in regards to fitting issues. About the only thing you have to worry about is where the hem falls.
I did some measuring in November when I saw her last. Her arm measurement, neck to waist, waist to floor, etc. and based on my sewing experience and the pattern details, I cut out size 2 on the pattern.
 I made a few changes. Well - I had to. Someone at the store decided they needed the instructions more than me as they were missing. I discovered this about a month later when I was ready to cut out pattern pieces.  The backside was originally buttoned down the entire back. I nixed this as unnecessary (and drafty). Instead, I cut the back on the fold and from the top, I cut down 5" to make a neck only opening. This pattern has a modified yoke and a little bias tape would finish the raw edges of the slit. 

Next up were the pleats on the front side. The pattern piece was no help at all and missing the instructions, I was glad to find this to help. There were three pleats and the middle pleat was easy to pin. The outer two were pinned into place by utilizing the yoke pattern piece to make sure I had the right amount of material used up in the pleats. I utilized the eyeball method. Were the pleats uniform? Same size? Looked right? Used up just enough fabric to match the yoke?
I then sewed the pleats and pressed them open.

Next up - trims.

This is a single yoke that you stitch down to the dress. A little rickrack here was nice. I ironed up 3/8" along the edges and then top-stitched the rickrack in place.


When I went to pin the yoke onto the dress - wrong side of yoke to right side of dress - gaping pleats!   There was  slight miscalculation in the eyeball method of pleat construction and a meeting with the seam ripper was scheduled.


Once you fit the pleats correctly, it's time to sew  the yoke to the dress. Thankfully, I looked at the yoke pattern piece  once more where about the only thing it did say was to sew the yoke seam at 3/8" instead of the usual 5/8".
Once you sew that seam, you need to manage the seam bulk or the yoke will look bulky in the wrong place.  I did a graduated trim on the seam allowances, especially where the excess fabric of the pleats is -  where you trim more on one side of the seam allowance than the other as this lies flatter and then I did little snips with my scissors to ease the curves.
 Next up is another trick to get the seam allowance to be flatter.   Understitching.
Basically, you are sewing down what remains of the seam allowance to the underside. In this case, I understitched the seam allowance to the dress. You follow along your original seam - maybe 1/16" over.
Understitching also stabilizes the neckline.
In the photo below, left side is the dress body, right side up. On the right in the photo - is the yoke (rickrack) with the wrong side up.
Usually once you do all the seam prep and the  understitching, the facing - or yoke- will fold over and lay down all by itself. A little help with the iron is useful here. I believe the pattern pieces said to cut some interfacing also, but I rarely do.


Sewing down the single yoke to the top side of the dress.
 Tamara did this as well to the corner of her outer pleats to finish the inside. See the corner of the yoke? Well the pleats on either side would have a raw edge corner if you did not fold down a corner of the pleat to catch it into the yoke seam. Not being known for my neat seaming, leaving the raw edge  corner flapping here would not only irritate the skin of a two-year-old, but it would have looked crappy.


And finally for today's post, we are up to the armholes.
The pattern had a pattern piece for a self-bias strip to be bound around the armhole. I had double-fold bias tape, 1/4" in two shades of orange and decided to use that instead. This is a child's size 2 so the armhole is a tiny tricky tight curve. I hand-basted my bias tape in place first and then top-stitched it down.  A little pressing helps get the curve just right.


 Hand-basting took about a minute but it makes sure bias tape doesn't slither off.


I had to re-do my back opening but it worked quite well. I ripped out the stitches for the first 1.25" to accommodate the yoke facings. I tucked them in and sewed the yoke down and then sewed the bias strip back down.


First post of the orange dress.

Final post.

30 January, 2011

The Orange Dress

 This is my practice grandchild, a.k.a. Sophea, my great-niece. She just received a sister Ella for Christmas and is responding as a typical two-year-old.  I hadn't finished the dress yet  and fortunately a family birthday party provided an opportunity for a fitting, where it was determined to keep the dress on the long side.

 I wanted a huge flower on the dress which involved a frantic e-mail to my friend, Pencil Girl, on where the giant orange rickrack that I bought in Puyallup might be. She was with me when I bought it and NOW I had a need for it. It never did come out of hiding which necessitated a visit here to buy some more. While there, I found this micro-pompom trim to finish the hem with.

 Here is my inspiration photo.   From nearly a year ago! This dress had pintucks running down the bodice and a floaty net underskirt.
 I found this pattern, New Look 6473 at Walmart and it looked close enough. Only it did not have a bodice and no where to sew the tulle to. It also had no instructions which I discovered about a month later when I started cutting out the pattern. I made view A - you can see where I drew my big flower. Thank God for the internet and Tamara Bostwick, who came to my rescue with her own review of the pattern. She wrote a bit about the order of construction and I figured out the rest myself.

I recalled why I sew garments and it is because ready made clothes never have pockets for girls or women. I designed this pocket utilizing that elastic thread on the bobbin. The pocket has a little give-n-take. I added the pleats to the bottom in a nod to the bodice pleats which gives it a little cupcake flair.
I mean, just the other day, Missy Sophea had a pocket-full of tiny gravel that went through the washing machine.     I'm just the aunty.


Here is a back view. Pretty plain except at the neckline.
I love this color.


28 January, 2011

Ploughman of the Moon

At a recent estate sale, I found a auto-biography of Robert Service, entitled Ploughman of the Moon. Reading his book harks back to an earlier prose style that, at times, tends to run on. I am content to dream and remember my times in Alaska and how much I would love to go back again.
It was definitely Alaska that made flying so important to me. But this poem, in particular, brings back good friends, Petersburg Creek, the entire Southeast area, the float planes, the big rolypoly seals on the boat decks, the giant icebergs from the LaConte glacier......

Shooting the halibut to death with a .357, the endless fog in Juneau, cooking in  the gold mine camp... the thigh-deep muskeg, lots of friends. I think I made more friends in Alaska than anywhere else.

"There are strange things done in the midnight sun...by the men that moil for gold. ....The northern lights have seen queer sights but the queerest they ever did see....     was that night on the marge of Lake Labarge... I cremated Sam McGee."


Another tidbit from Service's book.

27 January, 2011

Revisiting Hyperbole and a Half

For your viewing pleasure, I submit, "Wolves".
A comic involving a six-year-old pack and a lone teenager.
 

If you missed Hyperbole and a Half's story about moving from Montana to Oregon, here is the link to this hysterical story about two dogs; One who is 'simple' and the other dog who gets dramatic.


Previously blogged about here.

25 January, 2011

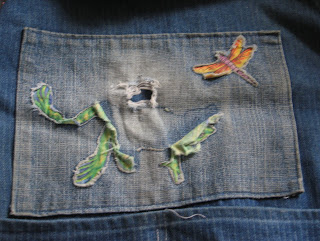
(Another) Work Apron


My work apron front panel is in tatters again. I wanted something springy feeling but  I wasn't feeling a design inspiration  (or is that divine intervention?) in my fabric stash.
I found this scrap of red from my great-nieces skirt and I thought I could do something  simple with a panel on top of the panel - maybe add some rickrack bling.


Simply sew down red panel over new denim panel - with elastic thread = wonky


Of course, I need to drive back to work in 30 minutes so I am totally rockin' the free-sewing -use what threads are in my machine thing. The serger still has a decorative crimson thread - check. The Riccar has a pinky-mauve thread- check. And I am sewing. 
After sewing down the panel onto the denim panel -it's a tad wonky. haha, there is still elastic thread in the bobbin of the Riccar.  Too funny.


This is last fall's panel design.


I haven't sewn down the panel as - let's face it- it's wonky. Tomorrow - got yoga tonight - I'll mess around with some rickrack to see it this panel will survive the cut.
I wear out these panels pretty fast. But the panel means I don't have to totally re-sew an apron so often. We'll see if rickrack can save this.

22 January, 2011

Dogs and Sunny Days

I got home from work today and IT WAS SUNSHINY SUNNY.
Of course, I had to wash my car so I pulled over to the side yard and let the dogs loose to keep me company or run off.   Hmmm... better give them a rawhide bone from their Christmas stash to keep them occupied. Rusty immediately laid down on the sunny grass and proceeded to eagerly demolish his meat-flavored rawhide. Rocket laid down and licked his bone, sucked  at it and next thing I know he had retreated to his plant cave near the arborvitae hedge to bury his bone where he stood guard as I washed a couple of months of winter filth off my car.

The dogs were on my side for once and stayed nearby. I moved the car around in front of the garage and started vacumning the interior which might have been done last - in September?  I work six days a week so sometimes it feels like I live out of my car and the car was protesting. The dogs had taken care of their distraction bones and Rusty found his tennis ball to throw at me in the hopes I would throw it for him to fetch. And Rusty learned A NEW GAME. He is deathly afraid of the vacumn and upon pain of death will not even get near a silent vacumn but you can only have so many balls get thrown at you - so I sucked it up with the shop vac. The ball is bigger than the nozzle so the ball stuck to the end as I rearranged the car rugs. And Rusty came and took the ball. I tried it again and if I held the hose out to him, he barked at the hose to give up the ball. If I laid the hose on the ground, he would approach and take his ball off the suction.  This dog is eight years old and he learned a new trick! This will not be the end of his personal vacumn torture but he loves his tennis balls more.

Now Rocket loves the vacumn. He thinks the vacumn gliding through his back coat, picking up loose hairs is his idea of a massage. He twists every which way to prolong the sublime vacumning. After I got done with the car and made a promise not to let it go so long in-between cleanings, Rocket wandered off. I went looking and he was back by his plant cave and next thing I know, he's dug up his bone. Now this makes Rusty a little jealous because now Rocket has a bone and Rusty does not. Rusty is now plotting to get the bone away from Rocket.

17 January, 2011

Spring Already! in Oregon

Winter Blooming Heather (Erika)

 Tulips and Iris's  pushing


Rain,Rain, go away, beam us some sunrays today.
It's important to celebrate sunbeams in the January grayness that typifies the Willamette Valley.
Even though I have been busy with medical stuff and work chaos, I still take time to revel in a rainbow or in small things bursting forth. The days are getting longer.

Blueberrys - red stems in winter. The green stuff is, unfortunately, weeds.


12 January, 2011

No Picture Wednesday

We put in wood floors last fall in our 20 year old house. They are gorgeous. A lot of accumulated wealth had to be stored elsewhere while we worked on this remodel.  And the rule has been, stuff cannot be lugged back in.  It has to have a place and a use.
This is the time to purge as the kids are finishing up degrees at college and starting to manage themselves. Its a good time to make easy decisions such as, "Do I really need these  (cool at the time) 750-piece puzzles,  Twister , or 80's craft books?"
The more difficult decisions will take me much of this next year. From going through my clothes closet (what fits?) to reorganizing how we store items. Attacking my growing sewing stash to making guest rooms fit for people to sleep in. We still need to redo the bedroom floors this June and these boxes and piles need to find their place.

One of the purged piles that took up an entire wall of my garage was for donating - either to the thrift store or as a garage sale - planned in the late Spring. This pile was stacked high and it had power. I could not make sorting decisions anymore because that wall was full and there was NO MORE ROOM. I was able to identify this 'threat' because I have some really smart friends who let me talk (and talkandtalkandtalk).

And when one friend said she would come over and load it into her truck, I was ready.

The pile was quickly divied up into 1. sell in her shop, 2. her use, & 3. the local thrift store.
And it has been dropped off. The entire van was filled with boxes of stuff.

I now have just my shipping supplies and one big empty box out there along the wall. I am ready to start making ruthless decisions again. The power to purge is back in my hands.

I'm Ready.

09 January, 2011

Anthropology Style Catch & Release Scarves


I just finished another Catch & Release Scarf. Sewing with elastic thread in the bobbin is so easy and makes for a stylin' scarf. The elastic allows you to twist it, knot it and basically style the scarf anyway you want. The drama of the shaping and the ease of sewing it are wonderful.
I used up some material in my stash to do these. I am so proud of myself.
Of course it is a gray January at 5pm in Oregon so the lighting leaves something to be desired.


***Added a few days later: What a difference outdoor light can do to help with colors - even with our gray, dismal January lighting.


06 January, 2011

02 January, 2011

Pretty Pajama Pants

I finished a pair of pajama pants in just over an hour.
Thanks to my new serger and coverstitch machine.
And my muslin.

Once you get past size 10, you are guaranteed special fitting issues. Making a muslin, a.k.a. YOUR OWN PATTERN particularily makes sense when you are making a garment over and over - such as pajama pants.
My special fitting issue is my food allergy problems which will often bloat up my stomach several times a day. Thank god for stretch jeans but what do you do for the ultimate comfortable sleep pant? Sew your own.

Sleep pants are the perfect start to drafting your own muslins because there is so much ease in them and who's gonna see you anyway (pressure is off for perfect seaming). Since there are only two pattern pieces, they are pretty easy to fit yourself.

I originally took an older pair of knit sleep pants and placed them over my garage sale flannel. I didn't mind 'wasting' this garage sale fabric as it did not cost much to begin with. I folded the pants in half and roughly cut them out.
My stomach gets huge so I made the front much wider through the hips and waist here. Because of the bloating, I also allowed the front waist  to crotch measurement to be longer than on the backside.
I then took my flannel pieces and pinned them together with the pinned seams on the outside. I put them on and adjusted my pins until it looked like it fitted. I liked doing this muslin with flannel as it does not stretch as you are adjusting the pins.

I took them off carefully and cut the pieces with a half-inch seam allowance, trimming off any pinned excess. Then I laid these onto pattern paper and drew an outline around each piece.
I also mark my front pieces because they will try to confuse you later when you sew back to front.
This pattern paper is now my pattern for any future pajamas I will make.
I probably could have used the flannel pieces for my muslin but it looks so much more 'professional' on pattern paper.

I bought this thin knit here  last year with the intention of sewing pajama pants within a year - and hey! already a resolution finished!
My pajama pants I originally made a pattern from came with a knit waistband. This is a separate fabric from the main piece.  I have a stash of knit ribbing that is in the round with no seaming and this works like a charm.
I cut a five inch piece off one end and fold it in half lengthwise to make a 2 1/2" seamless waistband. This waistband will fit just about any size waist because of the stretch. I then cut a piece of one inch wide elastic and put it around my waist so it meets and cut off the excess.
My knit was about 60" wide and I think I bought just under 1 1/2 yds.

This is what you need:
Length of knit to be able to cut two leg lengths. With 60" wide knit, you can usually lay each piece beside each other or alternately, put one front waist pattern piece at one end and the other back waist at the opposite end and figure out if your legs can go side by side. Knit is pretty forgiving. You would need more yardage for flannel because of the nap and the narrower width.
Waist length of 1" wide elastic.
5" knit ribbing for waistband or other knit.
Serger
And the Coverstitch machine.

*Cut out your leg pieces.
*Serge one front to back at the inner leg seam. This is from the crotch point down to the hem line. Sew the other front to back inner leg seam.
*With your fronts on one side and the backs on the other, pin pieces together to serge the crotch seam - one big curve.
*Now - flip that open and match side seams to encase the leg. Serge these.
You now have something that resembles a pajama pant.
*Try them on. Do you need to adjust that side seam? This is when you do that.

 *Grab your waistband and your elastic. Serge your elastic into a round and insert it into the fold of the ribbing.
*Mark your waistband (with pins) into quarters as there are four seams on the pants to match.
*Pin the waistband to the pant so your seam will be inside. Add a little ribbon strip to mark the back and serge; stretch the waistband to fit the knit pant as you serge. (This is how you do it on a traditional sewing machine. Doing it this way on the serger creates a ripple effect - I am researching how to do this seam better - on the serger.)
*Now- take this pant over to your coverstitch machine and from the outside, topstitch over your seam that you are finger pressing downwards.


*Hems. I rolled up a leg until it looked right. Then I carefully took the pant off and laid them out straight on the floor and cut off the extra fabric leaving enough to fold up and hem.  I folded the pants so one leg was over the other in order to cut the same amount off each pant.  I folded my hem allowance twice and pinned it and then coverstitched this hem in  place.
Done!
Now take (embarrassing - I'll only say it once) photos.

***I believe the sledge hammer is in the photos in case the mirror needs to be shattered.