skip to main |
skip to sidebar
I cut into my sashiko dragonfly sampler.
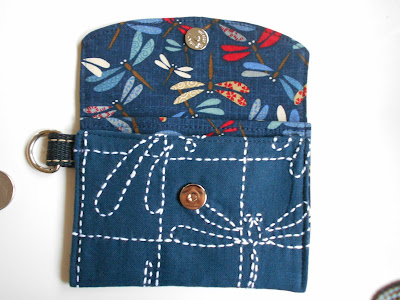
Open wallet showing two slip pockets.

Backside with coin pocket and secret pocket behind coin pouch. I pieced a little sashiko to the coin flap.
With detachable strap.
For the dragonfly wallet, I shifted the coin pocket left so most of a sashiko dragonfly could be seen.
I made the red wallet first. At a recent estate sale this summer, I found this unfinished kit for the Winslow Wallet. I bought the package because it contained two magnetic snaps. Spendy little items when you buy at retail so this was a huge score. The fabric was cut out and interfaced. It just needed sewing.
The original pattern was not included nor did it come with the strap. I just like detachable straps on small wallets. I made my own pattern from the cut out fabric pieces. It was pretty straight forward.
After finishing, I liked it. For a little thing - 5 1/4" w x 4" tall, this wallet has a lot of segregated storage.
I had time to make another. I picked out an airplane fabric and then realized it was directional. This just means some sewing geometry because this wallet starts out flat and then is folded and once you fold it, some of the airplanes would be upside down doing aerobatics badly, unless you cut and piece it just right.
Then I spied my dragonfly print, skipped right over to where my Yoko Saito fabrics are stored -- right next to my completed sashiko dragonfly piece.
This dragonfly sampler was meant to be a small pillow. I have no use for small pillows so it was sitting until a lightbulb moment happened.
I bought this sampler at Sewexpo back in 2014. I finished it, left it at a friend's house (lost) and made a second one. I did recover the first one eventually - which means I can make another of these purses - yay!The sashiko sampler was on flimsy blue fabric. I used the unmarked section meant for the pillow back to double up and treated this fabric as one, with interfacing added. I serged the edges before turning for extra durability and securing any stray sashiko threads that might work loose.
Now, if I can recall where I stashed the recovered first sampler.....
I found this nifty treasure box at a local christmas bazaar . I went one saturday after work and ended up taking photos of things I liked because it was overwhelming with an inordinate amount of possible handmade gifts.
I kept looking at this monopoly box for my niece who is 17 years old. After work the following Saturday, I went to see if they still had some left.
It could be a sewing kit or a place to put her treasures.
In trying to figure out what I had in stash (from garage saling), I went mostly for what fit inside this box which roughly measures 9.5" x 7.5" x 3" deep.
The ziploc in front has all the pieces to the original Spiderman Monopoly game - good luck ephemera.
Clockwise from the pack of felt and embroidery floss::
treasure box, measuring tape, game pieces, pincushion (making explained), chocolate covered pretzel sticks, a FQ of Olivia the pig fabric (her namesake), snaps, needle book, 6" ruler/seam gauge, 4" quilting square ruler, pad of notepaper from Schmetz needles, red container with threads, pins, small items.
I am undecided about adding a crochet hook/ knitting needles, but need to let go of add one of my pairs of sewing scissors - for the cause.
What else would you add?
Having a huge clean out sale in my etsy shop right now.
RunningWithNeedles
Just use the code CLEANOUT2014 to get 40% off everything.
#3029 Classy and Clever Computer Case
Gail Kellogg, SVP Worldwide
VIKING CLASSROOM, SHOWPLEX
Thu. (#3029A) 8:00 – 10:30 am, Thu. (#3029E)
11:00 am – 1:30 pm, Fri.(#3029B) 2:00 – 4:30 pm
Experience the fantastic Husqvarna Viking Huskylock S25
Serger to create this stunning and useful case for your laptop
computer. You will learn how to apply zippers with the serger,
use accessory feet to embellish with decorative trim and leave
class with a sophisticated and finished project.
$25 KIT FEE INCLUDES: Two 13" × 18" double sided quilted
cotton, lining fabric, light weight batting, clear vinyl, two 18"
zippers, thread
STUDENT SUPPLIES: General sewing supplies
Description is from the SewExpo brochure.
I am going to learn how to apply zippers with a serger (?).
All I need to provide is a kit fee and "general sewing supplies".
I don't take a lot of classes so I usually scramble sewing notions together from my sewing room into a ziploc bag.
Yes.
A ziploc.
But this is SewExpo. I kinda need to look like I sew.
I explored online
and found some inspiration. I wanted to use some Pendleton Wool and
make it big enough for a small cutting mat. While a roll would be nice
and secure and smaller, the pesky cutting mat wanted to be in on the
action.
"Q: I am planning on taking a 3 & 4 needle class and under
student supplies, it lists 'basic sewing supplies'. What do I really
need to bring?
A: Basic sewing supplies means to bring: Scissors (fabric &
paper) pins, seam ripper, chalk, seam gauge, ruler, measuring tape,
sewing needles, rotary cutter and mat. Optional: mini iron and ironing
pad. And anything else you use that will make your sewing experience
pleasurable."
I laid my basic sewing tools out, figuring out some math numbers on paper.
Then I selected my fabrics.
A vintage Pendleton Wool Wrap Skirt was sacrificed for it's plaid properties (and possibly a chance to win something at the Pendleton Booth).
A nice coordinating airplane print and a neutral off-white.
 |
| Airplanes & Pendleton |
I made the side-facing pockets with the airplane print. Re-enforcing the cotton by doubling up and sewing a grosgrain ribbon down the edge.
The pockets were custom fitted to the notion with sewing lines 1 3/4" apart.
Basically, I started with an extra-long blue panel, using up inches as I needed to and trimming the excess at the lower end. Another way to handle this is with an elastic casing, easing in room where you need it.
You can see where I sewed the pockets flat on the right-hand edge - couple of pleats.
This is the smooth white fabric on top of the off-white textured fabric. This will become a pocket to store the small cutting mat.
On the left-hand side, I wanted two clear vinyl pockets to hold my small clear ruler and some pins and what-have-you. I edged my vinyl with some bias tape and the vinyl sewed much better this go around. You may remember some vivid cussing with my last experience with vinyl.
The scissors rest in the pendleton fabric pocket with a piece of that gorgeous ribbon snapped in place across the handles.
So now we have the scissors secured and all pockets done.
I was thinking of embroidering an airplane on the front but decided to head back to simple and just zigzag on the up-cycled Pendelton Label.
I've misplaced my finished product photo but by that time the light had gone except for the Ott light at my sewing table.
Basically, I have a notebook with handles that will lay flat when opened.
Should be easy to take along.
I can tell I am feeling better because the different design elements went easily together with a minimum of hand-sewing (Scissor securement had to be hand-sewn because I forgot to do it before I sewed the pocket together.)
I'm ready to figure out zippers and sergers.
Sewing tool organizer tutorial images.


