H*A*P*P*Y H*A*L*L*O*W*E*E*N
31 October, 2015
29 October, 2015
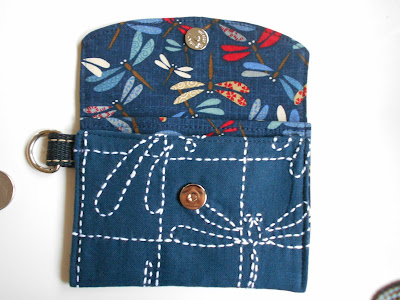
Sashiko Dragonfly Wallet
Backside with coin pocket and secret pocket behind coin pouch. I pieced a little sashiko to the coin flap.
For the dragonfly wallet, I shifted the coin pocket left so most of a sashiko dragonfly could be seen.
I made the red wallet first. At a recent estate sale this summer, I found this unfinished kit for the Winslow Wallet. I bought the package because it contained two magnetic snaps. Spendy little items when you buy at retail so this was a huge score. The fabric was cut out and interfaced. It just needed sewing.
The original pattern was not included nor did it come with the strap. I just like detachable straps on small wallets. I made my own pattern from the cut out fabric pieces. It was pretty straight forward.
After finishing, I liked it. For a little thing - 5 1/4" w x 4" tall, this wallet has a lot of segregated storage.
I had time to make another. I picked out an airplane fabric and then realized it was directional. This just means some sewing geometry because this wallet starts out flat and then is folded and once you fold it, some of the airplanes would be upside down doing aerobatics badly, unless you cut and piece it just right.
Then I spied my dragonfly print, skipped right over to where my Yoko Saito fabrics are stored -- right next to my completed sashiko dragonfly piece.
This dragonfly sampler was meant to be a small pillow. I have no use for small pillows so it was sitting until a lightbulb moment happened.
I bought this sampler at Sewexpo back in 2014. I finished it, left it at a friend's house (lost) and made a second one. I did recover the first one eventually - which means I can make another of these purses - yay!
The sashiko sampler was on flimsy blue fabric. I used the unmarked section meant for the pillow back to double up and treated this fabric as one, with interfacing added. I serged the edges before turning for extra durability and securing any stray sashiko threads that might work loose.
Now, if I can recall where I stashed the recovered first sampler.....
27 October, 2015
Friendship Quilt Pincushions
I thought I had already blogged about this estate sale find. All of $1 - that's right - one dollar!
The quilt was in pretty poor condition but it was a friendship quilt.
Back in the 1930's, 40's and even into the 50's, these quilts were very popular.
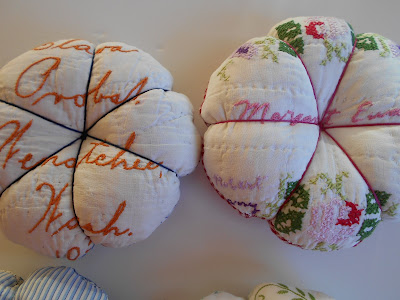
Each lady hand-embroidered their block with their signature done in their signature embroidery stitches. Embellished or not.
This particular quilt was done mostly by ladies from Oregon (swoon) in the 1930's using feedsack fabrics and tiny little hand stitches throughout. No machine piecing done.
If I hadn't of bought it, it would have gone to a landfill.
I sat on it for about a year before thinking of a way to upcycle it into something 'new'.
All of the blocks were the same, hand-stitched six-sided stars with hexagons created in-between. There is a fancy name for this block . . .maybe one of my readers knows it?
Seaside, Oregon. Complete with fishing boat and fish jumping. A crab! and a seashell.
Some ladies embroidered their town in addition to the date.
This block was age-spotted but I couldn't leave it out of my pincushion collection.
Cutting out 6 inch circles, preparatory to making the pincushions.
I gave the remaining holey quilt to a friend. There is still some usable parts of feedsack but I was done with it.
I made 20 pincushions.
Stuffed with lavender and polyester stuffing.
Finished off with floss and buttons from my grandmother's stash.
For sale in the etsy shop.
More information on Friendship Quilts.
25 October, 2015
Phone Charger Travel Case Organizer
When my sis has come west for her annual Oregon Vacation, charger cords are everywhere. They may still be everywhere, but I made her an organizer to corral items while packing.
The case opens to reveal four sections. I did a divided double slip pocket for organizing her family of four.
As phones get bigger and bigger, this case may be all about the cords. I plan on getting her a four in one USB charger as well to carry in here. All electrical receptacles were in use - thus making forgetting a cord or two a reality as they were all over the house. This way, all the cords are visually seen, she can plug everyone into the four-in-one charger - utilizing just one plug-in.
That's the working theory.
Roomy enough for smart phones (but not ipads) with a clear pocket in front for the cords and plugs.
Notice those red dots at the top? Those are snaps for when it is folded up in luggage so items can't slip out.
Look at the backside - frontside? Big telephones bought at Eurokangas in Helsinki on our trip there a few years ago.
It seemed perfect.
I quilted around the phones to add some dimension.
The Case folds in half (2 X 2)with a flap to velcro over.
Snaps at the top also help secure the contents.
I still have my rotary telephone. Do you? It works when the power goes out and the cell lines are all busy. And it's ORANGE. Very vintage.
This is a story about my niece when she was nine years old. She came over to do some sewing with me and we were playing with felt and reverse applique. She saw me doing the Lazy Daisy stitch for decoration and after watching me do it once, she did it perfectly. The lazy daisy stitch is one of the more difficult embroidery stitches too. Just amazing for a nine year old.
Then we moved to my walk-in closet where I was sewing at the time - where my fabric was stored. She was going to go treasure hunting for some fabric to take home. My old Rotary Telephone resides here too.
So Livy asks what the orange thing was. I told her is was a phone. She gives me the most confused look and asks, " What does it do?". I told her she could call Grandma on it.
She is very baffled. I instructed her to put her finger in the five hole, run it to the stop and let go, then proceed to the zero, then the three (5-0-3- area code).
This is the girl that just finessed a Lazy Daisy stitch after one look-see. She is completly baffled by this orange thing. Amazing bafflement. So I showed her. How to dial. Of course, you used to only have to dial seven numbers, now it's ten. So it takes a while.
Then she dialed.
And Grandma answered.
I loved the look on my niece's face.
20 October, 2015
Happy Mail and Curried Cauliflower Rice
I received Happy Mail today from Crafty Tokyo Mama.
I was sewing from our mutual japanese sewing book and sent her the jap. style pocket tissue case I made. Usable, but I changed things up because I got lost in the directions. She made me one that is correct. There is a pocket on the outside of the pouch for your tissues with a zippered pocket behind that.
Look at the fabric on the back - so cute with it's Oregon reference. I've only seen this fabric in black & white so this red is a treat.
Her card is origami that folds up into a cute puppy dog.
It's a square of paper with colored sections that you fold just right.
Why don't we have access to cute stuff like this in the USA?
I know you can order online but this was in a little japanese store. Maybe even the Daiso 100 yen store!
Why don't we have access to cute stuff like this in the USA?
I know you can order online but this was in a little japanese store. Maybe even the Daiso 100 yen store!
I was reading Angry Chicken last night and she featured a Cauliflower recipe that I thought I could eat. I came home from the store with a giant head of cauliflower.
Recipe is from Martha Stewart and basically is curried rice with cauliflower. I did make some changes. My garbanzo bean can from the pantry was from 2009 (oops!). I don't tolerate legumes well so you can see it's been a while since I tried. Never fear, they were tossed into the garbage
I added some mushrooms and some chicken leftovers from two nights ago.
I roasted my florets of cauliflower in oil ( I used my walnut oil) and I felt it needed more than the 2 teaspoons called for in the recipe.
Add all four teaspoons of curry powder - I almost didn't.
I also needed to bake this about 26 minutes for the rice to get tender instead of the 15 minutes called for in the recipe.
I am definitely putting this on rotation. I can tolerate rice in small amounts but could have easily eaten double what I ate. It was that good.
Subscribe to:
Comments (Atom)


