Basic Tricks To Take Your Sewing Up A Notch

29 December, 2016

Holiday Baking


I had time this holiday season to do some baking.

I played with Bob's Red Mill 1 to 1 Gluten free flour.  Most of the time it behaves just like regular flour. It's a straight replacement and works well for people who must avoid gluten.

I can't eat grains without alarming my auto-immune but gluten-free grains are easier on my system than wheat flour.

This is an amazing flour for Biscotti. I made lemon biscotti and the 1 to 1 flour gave them the perfect dryness.  I just used the first recipe I found online - they are nearly all the same. 

I drizzled mine with dark and white chocolate and they were perfect for dipping in our morning coffee. 


My next cookie is an old Betty Crocker recipe that goes by the name of Cream Wafers. 


My sister discovered this cookie when she was baking for a wedding a long time ago. These are little bite-size cookies that melt in your mouth. The wafers are like a pie crust with frosting between. I will say Bob's red mill 1 to 1 flour made them super melty in your mouth.

You roll them out as thin as you can and then cut with 1 to 1 1/2 inch cookie cutters. Then you sluice them through some granulated sugar and lay them on a cookie sheet. With your biggest fork, prick them like saltine crackers. Bake for just 7 minutes.

However, half of them were so fragile, they broke just moving from the cookie sheet to my counter. I made the frosting as loose as I could but still had some serious airplane disasters. The poor little gingerbread men lost legs and heads at an alarming rate.


I had made a couple of batches of chocolate chip cookies with this gluten free flour and noticed that my cookies were drier than usual. More crumbly after a few days. Someone suggested adding more butter, so I kept this in mind when I made the Cream Wafer dough.


The stars lost their pointy bits


 The pile of broken bits were eaten up anyway. This little cookie is a holiday favorite. I get requests all the time. Next time, I might try half Bob's Red Mill Gluten Free flour and half regular wheat flour and see it this helps keep them less fragile but still delicate to melt in your mouth. The ones that survived were a fantastic texture but too delicate for me being in my usual hurry.


 I also made my traditional Danish Puff Pastry - also from an old Betty Crocker cookbook but lost the taste for playing and used regular flour instead. It's difficult to experiment, especially at holidays where the pressure is on to have the usual tried and true delectable treats.

It was fun to play with Bob's Red Mill Gluten Free 1 to 1  flour with several recipes back to back. I have a good sense of how it works for me now. And it's way better than the old gluten free method of combining four or five different flours to get the texture you want (plus the xanthum gum...).

Both my kids came home. I like to think it's my danish puff that brings them home but it's probably the lottery scratch off tickets that Santa gives out i
n the Christmas stockings.


 In other news, my dear sewing friend Kyle, made a month by month calendar featuring her bags she has sewn in the last few years. I love this idea and the thoughtfulness of sharing. What better way to acknowledge what we make than to celebrate it.


I'm still working long hours after a co-worker suffered an on-the-job injury that the supervisor is trying to bury under the rug and not do workman's comp paperwork.


I'll leave you with a beautiful Oregon coast photo that my son took the day before Christmas.
Both of my kids really enjoy photography and get very creative.


21 December, 2016

Cork Wallet


 One of the nephews suffers from  having a December 18th birthday.
At 14 years old, I think it's high time he learns about the combined birthday/Christmas gift.

Of course I caved.
I'm the airplane auntie.


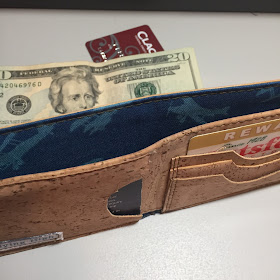
 This was a quick, easy sew. I would do one part different, but otherwise the directions were very clear to follow.

Made with cork fabric, the pattern is designed with non-fraying materials in mind. This produces a very thin wallet.

The back piece is cork and it is 'lined' with cotton fabric (did you notice the airplanes?).
The pattern has you cut the cork and cotton lining separately and then make them the same size by folding in the 'seam allowances' of the cotton fabric just so and it will magically match the cork fabric dimensions. Sure. Between the cotton stretching as I ironed the raw edges under and the cork stretching a wee bit. Ahem.

But I have a solution of cutting the cotton fabric first. Then I will use a template cut from card stock that is near the finished size to help with ironing the raw edges under. Then I will lay my finished cotton lining on top of the cork fabric and draw an outline and cut out. Then they will match easier.

Except for turning the raw edges under on the cotton lining, all other edges are raw - hence the name of the pattern - Rawly Wallet by Clo Bird Designs.


 There is a 3-piece credit card pocket on the right side of the wallet and an ID slip pocket on the left. You can customize by adding more card pockets to both sides. You can add decoration to the front or onto the pocket. I added a piece of the fabric selvedge to the ID pocket - "Flying High".


Folded in half, it's quite slim.

I'm going to make more of these as these wallets are quick to sew.

19 December, 2016

Candy Airplane Tutorial


I thought it was easy enough to look at my photos of my candy airplanes in order to make your own and then I got a couple of emails questioning how I put it together.

Supply list:
Fuselage: Baby Ruths or other 'stiff' long candy bars.
Wings: Air Heads
Wing support and tail empennage: Single Starbursts
Wheels: Rolos
Propeller: Taffy or mini Tootsie Rolls
Big pile of hot glue sticks
(and your hot glue gun).

You'll need a Baby Ruth or any other candy bar that is long like a fuselage. Almond Joys used to not work because they are two pieces and it's not stiff enough to use as a fuselage. I noticed last time at the store they have added a stiffer cardboard to the bottom for support.
I've used starbursts, Uno bars - anything that is long and will support the wings.

The AirHeads work well for the wings. In fact, sometime I make single wing aircraft. I haven't really found a substitute for these. In the USA, they are usually sold six strips to a pack - meaning you can get three biplanes out of a pack.

Starburst sold in the big pack. Alternatively, you can buy the single pack and use these. Less expensive to buy the big package. These will support your second wing and also look like a tail on the fuselage.

Rolos, individually wrapped in the big package. Haven't found an alternative for these either. They are round and look like wheels.

The propeller can be made with salt water taffy or mini tootsie rolls. Any candy with paper twisted at the ends will work.

Gather your candy and hot glue gun. It's usually cold when I make these so the glue gets brittle or doesn't bond well with the plastic candy wrappers. These are slightly fragile with tails popping off occasionally. Especially in transit, moving airplanes to their new homes.  Easy fix though.


I also used a (free) priority mailing box, kept flat, on my table to catch any hot glue.


 Put a blob of glue on top of your candy fuselage about 2 inches from one end. Attach one Airhead strip. This is your top wing.


 Flip the candy bar over and attach a starburst not quite at the end of the wing.


 Blobs of glue on both starburst wing supports and also on the candy fuselage and attach bottom wing. Work quickly as glue doesn't really bond with wrappers. You need to place three blobs of glue and place that bottom wing on. I touch each place where the glue is underneath to make sure it connects.


Attach rolo wheels too on this bottom wing.
Either together or about an half-inch apart. Kinda on either side of the fuselage.

There's no wrong way or right way. If your rolos are turned the other way, it will still work.


 Turn plane upright. Add tootsie roll to front of fuselage candy bar.
 

Sometimes, there is empty space up there. In the case of the Baby Ruth, the wrapper was enough support for the propeller Tootsie roll. If it isn't, then use more hot glue to bring empty front space closer to main fuselage.

You're gonna use a lot of hot glue sticks.


 Finally, add another starburst to back of candy fuselage to indicate a tail empennage.


I don't buy candy ahead of time but I do look for the best deals. These babyruths were 2/$1.00 whereas regular candy bars are almost a dollar each.

The big package of starburst were enough to make nearly 50 biplanes.
The package of rolos would have been enough except someone got into them.
The airheads? Who eats these anyway? I actually cleaned out my fred meyers for awhile.
I've used salt water taffy before but I really like the look of the mini tootsie rolls.

There's no wrong way or right way.

Be creative with your candy choices.

Maybe go on to making trains and other funmobiles.

Train wheels are round Mints - York or Pearsons. Peppermints.

Image result for candy trains image

Image result for candy trains image

Image result for candy airplanes image

Image result for candy planes image

04 December, 2016

Flying Potatoes And Tutorial


Two more gifts finished.

And the extras put into the etsy shop. (Yay! me).

I still need to finish an outstanding purse order from five weeks ago. The fabrics are cut out and interfaced - there's a procrastinating slug inside me about this project. However, the 12 hour days are now scheduled and not merely an emergency. It needs to be finished today.

These microwave potato bags are a must-have if you want restaurant quality baked potatoes in a quarter of the time it takes in the oven.

Dear hubby's last one finally gave up the ghost after three years of continuous use.


It caught fire. Which is alarming. But expected.

Even though I use 100% cotton materials in these bags, this is a known hazard.
These bags produce the moistest, fluffiest baked potatoes. The minimal risk is worth taking instead of using an entire hour to bake potatoes in a traditional oven.

If you want to make your own, I've written you a tutorial at the bottom of the post.


 Look who walked into work the other day? One of Santa's elves!
Is this not the cutest outfit - she even styled her purse with a pompom.
Delicious. (fred meyer stores!)


 Canby's Light Up the Night commenced Friday night with a parade featuring Santa texting? Well, he's not driving...

They formed up the parade right outside my workplace. Since I couldn't get out of my parking lot, I enjoyed the excitement. Small town parades. Big smile


 I found some wine for gifts featuring a biplane from a local vineyard. Be still my heart.


And, finally, my son sent me this photo of his girlfriend's mom's chickies wearing their best outfits sitting on Santa's lap.


Potato Bag Tutorial:


Cut from 100% cotton fabrics;
Try to use cotton thread.

11" x 22" Main fabric

11" x 22" Lining fabric
11" x 22" Warm & Natural 100% cotton batting


Make a quilt sandwich of Lining fabric face down, batting on top, and them place Main fabric face up on top. Quilt as desired.

Trim to a rectangle of 10.5" x 21.5".

Serge(overlock) the short ends. Or, use a tight zigzag. Or, make it more work - fold under twice and stitch.

With Main Fabric face up on table, fold down top serged edge 4". Fold up bottom serged edge 7" (or so). The serged edges will overlap 1 inch.

Baste where overlap is at the side seams. This keeps the top edge even when serging in the next step.

Serge side seams. Or you can use your tight zigzag to finish the edges. Knot off serger tails and trim.

Turn and enjoy:::

Anything polyester has a lower melting point than cotton. Try for 100% cotton.
The bag gets old and breaks down which is why it eventually catches fire.
Do not leave microwave unattended.


MICROWAVE BAKED POTATOES


Wash potatoes, pat dry. Do not prick with fork. Place up to four potatoes in bag and put in microwave on Baked Potato settings.

Marion asked in the comments how many minutes this takes as she doesn't have a baked potato setting on her microwave? I think it's about 5 or 6 minutes. You might need to experiment - adding 45 seconds until you get the fluffy just right.

Keep potatoes inside bag until meal is ready to stay hot.

These bags make the fluffiest baked potatoes with just the right moistness.