Basic Tricks To Take Your Sewing Up A Notch

30 May, 2016

There Was Sewing Done


 I made a similar book bag
a few weeks ago and immediately received an order for another.
This customer wanted elephants inside the tote.

I was looking for a blue kokka elephant fabric for the inside lining but had to settle on this pasha elephant instead. I believe I have some blue elephants but they may be airplanes instead. Zowie - there goes my mental mindkeeping. I'm almost certain they are inside my sewing room hiding in plain site.

 
https://cdn.shopify.com/s/files/1/0179/1119/products/elephants-blue-nancy-wolff-kokka-japanese-fabric_large.jpg?v=1352781005 haha - here they are. they can't hide forever...


 The book tote is completely reversible so she can put her big books out there or throw the elephants around.


I had some Yoko Saito books come through my library queue and I'm enjoying thumbing through for inspiration. My blogging friend, Mrs. N,  is learning to do Japanese patchwork and I thought to do some myself.


I had to work today for a few hours. I'm very proud of myself - I rode my bike into town and back. Its just over 3 miles to my work place. I need to do this more often. My schedule changes so much and it's difficult to predict. I don't want to be on my busy roads at twilight.
I could always bike in, and if I need to, call my hubby to come pick me up.


We celebrated Memorial Day yesterday with BBQ baby back ribs, baked beans and potato salad.
The weather has been much cooler than a year ago when we were already sweltering under 100' days. This May has been averaging 70' or so making it very comfortable to sit outside on the patio and enjoy our dinner.


I'm trying to get my yard in shape and my new nemesis is the garter snake.
This is the year of the garter snake. 
 
The last few years have been all about cute baby rabbits which are not to be seen (at all!) this year. A whole lotta shrieking has been heard around here as Mr. Snake slithers away from where I'm about to step.


My vegetable garden is still a mass of weeds but I'm almost through whacking them down so I can roto till and re-do the compost piles and show those garter snakes who's the boss.

---breathe---


I made some more microwave cozy hot pads for my etsy shop too. Sewing is easy on these but it took me three sessions in the sewing room to get them done. I just love these red thimbles on the fabric. I found this fabric in Hawaii back in January. So perfect for the sewing enthusiast!

On that note, I'm ready again to try and get computer viruses just so I can watch The Great British Sewing Bee which is now up to season 4.

Recently. someone released season 1 to youtube but I think I would buy it if it were available. This show is sew much better than Project Runway with real sewing getting done and no drama - at all!  Getting little snippets is not my preferred way to watch tv. I saw on Netflix, they are carrying the Great British Bake-off ---- so maybe they will add the Sewing show too.

I had both kids home last week - not at the same time. It was so pleasant to catch up on their news. I am so grateful both of my kids are functioning adults and really living their lives.
 

We'll see the son again multiple times this month as he moves from central oregon to his new digs south of us  and settles in on his pharmaceutical residency. He graduates as a doctor in two weeks. Proud mama.

24 May, 2016

Make Do And Mend


Dear daughter made a flying visit home. Sunday  - after midnight until early wednesday morning.
Quick.

Too quick.

I haven't seen her since January when she met up with us in Hawaii.

She's working near Anchorage. At first, it was just a temporary gig but another job opportunity came her way in January and she needed a different wardrobe. I schlepped a duffle bag of office-worthy clothes to Hawaii and she took them from there.


 Its been five months and she is really enjoying her job but wanted to meet up with some friends and raid the closet where she left some of her things.

She also brought some mending for her dear mother to fix. You can feel the love from here.


 First up was this tank from Nicaragua. From the winter before last when she was traveling around central america. You can't just go out and buy another tank memento, so mending was the next best option.
Her hem gave out - the kind where you pull the thread and it all unravels.

I had the right color thread but it wasn't the right thickness to match. I could have hauled out my coverstitch machine ( the correct fix would have been to do this and buy new cones of thread to match). Which was not gonna happen. 


Instead, I made do and mended with what I had on hand.
Most t-shirt hems are done with the coverstitch - which is three threads; two on the outside in parallel lines with the third criss-crossing behind. It's a very stretchy and mostly secure way to finish hems in knits.

The bottom thread was still kinda attached, so I took my thinner thread and couched that stitching down. Couching is mostly invisible stitching that goes over a thicker thread at regular intervals so the thicker thread lies on the surface of the material securely.


 The top thread was mostly pulled out but not cut off!!!
So I threaded my needle with this thicker thread and did a running stitch along the line of stitching. The hardest part was not to pull the threads taut. You want this hem to remain stretchy somewhat.

It's not perfect, but it's mostly invisible to everyone else.


 Next up was this lovely little sweater she bought here in Portland. Different wool colors are sewed onto a base sweater in the shape of a flower.

Some of the stitching had come undone. 


 Again, I did not have a thick enough thread to match. Well - I might, but it would require digging for hours. So - I used an off-white upholstery thread doubled up to mimic the texture and it worked fairly well.

Upholstery thread is thicker than sewing thread. Less likely to break under stress. 

I  cast on a blanket stitch and secured the three areas which were coming undone.

Not perfect, but from a distance, it all looks great.

And really, that's what mending is all about. Securing whatever has come loose in a way that doesn't call attention to the fixed part.


 Next up was her black coat. Terrible to photograph.

Where her pocket sits in front, the 'side seam' had opened up. So, instead of putting your hand inside the pocket, your fingers would catch on this opening (making it bigger).

I hand-stitched this closed with two lines of stitching for security(stress point). The first row is behind the seam under my thumb, the second is visible, meeting up with the original stitching.


 These palazzo pants were next in the queue. She got them in Guatemala (I think). The cuffs are the mustard yellow. The cuff is attached at the bottom of the pant and then turned up to make a mock cuff.
The edge is a selvedge so was not turned under and sewn. A four inch area of the selvedge started fraying.  I did this mending in a darning style.

About  1/8" from the frayed edge, I made a neat row of running stitches. Then I used my needle to help turn under the frayed edge, hiding my running stitches and stitched it down to the under fabric. The running stitches give this section a little strength. If you look closely, you can see the four inches that are turned down but it would take an eagle eye to spot it as these legs are --w i d e--.

I also added a drop of fray check at each end to help stop any more fraying.


 Last was this pretty red-orange polka dot dress. The outer fabric is a sheer gorgette (?) over a thin satin. Gorgeous. Half of the hem fell down.
The bottom edge was serged to give hemming something to hang onto.

I was able to match the thread color but mine was too thick. I think a silk thread would have been more invisible but I didn't have any in this color. This was a fairly easy fix as well. Use a single strand of thread and use the serged edge to go through about 1/4 - 1/2" , then 'grab' a teeny bit of the overskirt in the red areas (not the white polka dots areas) and repeat. The trick is to get into a rhythm so the thread is evenly spaced and not pulling.


I don't mend often. There has to be a compelling reason for me to 'perform'. I was a little worried about the t shirt from Nicaragua but it worked in the end.

I learned to mend from my mother and Mrs. Necessity.

Here's a photo of dear daughter trying to 'steal' a Stetson Fedora I recently found at a community rummage sale for my dear son. We are torturing him as he's stuck in central Oregon this week. She's trading him the ball cap....hmmm...


16 May, 2016

Wrong Broad


 These are Retreat bags from Emmaline patterns.
The ditty bag size uses wire frames to hold it open and provide structure.


I had last week off work and was able to do a number of small jobs that pile up when you are trying to survive the day job.

One was getting my hair cut, at last.

I was four months overdue. The supervisor at work decided, without asking, that two of us clerks would also clean the workplace. We were doing the cleaning during the week, but then her peabrain decided to have us do it on Saturdays which, well, sucks.

We used to be able to count on getting the hours of 11am to 3pm free on Saturdays. So that's when I make appointments. Suddenly, without notice, I had to do a bit of cancelling -- if your value your hair, you don't wanna cancel at the last moment with your hairdresser person.

As it was, I had to show proof of my doctor appointments. Seriously.

No, it gets worse. We are doing that cleaning on overtime.


Rant over. I also did some yardwork, saw some friends for coffee, took care of my parent obligations, took time for me.

I didn't sew as much as I wanted but I did do some long over-due organizational jobs in the sewing room --see my zipper and threads all organized here.

I even managed to take four boxes of stuff to the thrift store.


So I still had my pink camouflage fabric out - whittling away at it - trying to use it up and these two bags came out of the sewing room. They still need zipper ends tidied up, but I seem to have lost misplaced those metal zipper ends (also from Emmaline Bags).

It was super easy to pick zippers for these bags! Thank you Kathy.

The label just 'happened'.


14 May, 2016

My Sewing Machine Area


 My sewing machine area.
It's gray and drizzly today, so I had to do some fancy schmancy photo editing to get to this photo.
My walls are painted a light turquoise.
Because I'm in a corner with no window, I utilize OTT lights for natural light above me when I sew.

I think we re-did the floors (hardwood) almost four years ago. When I put the sewing table in, I just propped the thread racks on the table.
And sewed around them.

I liked them there, but I was still getting a feel for how my room could work for me.
Then I found the black wire sewing machine thread rack (left hand wall) last summer at a garage sale.

It was also propped on the table behind my sewing machine - where the serger cones got in the way - in fact, all the thread was in  my way.

I've had this week off, but can't go anywhere because of the 14 1/2 year old Lab, Rusty, who keeps on trucking. Well no, he can't go trucking because he can't get into a car. He's still living but has episodes with his pancreatitis that keep us up all night with him pacing it off.

On the bright side, I was able to piddle away at some of those chores that get put off because of the day job and I have felt quite productive this week. Admittedly, the thread racks have been put off for three years - time flies!

After living with the problem so long, it was a relief to get the serger cones off to the left of the serger machine where they are in no one's way. The regular thread is mostly on the two racks that end about 8 inches above the table - so my big projects have ROOM.

Don't worry, I have more thread - mostly duplicates that don't need to be left out to get dusty.


My Bernina serger is on the left and sees weekly use, as does my regular Pfaff on the right.
Way on the left sitting on a stool is my coverstitch (Hems/binds knits). The cover stays on because it's not being used at this time.

Behind my serger is  a small stack of plastic drawers I've had forever. The machine manuals and extra feet, the oil are stored here. As well as elastics and other notions.


Even after nearly four years - maybe it's only three, I'm not fully integrated into ONE ROOM.
I keep trying.


My other job today was hanging the zippers. They were in a drawer all neat until someone had to paw through them - several times. I keep finding zippers at estate/garage/rummage sales, so this became a huge jumbled mess. I found a couple of ideas on pinterest and Instagram and tucked them into the back of my head  - for later.

So - I was at a rummage sale today at the Baptist Church when not one, but three!!! possible solutions for zipper storage were within five feet of each other.

One was a cork board. It didn't have hanging hardware - but an easy fix.

Then I saw a metal pet grate that goes into the back of a car to keep pets corraled in the back. The grid looked rife with possibilities, but it was heavy.

Next to it was a stack of large picture frames and a couple had a metal grate inserted - see photo below.
Lightweight, easy to hang, done deal.

To hang my zippers, I used little curtain hooks - shaped like the number 2 - with one end that's sharp to pierce the back of the curtain and the round part to go over a rod.

Then I used binder clips to hold ten or so zippers and just slid the round end over the curtain hook.


I actually had to go to the store to buy binder clips as I only had five in my house. I used 20.
'Cuz I have a buttload of zippers. I sorted them by metal teeth, nylon teeth, short, long, big teeth (#5), little teeth ( #3).


This organizational frame hangs behind the door.
It's not pretty enough to be wall art but this was a good spot.

 Never fear, these are not all my zippers!
The old zipper drawer holds the zippers still in their covers and my 'small' collection of very short zippers.


I can now see at a glance that I need to be sewing more with zippers, which kinds, and which colors. Much easier and EFFICIENT!


And, there's room to add more if I find more at the next sale.

Sometimes it pays to procrastinate...


I haven't found a place to hang this small wall mirror. It's chalk painted a gray-blue over white over grey. I bought it locally and when I got home, found it to be the perfect place to hang some mini birthday bunting from my friend in Kyoto. I thought it would look good in my sewing room but I'm at a loss as to where it needs to hang.
Sigh... another small job to add to the list...
A glance back at when I first put together my sewing room
I just went and had a look back. Wowza. I've actually managed to stuff more into this room and had to expand into a bedroom dresser for my japanese fabric haul. I need to sew more. Use up more. Seriously.

You might as well read this sewing room post too.

Which all directly translates into requiring more time off the day job.

11 May, 2016

Crafty Tokyo Mama Thank You


Way back in March, I received some early birthday gifts from my dear friend in Kyoto. She knows my fondness for airplanes and fabric and regularly indulges me.


How perfect is this biplane postcard? We never see such cuteness here in the states.

Except - after I put it together and was getting ready to toss the punchout, I noticed it was made by HALLMARK! In China. We have Hallmarks here. I think Hallmark originated here in the states. Do we have awesome biplane postcards? No.


 And she sent me a second biplane - from the DAISO store!
Daiso helps make some  sweet packaging. Everything Janine sends me is perfectly wrapped in kawaii cuteness.. Stitckers, patterned bags, you name it. I need a Daiso store of my own!
{I save all her packaging to re-use}


Even her postal stamps she chooses are perfect. 
Airplanes, japanese geishas, Mail boxes (Red cylinder at bottom left)


She covered a journal book in awesome airplane fabric and then gifted me with the same airplane timetables fabric to play with.  :-)

Look at that Kawaii airplane ribbon.


She always picks out items with birds in them too.
Her parakeet, Trixie, just passed away. Trixie was one extraordinary pet.


When I am putting together a gift to send to her, I keep a lookout for bird fabrics and western/patriotic items. TV series and movies.


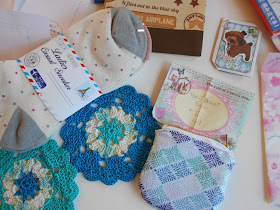
 She sent me some socks, a tiny coin purse she sewed for me and two doilies she crocheted for me - such beautiful colors.

My gifts all comes with origami notes, cute notepaper that can fold into shapes. I think she sent me eight different happy mail items. I feel well loved by her thoughtfulness.

This is where we are not similar - I usually am cramming as much as I can into a flat rate package to send to Japan. I'm still learning to put washi tape on my etsy orders...


 She also sent me some Japanese patterns which are read right to left from the top to the bottom and then over to the left. You follow the pictures in numerical order.
This one was for the four pocket card case.


 This one is for a tissue holder.
 

In Japan, you must carry your own tissues and a cloth for wiping your hands for when You are out and about and need to use the restroom. Toilet paper and towels are a rarity in public bathrooms. Of course, you need cute tissue holder accessories.

Again, she sent me the extra fabric - you obviously notice the airplanes?


See the Hallmark logo in the bottom right?
 Janine and I met online via the SewMamaSew Giveaway Day. Several years ago now.

I read her blog, She read mine. We both sew. We both like old things. She grew up just south of where I live. Her family is all in Oregon. We had many similar ideas and dreams.

We managed to meet up here in Oregon a couple of times.

I visited her in Japan a year ago and got to see her for an extended time. You can view many of my blog posts about Japan during the last two weeks of March 2015 by looking in my blog archives (sidebar). Her time in Oregon is packed with family events so it was real delight to spend more time with her when I visited Kyoto. I feel like I've know her all my life.

My niece has recently moved to Singapore. To get there, most flights go through Tokyo. I am making plans for returning to Tokyo. {My niece has a Daiso store in Singapore}.


10 May, 2016

I Like Big Books and I Cannot Lie

https://img1.etsystatic.com/123/0/60493224/icm_fullxfull.87325725_bpr9li8bif400s0c8c88.jpg
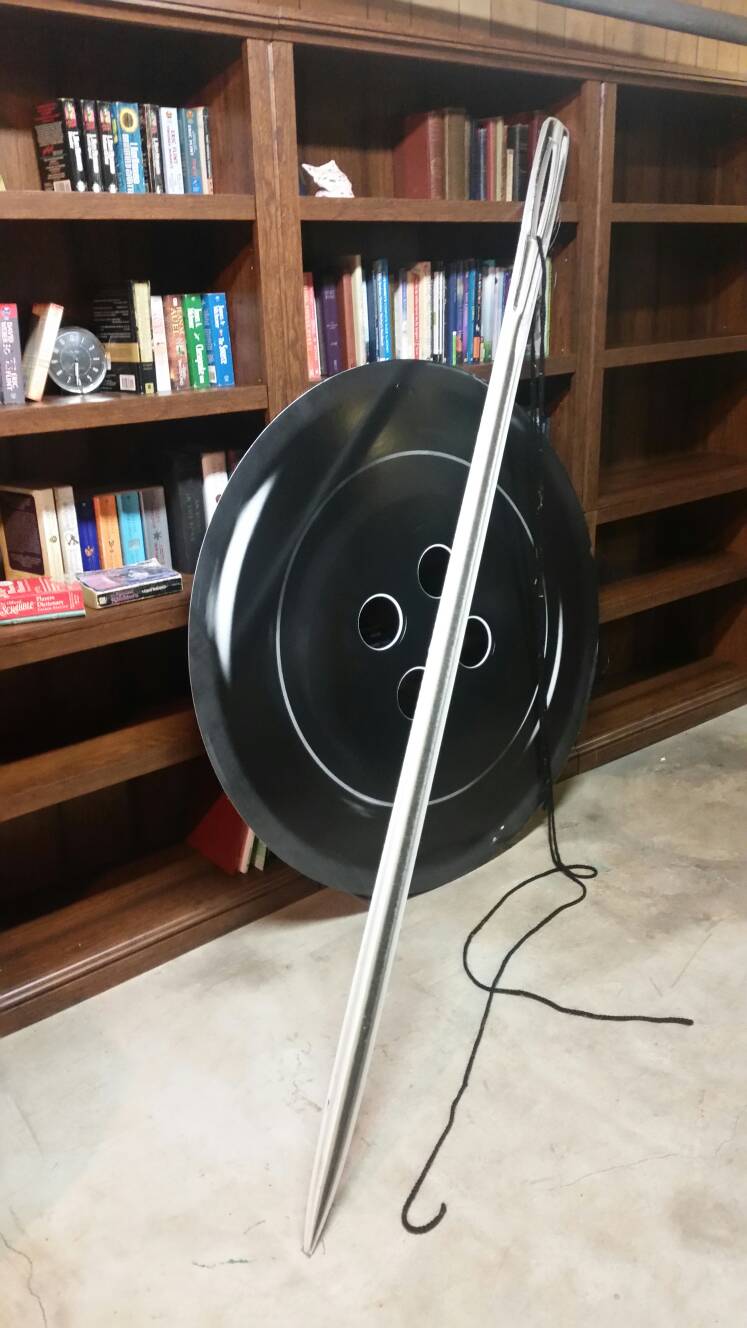
Wowza. Someone asked me if I'd like this gigantuan Button and Needle.
Of course I said "YES!"

It wouldn't fit in my car. I had to get Creative Girl's truck.
It's four feet in diameter. The needle is super long - maybe ten feet?.

It was wall art in someone's friends' living room.
Now it's mine!


 This gal sells books on etsy. Yes! books.
So I made her a book bag for a thank you.


 I used this Tailor iron-on transfer stuff. uggghhh. It leaves a residue of stiff sticky stuff.
Of course I read the directions. Two years ago when I bought the stuff.

I'd rather use my freezer paper to send fabric thru the printer and then piece it to a bag than use this stuff again.

Subtle "BOOKS" embroidery

 My book bag is reversible. Pencil Girl? Recognize this fabric?
I've had it in my possession for less than 48 hours and BAM! - already starting to use it.


 So the gal wanted me to make more of these bags. 
She said she would pay $15-20 if I made her another one for her sister....


The giant button is In the guest bedroom until some of the kid's things leave the house in this next month.
It's going in my garage - I need to get rid of some boxes full of stuff to sell so it will be awesome on the one big wall.

The button and needle are made of foam core with stiff paper adhered so it's all very light weight.

08 May, 2016

Olivia The Pig Purse


A few weeks back, I made a Star baby quilt for someone who is about to pop. That baby has a three year old sister, named, Olivia. My niece also has that name, so I have Olivia the Pig fabric in my stash. I decided to make a small purse for her and fill it with some fun girly items.

 This is a largish stuffed bear who is modeling my purse so well.

Pattern called for piping, I used faux piping instead.
 This was a new-to-me sewing pattern that went together fairly fast once I decided to sit down and just sew.


I want to eventually write sewing patterns so this was a great lesson on what to do and what not to do. I find some pattern makers choke at a difficult part - they can't find the words to describe what they are doing, they can't get clear photos.

I'm left trying to figure how to get from step K to P with nothing of use in-between. That lesson is to re-make the dang thing, take even more photos, and get help to figure out the words.

Her pattern was short without excess wordiness chatter - which I like.
Her site is slow and filled with ads, so it can be slow going to navigate the pattern.


Finished Star quilt


I added some Bubbles, a Tiara, Stickers and some cool Sunglasses for Big Sister.
The quilt is rolled up next to the purse.


 And here is Mr. Bear reclining on the lovely flannel quilt.


 This is my most awesome African Violet. Pink, edged in lime green ruffles.